D850
Time-Lapse Movies 2: Settings Selection and Movie Creation
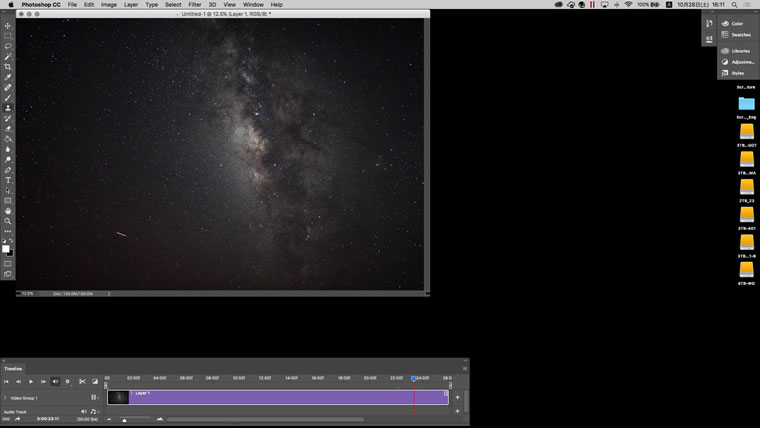
In terms of expression, my intent with this piece was to capture both the appearance and movement of the magnificent Milky Way crossing the night sky. Combining interval-timer photography with silent photography and exposure smoothing enables the camera to meter lower light levels, allowing the movie to be shot using aperture-priority auto. Another key strategy is to enable auto ISO sensitivity control with maximum sensitivity and minimum shutter speed set to values that allow the camera to capture even dim stars. Here I chose a maximum sensitivity of ISO 25600 and a minimum shutter speed of 6 seconds. Because filming starts at the normal exposure limits, the initial shots are under-exposed, but that makes it all the more entertaining to watch the stars quickly start appearing thanks to exposure smoothing.
Filmed and narrated by YAMANO Yasuteru
Adapting Settings to Your Goals
The settings chosen for exposure mode, interval, number of shots, silent photography,
and the like are key when interval-timer photography is used to record the raw materials
for a time-lapse movie.
Exposure Mode
Manual
exposure is a good choice for conditions in which subject brightness will not change,
for example the night sky or subjects photographed over a short period in daylight.
In cases in which the brightness of the subject will change, manual
exposure is recommended if you want exposure to vary with the brightness of the subject,
aperture-priority auto for auto exposure control that adapts to changes
in brightness to ensure the subject is correctly exposed at all times.
A
more advanced technique is to select manual exposure mode and shoot
at a fixed shutter speed and aperture while using auto ISO sensitivity control
to ensure optimal exposure, if only in the range between a selected ISO
value and the value chosen for maximum sensitivity. This may be a
good technique for photographers who can picture how brightness will change under
given shooting conditions and choose the appropriate ISO value and
maximum sensitivity.
Auto ISO sensitivity control
is also enabled in other non-manual, auto-exposure modes, and can therefore be used
with aperture-priority auto, for example.
Interval
The interval is best defined in terms of movement, measured not as the subject’s
speed in meters per second, but as the distance the subject will move through the
frame (or more precisely, across the image sensor) during the interval.
Subjects
that move a long distance across the sensor during the interval will seem to move
jerkily in time-lapse movies, so for worry-free recording it is best to choose as
short an interval as possible. An interval that seems too short presents no challenges,
as you can always drop frames when creating the movie, but too long an interval will
frequently render the footage for all practical purposes unusable, although you may
be able to smooth the subject’s apparent motion through the use of advanced
editing techniques.
In terms of actual numbers, my basic rule is to choose
an interval of one second when photographing drifting clouds in daylight with a wide-angle
lens. If the clouds are moving quickly or the lens has a focal length of more than
50 mm, the clouds will cross the sensor quickly and I will reduce the interval
to half a second to smooth their apparent motion.
Things are different
when filming dark subjects such as the night sky, however. In this case determining
the shutter speed needed for correct exposure is more important than choosing the
interval. Naturally the lens’ maximum aperture and the desired ISO sensitivity
also play a role. So, the basic approach is to first estimate the shutter speed needed
for optimal exposure at the desired aperture and ISO sensitivity and to calculate
the interval as the shutter speed plus one second, or in other words the shutter speed
plus the time needed to record the image to the memory card. Note that a one-second
margin does not necessarily guarantee success, as the time needed to write the image
to the memory card varies with image quality and memory card write
speed.
I recommend that you try a test run during the planning stages to
ensure that you can reliably both take and record photographs in the time allotted.
Number
of Shots
As I said earlier, the number of shots is fundamentally
based on the frame rate and length (duration) desired for the finished time-lapse
movie.
Although in the end you need only 900 shots (frames) to make a 30-second
movie running at 30 frames per second, it is probably best to allow some leeway as
battery and memory-card capacity permit, as some of the shots may not fit your creative
vision. You also don’t want to find yourself wishing you had shot for just a
bit longer.
Silent
Photography
One reason the D850 has attracted the attention of
those wanting to create time-lapse movies is that it features a silent photography
option.
When using the interval timer for anywhere from hundreds to more
than a thousand shots at a time, photographers once feared that the noise of the mirror
and shutter would bother those nearby; that the vibrations produced by the mirror
and shutter, although slight, would affect image quality; or that the wear caused
by the movement of the mirror and shutter might reduce the camera’s working
life.
The D850’s silent photography feature, which
eliminates all these worries at a stroke, represents a huge advance for users of interval
timer photography.
And these are not its only benefits. Enabling both exposure
smoothing and silent photography allows the exposure system
to meter light at lower levels in autoexposure modes such as aperture-priority
auto. The lower limit of the D850’s exposure metering system has been
so improved that it extends to subjects 3 EVs darker than the D810; the camera
can now meter virtually any subject, including stars in night skies far darker than
users of existing metering systems could dream of.
This is one feature
I recommend to the many astronomy fans in the time-lapse movie community.
Other
Settings
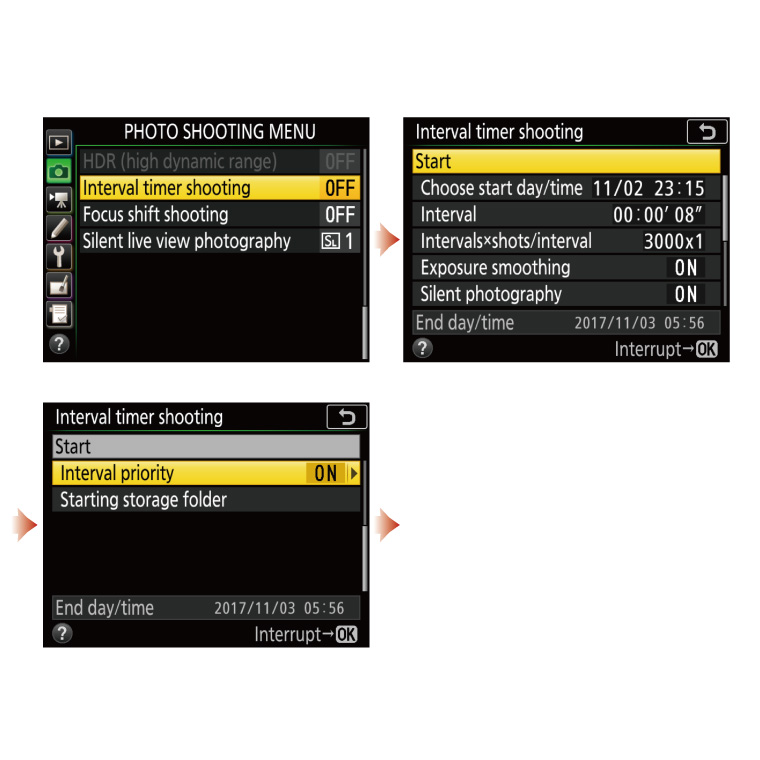
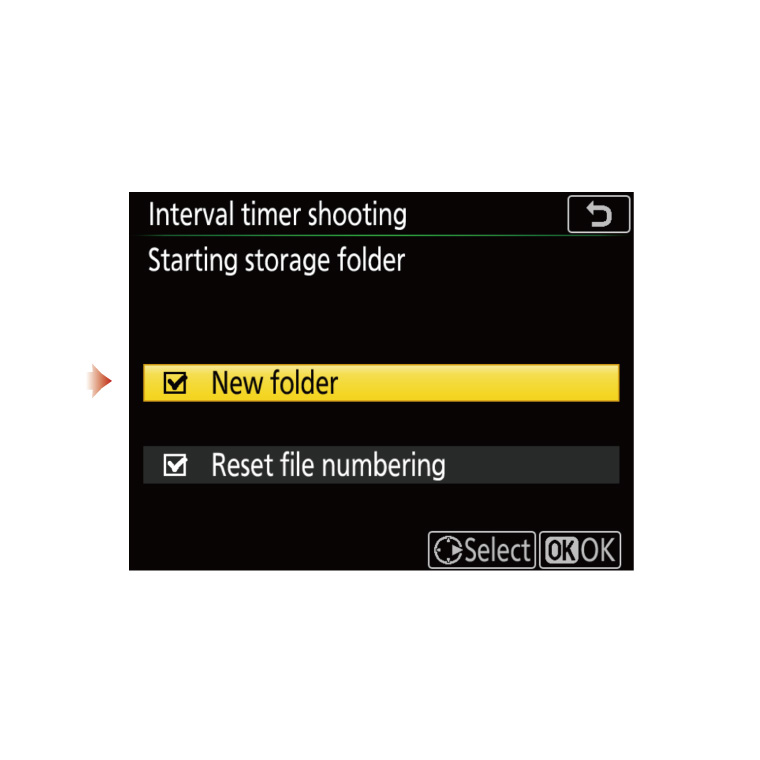
Unless you have a specific reason not to, it’s probably best to go to Starting
storage folder at the bottom of Interval timer shooting menu
and select New folder and Reset file numbering,
as this makes managing files post-photography much easier. With each new interval-timer
photography sequence, a new folder is created and file numbering is reset to 1, eliminating
such unwanted tasks as renaming files when it comes time to make the movie using editing
software or the like. What’s more, each folder can now hold up to 5,000 files,
which comes in handy given the large number of photographs that must be taken to create
a time-lapse movie.
Making Time-Lapse Movies from Sequentially-Numbered
Photos
To create a time-lapse movie, files containing photographs
taken using interval-timer photography are processed to achieve the
desired image quality and joined together in sequence. Given that the best image-quality
option for recording photos that will later be processed to fine-tune image quality
is NEF (RAW), it is assumed for the purposes of this explanation that the files are
in NEF (RAW) format.
Enhancing NEF (RAW) Images
Although most would not find the process of processing a single NEF (RAW)
image too time-consuming, processing images by the hundred or thousand is an entirely
different matter. If a computer running Capture NX‑D would need about 10 seconds to
process a single NEF (RAW) image, you would need to wait about 10,000 seconds, or
3 hours, for it to process a thousand (see Note 1). This has all changed thanks to
the D850’s NEF (RAW) processing feature, which can process
a thousand files (see Note 2) in about 25 minutes (see Note 3). This saving of time
not only reduces the psychological resistance some may feel toward shooting in NEF
(RAW) format, but also ensures more satisfying end results by allowing users to experiment
with different settings in a quest for better quality.
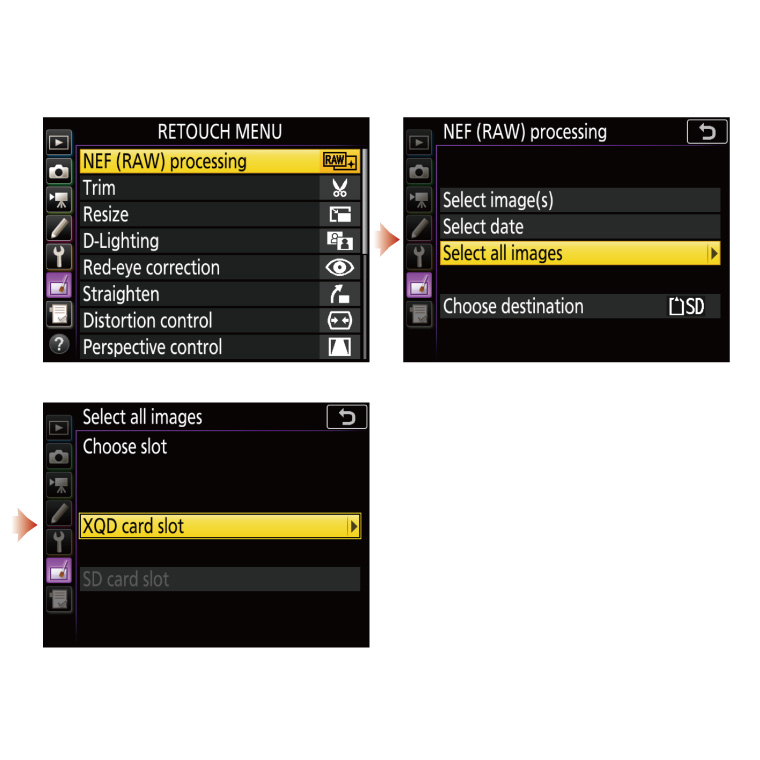
The process is simple. Choose NEF (RAW) processing in the Retouch
menu and use Select date or Select all images to
choose the images you want to process in a single batch, or in other words the images
you want to process at the same settings.
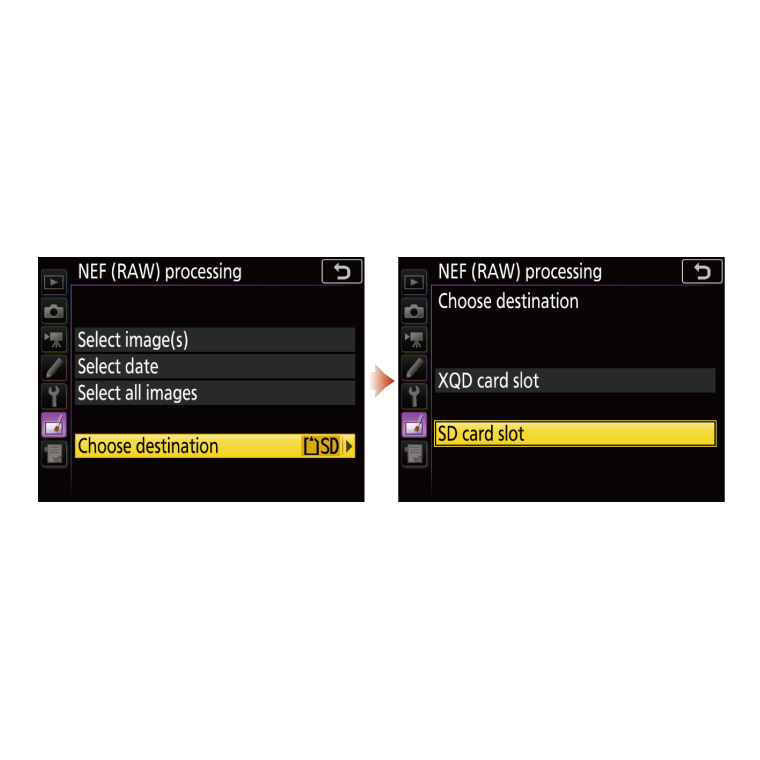
If you have recorded the raw
materials for several time-lapse movies on a single day, you will want to optimize
NEF (RAW) processing settings separately for each movie. Select date
does not let you select the materials for a specific movie (or in other words, the
specific folders created when New folder is selected), so my solution
is to back up the photos to a hard disk or the like and then copy the source photos
to a memory card (or delete all but the photos I want from the memory card) and process
them using the camera NEF (RAW) processing option. One reason I do this is that I
will often have taken photos until the card is nearly full, and I want to avoid a
situation in which there will not be enough room to record the processed photos to
the memory card.
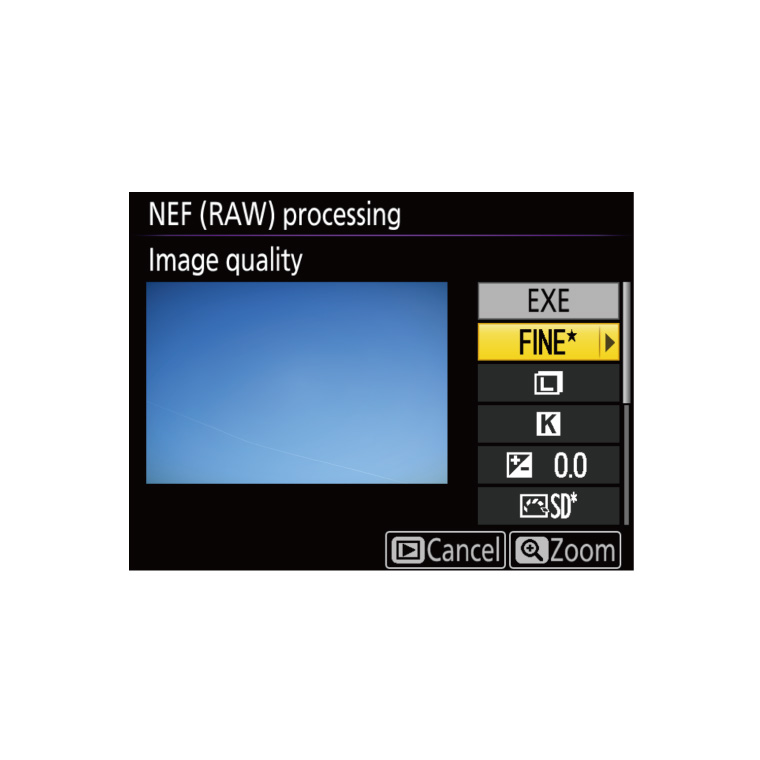

To maintain image quality, the images created using NEF (RAW) can be saved in JPEG
Fine★ format. You can choose an image size based on the resolution
you want for the final time-lapse movie: for movies with a resolution of Full HD or
4K UHD, the best choice is probably Small, as small images shot using
the FX image area will be 4,128 by 2,752 pixels in size.
Creating Movies
from Sequentially-Numbered Photographs
The process of creating
time-lapse movies from sequentially-numbered photographs involves three main tasks:
resizing, choosing an aspect ratio (cropping), and joining the photos into a movie.
All are accomplished on a computer using what is known as editing software.
Although Capture NX‑D can be used not only to process NEF (RAW) images but also
to resize images and choose an aspect ratio (crop), it cannot be used to create movies,
and consequently this task must be performed using movie editing software or the like.
It is surprising how few people know that Adobe Photoshop photo editing
software can be used to create time-lapse movies from photographs. Given that it can
also be used to edit movie files, it is likely that most Photoshop users will want
to try editing time-lapse movies using familiar Photoshop tools before attempting
to use movie-editing software.
You can also try looking for one of the
applications available for making time-lapse movies from photographs, such as DaVinci
Resolve.
For this video I’ll be using Photoshop CC.
Photoshop CC has many tools for resizing images and changing their aspect ratio (cropping);
the technique I use here is only one of many possible methods.
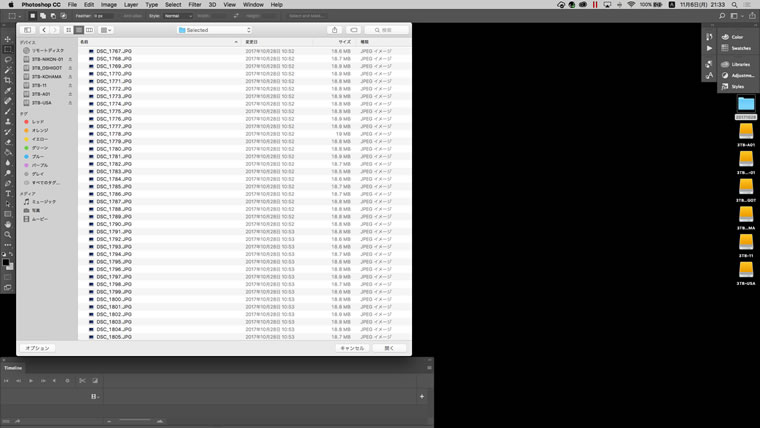
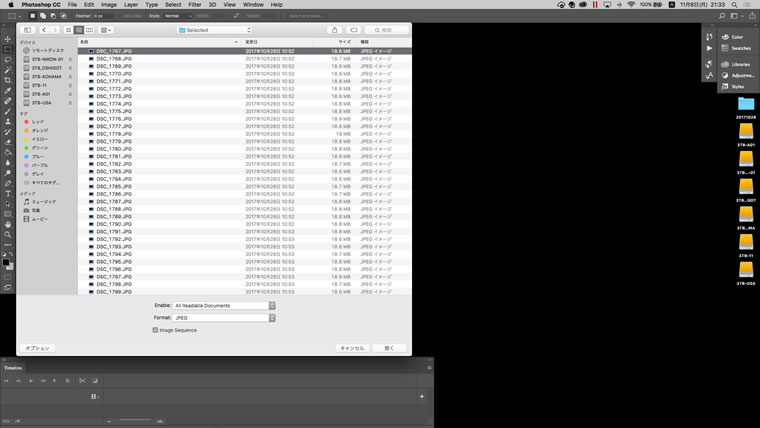
Step 1: Import a sequence of photos. Open the folder containing photos for the movie and select one image, then click Options at lower left and select Image Sequence.
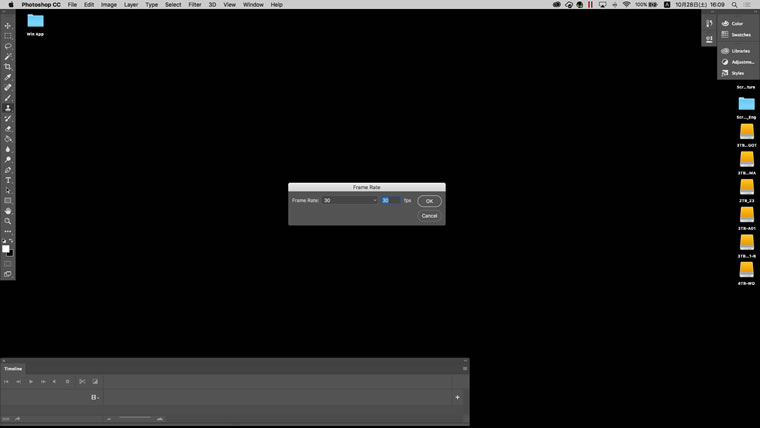
Step 2: When prompted, select the frame rate for the final movie.
30 frames per second is generally a good choice if you are unsure
what to pick.
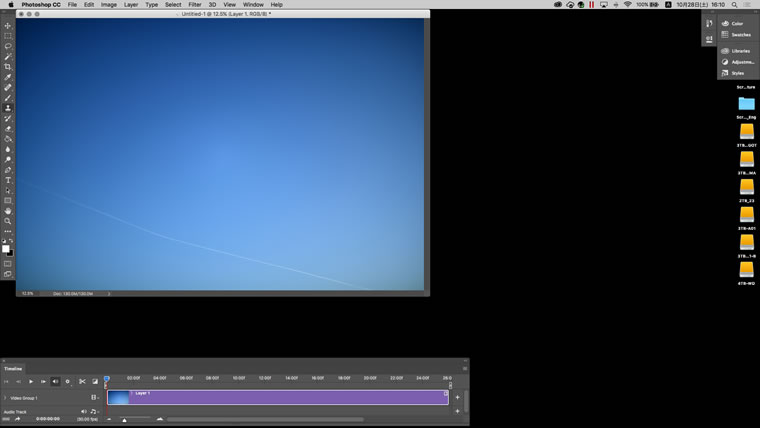
Step 3: Photoshop will open the image sequence
and display a time line.
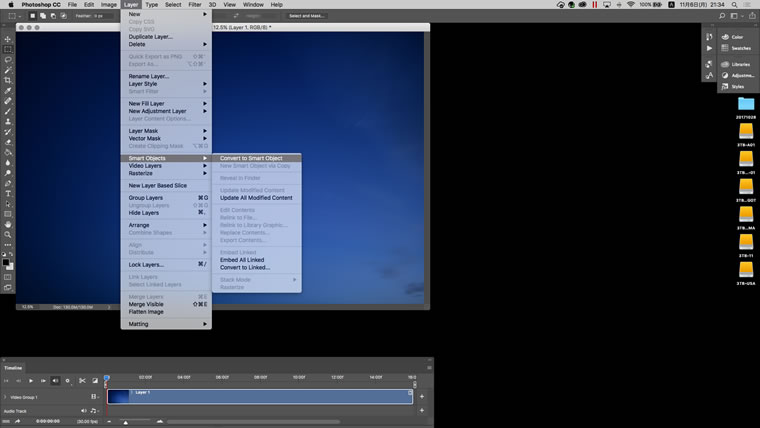
Step 4: So that all edits performed from this step will apply not just to the current image but to the entire movie, select Smart Object > Convert to Smart Object in the “Layer” palette.
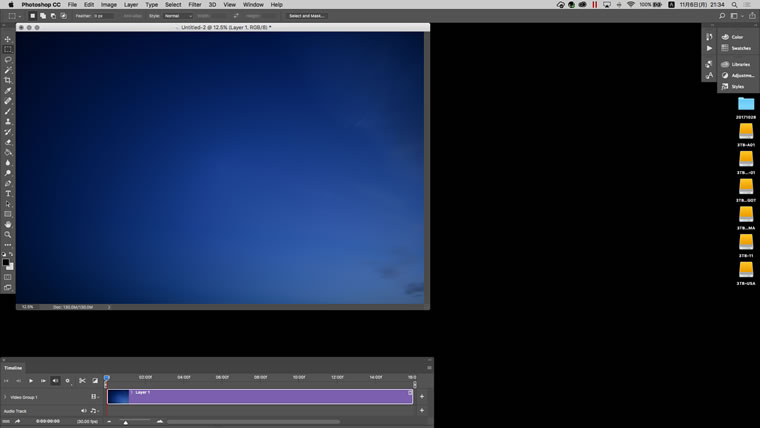
Step 5: The color for Layer 1 in Group 1 in the timeline window will change from blue to magenta to show that the file sequence is now a single smart object that can be edited as a unit. The window currently shows the first frame, but editing will be easier if you instead display a frame suitable for converting the movie to a 16-to-9 aspect ratio and trying out different scales.
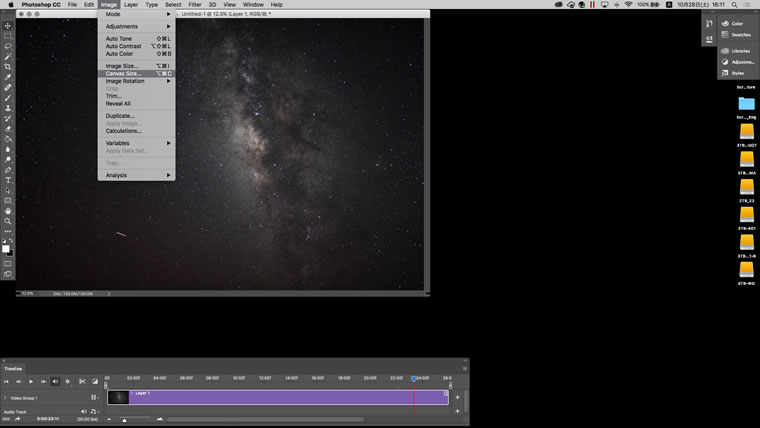
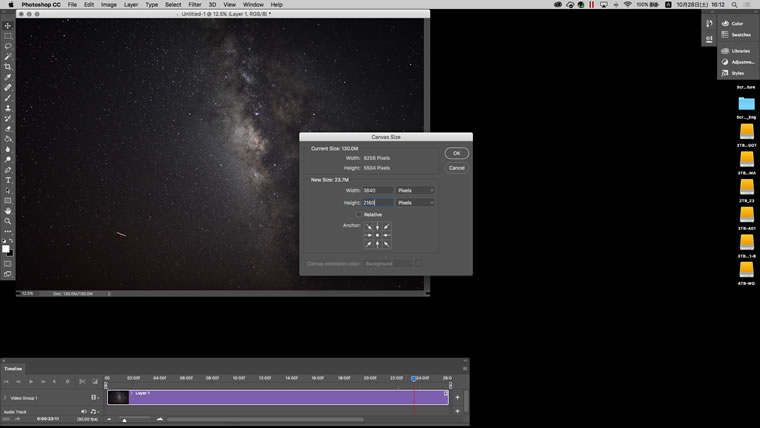

Step 6: Next, choose a frame size for the final movie. In the Image menu, select Canvas Size and enter the desired frame size in the “New Size” area. Choose 1920 by 1080 for Full HD or 3840 by 2160 for 4K UHD. Movies intended for television or YouTube typically have an aspect ratio of 16 to 9, so choose this ratio unless you have some specific reason not to.
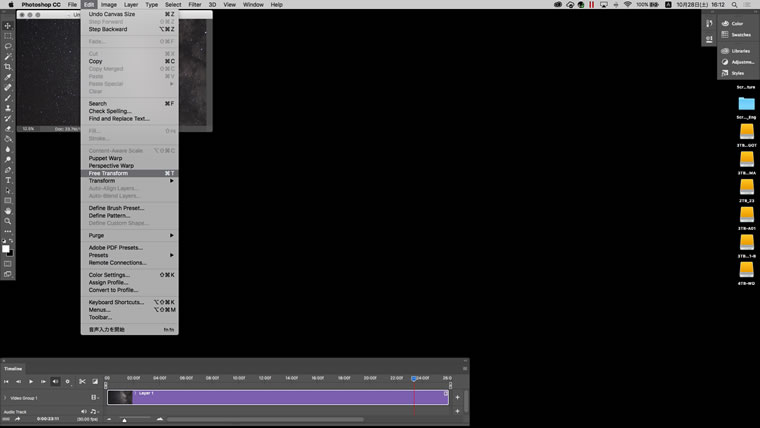
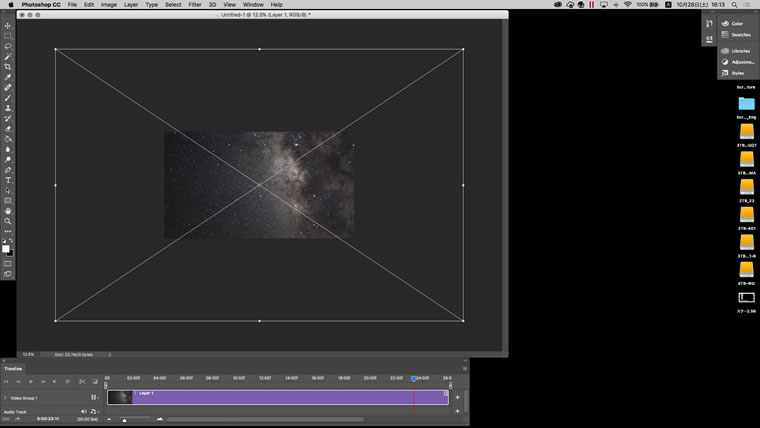
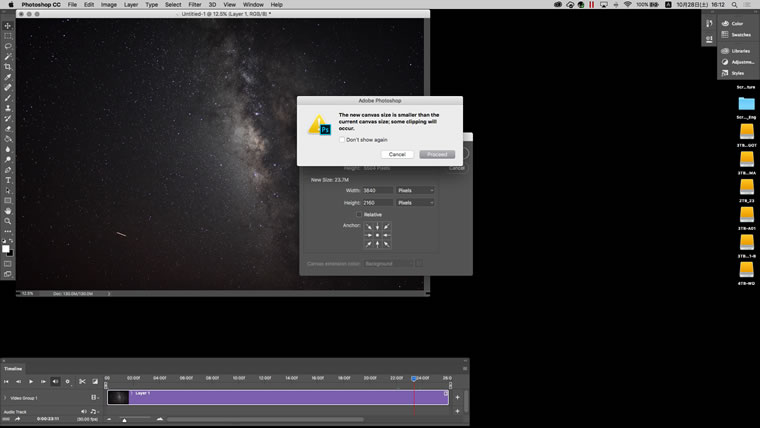
Step 7: Photos larger than the selected canvas size will be cropped
to fit. The tool used to choose the area of the photos that will appear in the center
of the canvas is Free Transform. Select Edit >
Free Transform.
Step 8: Photoshop will
display a white rectangle showing the dimensions of the full image.
Step 9: If you hold the shift key and drag a corner to select the
size, the image will keep its original aspect ratio (3 to 2); instead, enter the position
and size of the area that will be used in the time-lapse movie. You can think of this
step as scaling and cropping the entire movie.
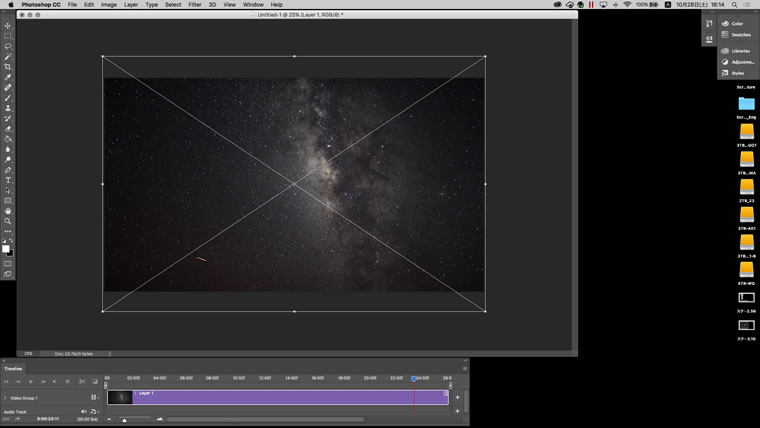
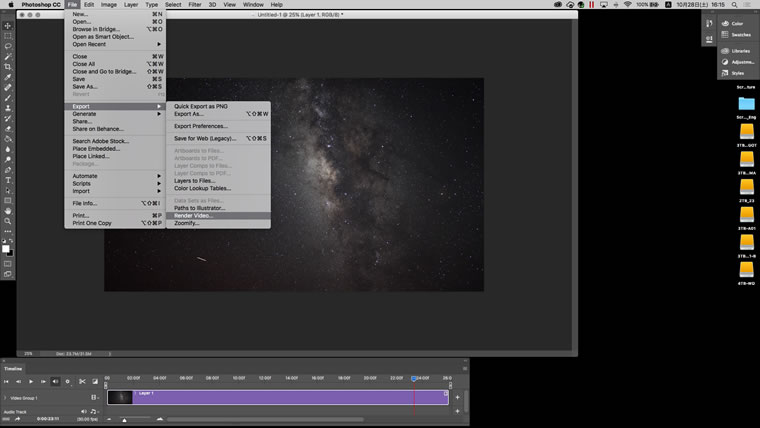
Step 10:
After a preview conducted by moving the cursor in the timeline window, you are ready
to create the movie. In the File menu, select Export
> Render Video.
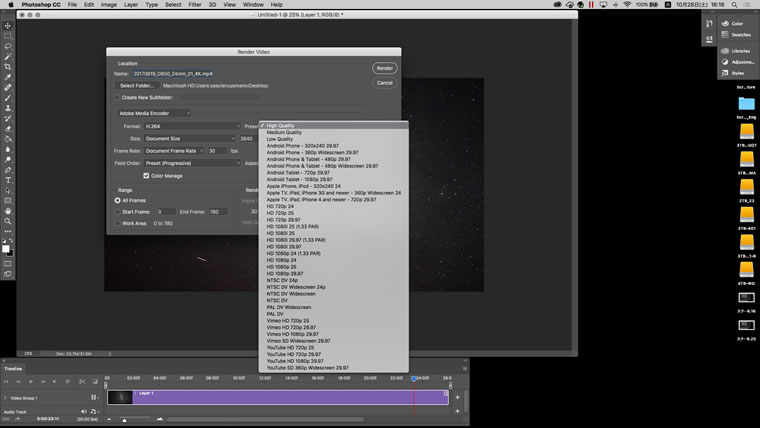
Step 11: Choose an export format. H.264 with a preset
of High Quality or Medium Quality is generally a
good choice. For high-end movies, choose QuickTime with a preset
of Uncompressed or select DPX. You can choose a
container and codec based on whether you plan to
release the movie “as is” or combine the footage with other content as
part of a larger work.
This concludes my brief tutorial on creating time-lapse
movies using Photoshop CC, but Photoshop CC also includes editing features for such
tasks as importing movie files, adjusting image quality, and adding audio and transitions.
Interested viewers should feel free to take a look.
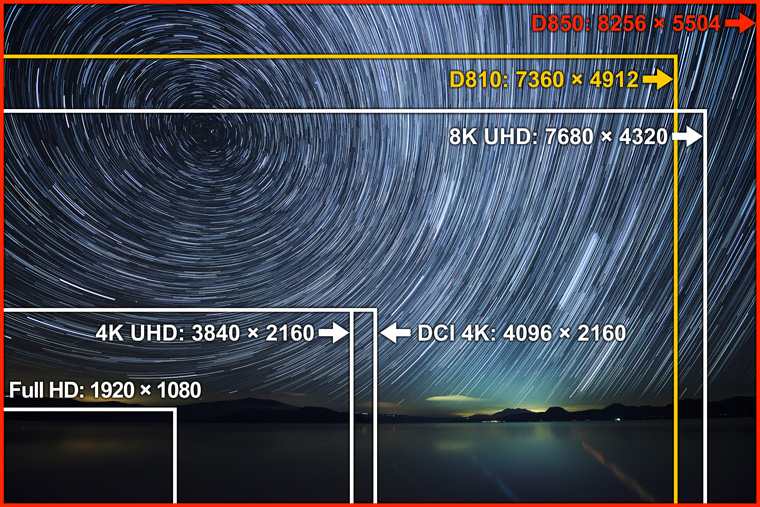
Making the Most of High Resolutions
One
of the D850’s most notable features is its high pixel count, which supports
an image size of 8K UHD, four times higher than that of the increasingly popular 4K
televisions, allowing time-lapse movies to be filmed at sizes up to 8K UHD. If your
goal is a work with a resolution of 4K UHD, you can increase definition by down-converting
from a larger size. Alternatively, you can crop a larger image to smaller size, allowing
you to select a standard-lens crop from footage filmed with a wide-angle lens or add
panning effects during editing.
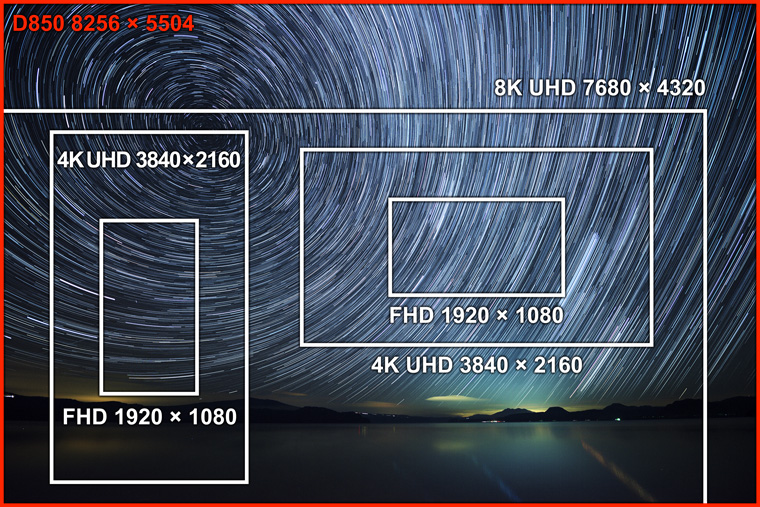
New uses for high-resolution footage include
“vertical video” for display in digital signage or on smartphones. Footage
filmed in landscape orientation on the D850 has enough pixels to display in 4K UHD
when shown on a 4K UHD device in vertical orientation.
While it can be
fun to view time-lapse movies on smartphones and the like, expectations are high for
time-lapse movies that can be viewed in 4K UHD or 8K UHD, particularly in the case
of Nikon system cameras like the D850, with high pixel counts and high-performance
NIKKOR lenses. Needless to say, more will be demanded of footage filmed at such high
resolutions than simply a high pixel count: viewers will expect more in terms of overall
image quality, including tone range and color information. I would like to draw your
attention to the freedom granted to photographers shooting in NEF (RAW) format, which
not only offers a high pixel count but is resilient in the face of editing.
The phrase “one source, multiple uses” may have drawn attention in
this digital age, but time-lapse movies also have the potential for multiple uses
from a single source.
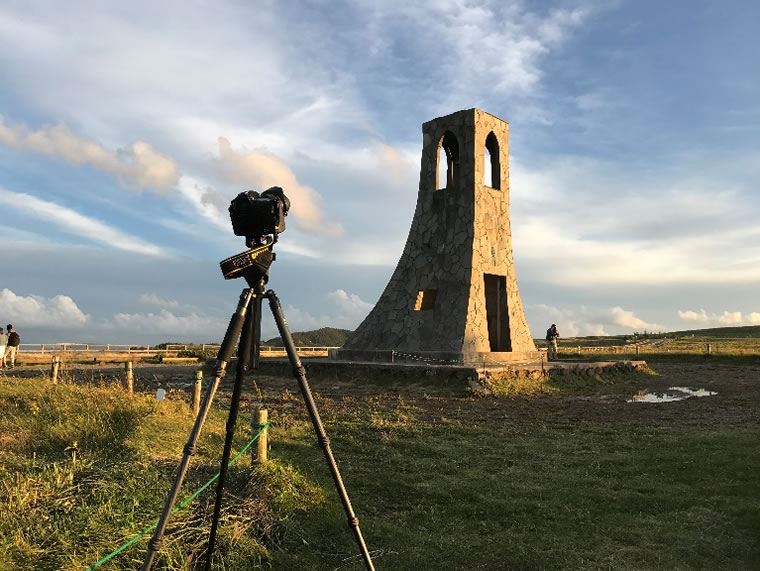
Extended Recording
The equipment needed for recording the raw materials for a time-lapse movie are
fundamentally the same as those needed for any extended photo shoot: a camera, a lens,
and a tripod. One thing that is different is that you will require some strategy to
prevent breakdowns during the long time that elapses between the start and end of
shooting.
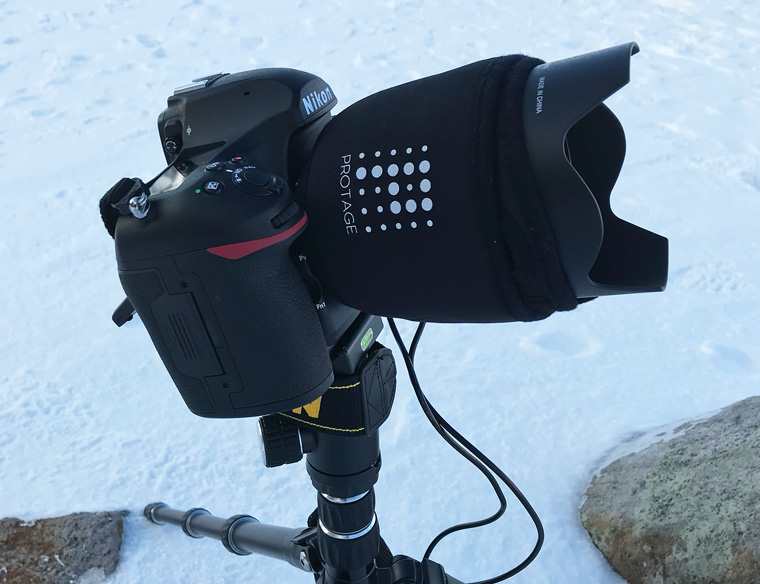
Although the sky may be clear when shooting starts, rain may fall before it’s
over. Even if you’re willing to take a rain check with good grace, the changes
you may face during shooting also include condensation or the wind picking up. If
you’re worried about condensation, you have such options as wrapping a warmer
around the lens barrel, while wind can be handled by removing the strap or wrapping
it around the tripod.
Note 2: Converting 14-bit NEF (RAW) files (lossless compression) to JPEG Fine★, size L.
Note 3: Images read from a 128 GB SONY SF-G SD memory card and saved to a 128 GB Lexar Professional 2933× XQD memory card.
Tips and Tricks > Time-Lapse Movies 1: Things to Know About Time-Lapse Movies
Tips and Tricks > Time-Lapse
Movies 3: New Expressive Possibilities
Profile of YAMANO Yasuteru
Photographer and researcher of photographic techniques. Born in 1954 in Kagawa. Has been publishing photos and articles in astronomical journals since the 1970s. Has published many digital photos and articles relating to digital astronomical photography since the year 2000. Member of the Society of Photography and Imaging of Japan (SPIJ).