Video Shooting
Video Shooting #7: Using RED LUTs for N-Log
Supervised by Kaz Ohata (Cinematographer)
Sample cinematography by Yoko Asazuma (Cinematographer)
The RED-curated LUTs for N-Log are designed to replicate the signature film-like look of RED cinema cameras. By applying them to N-Log footage, you can easily recreate a cinematic atmosphere.
This article introduces the features of the RED LUTs and how to set them up in DaVinci Resolve.
Index:
The RED LUTs introduced here consist of five types of LUTs.
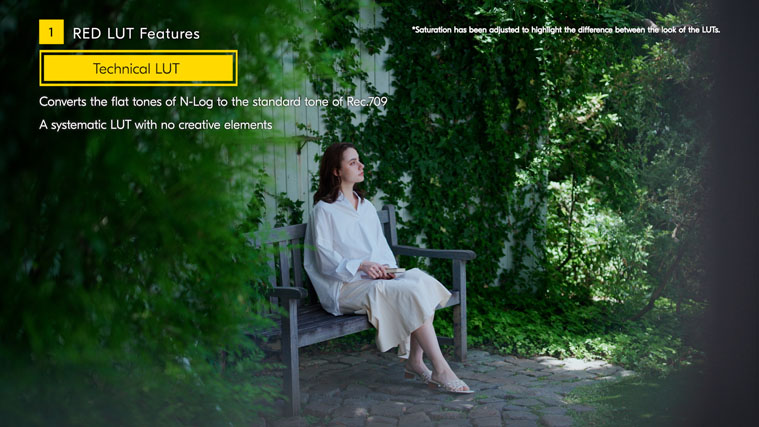
First, we introduce the Technical LUT. This LUT converts the flat tones of N-Log to Rec. 709, the standard colors for video. It's a technical LUT without any creative elements.
Next, we will look at the Creative LUTs that add character to the look of the video. There are four different Creative LUTs, all of which replicate classic film looks.
The most standardized Creative LUT is FILM BIAS. This is a LUT that reproduces a natural film color look without any artefacts. For example, when used in daylight conditions, it brings a sense of clarity to the footage and produces clean, crisp colors.
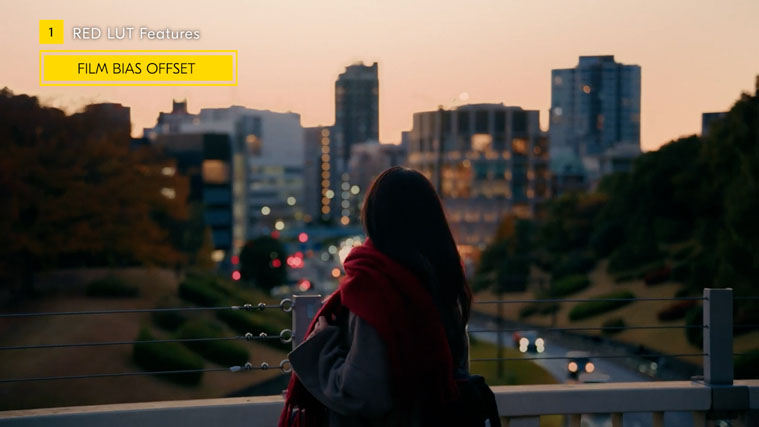
Next, we'll introduce FILM BIAS OFFSET. This is a LUT that recreates the "Teal and Orange" look often used in cinematic video production. It's characterized by reddish highlights and bluish shadows. In daylight conditions, rather than the clean look that you get with FILM BIAS, this LUT adds warmth to the mid-tones and highlights. When used in the orange light of sunset, it can create a rich and atmospheric feel.
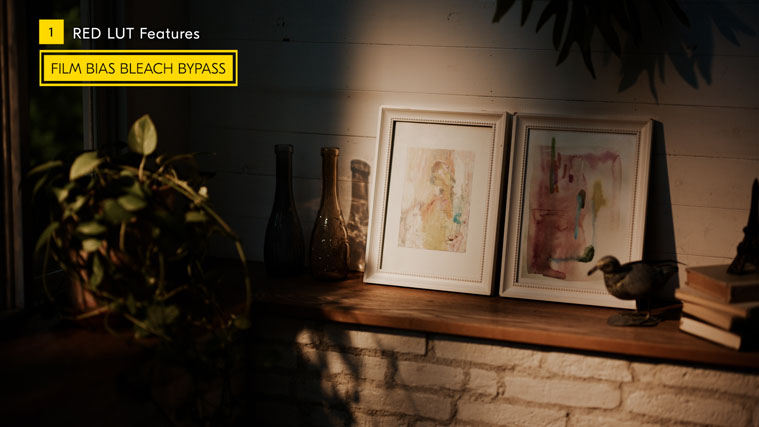
The next one is FILM BIAS BLEACH BYPASS. BLEACH BYPASS is a term used to refer to a special film development process called silver retention that produces high-contrast images with low saturation. FILM BIAS BLEACH BYPASS is a LUT that reproduces the extreme film look. This solid bleach bypass look is often used in films with serious content.
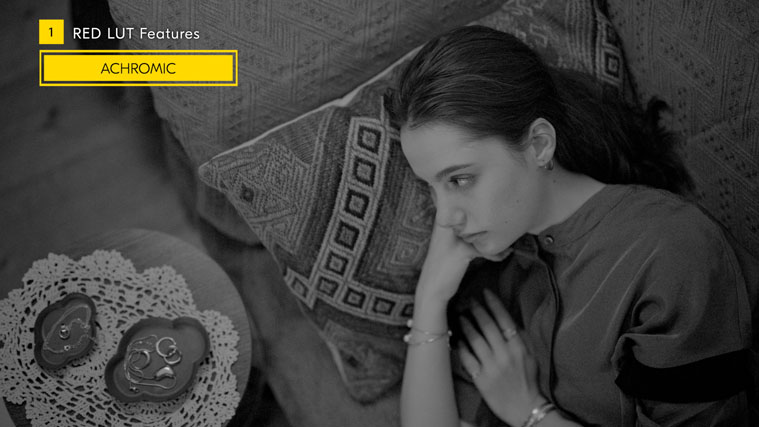
Finally, we will introduce ACHROMIC. This is the only RED LUT that is black and white. You can see that it has a similar contrast to FILM BIAS. RED has also developed monochrome sensor cinema cameras in the past, and the ACHROMIC shows RED's strong commitment to black and white expression.
Now, we will explain the steps for applying the RED LUTs during color grading.
First, let's set up the project settings in DaVinci Resolve. First, open [Project Settings] from the [File] menu in the menu bar, then select [Color Management].

Set [Color Science] to [DaVinci YRGB], [Timeline Color Space] to [DaVinci WG/Intermediate], and [Output Color Space] to [Rec.709-A].
Select [Tetrahedral] for [3D lookup table interpolation] and save the settings.
That's all for the project settings.
Next, we'll load the RED LUTs into DaVinci Resolve. The RED LUTs can be downloaded for free from Nikon's Download Center. To load the LUTs, open the LUTs tab located at the top left of the Color page.
Right-click on any LUT or folder in the list and select [Reveal in Finder]. This will open the folder where LUTs are stored, so copy the RED LUTs into that location. Return to the DaVinci Resolve screen, right-click on any LUT or folder again within the LUTs tab and select [Refresh]. The RED LUTs will now be loaded.
This completes the initial setup.
Finally, we will show you how to apply a RED LUT.
In DaVinci Resolve, there are several ways to apply a LUT, the simplest of which is to apply the LUT directly to the clips you shot. To begin, right-click on the clip to which you wish to apply the LUT on the Media, Edit, or Color page. Select [LUT] from the drop-down menu to display a list of LUTs. Select the LUT you wish to apply, and the LUT will be applied to the selected clip.
On the other hand, to make other color adjustments than applying a LUT, we recommend that you apply a LUT to nodes in the Node Graph window.
First, arrange the clips on the timeline on the Edit page. Then go to the Color page and select the Clips tab in the upper left corner of the screen to view the clips lined up on the timeline. Select the clip to which you want to apply the LUT, then right-click on an empty node on the Node Graph window in the upper right corner of the screen. Then, select [LUT] from the drop-down menu to display a list of LUTs. Select the LUT you wish to apply, and the LUT will be applied to the selected clip.
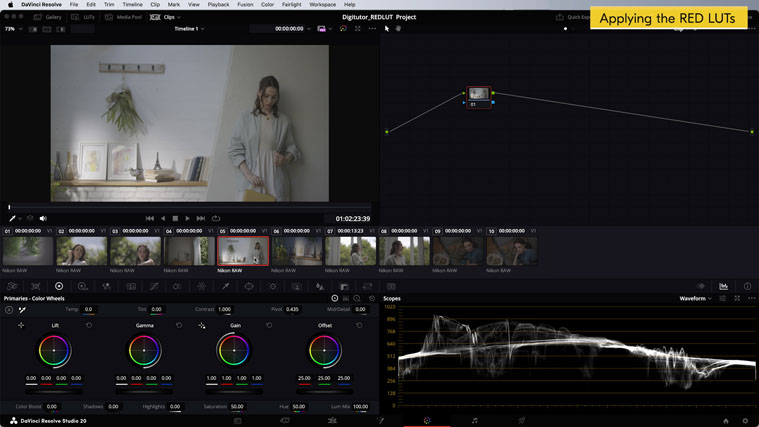
When adding more nodes and adjusting colors, you need to pay attention to the order of the nodes. If you perform color adjustments after applying a LUT to a node, it can easily lead to tonal clipping, such as blown-out highlights or blocked up shadows. Therefore, when making basic color adjustments, such as brightness or white balance, it's better to add a node before the node with the LUT applied and make your adjustments there.
By applying the RED LUTs to N-Log footage, you can easily recreate a cinematic film look. Additionally, by adjusting the contrast and color tones, you can refine it to match your own personal style. Be sure to try out different RED LUTs to match your own style.