
NIKKOR The Thousand and One Nights No.99
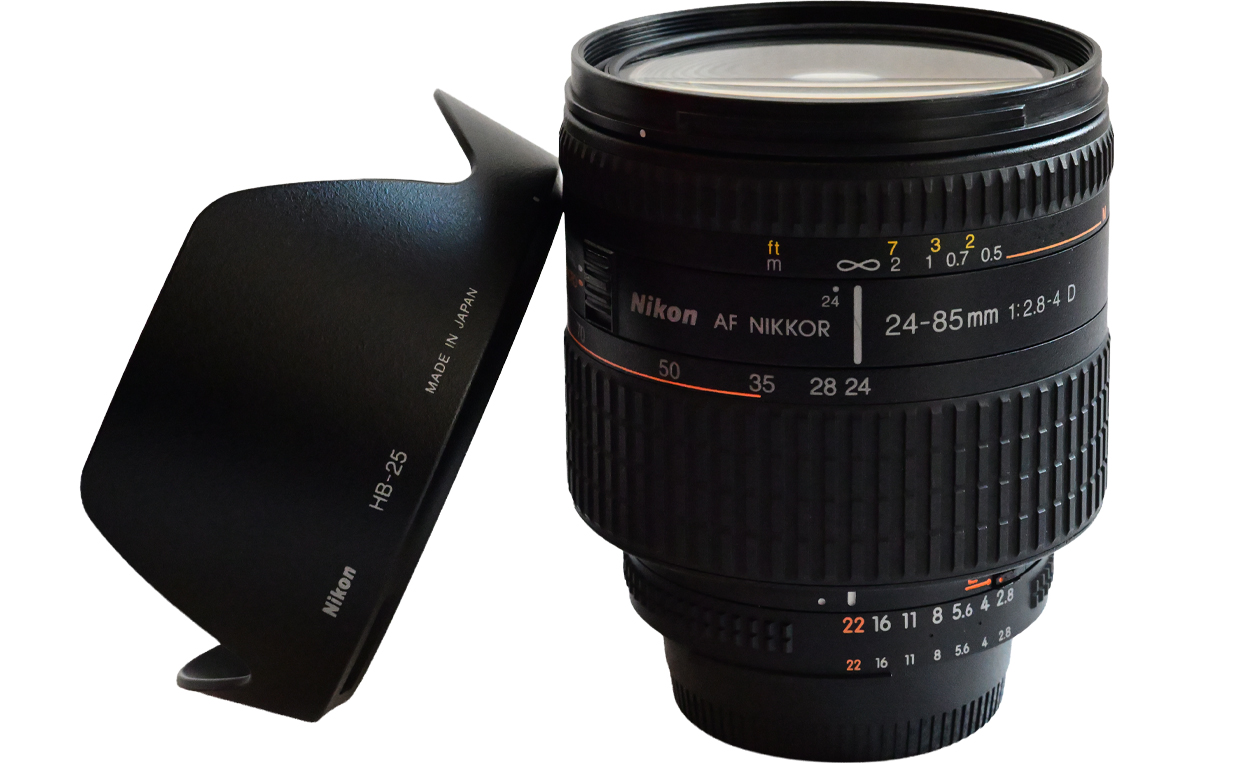
Attempting a new way to design aspherical optics
-Ai AF Zoom Nikkor 24-85mm f/2.8-4D IF-
In Tale 99 we'll examine the Ai AF Zoom Nikkor 24-85mm f/2.8-4D IF. Did you know? The Ai AF Zoom Nikkor 24-85mm f/2.8-4D IF was designed with exactly the same number of lens elements as the Ai AF Zoom-Nikkor 24-120mm F3.5-5.6D IF. Further, the two lenses are also almost identical in size and weight. How was it even possible to design a fast-aperture zoom lens with a maximum aperture that begins at f/2.8 with those specifications? And 1:2 macro capability! What, I wonder, was the intent behind development of this lens? In this Tale, we'll take a close look at the last AF-D zoom lens; a lens with a remarkable sales run that kept it on the market until quite recently.
By Haruo Sato
I. Development history and the designer
Now let's take a look at the history behind the Ai AF Zoom Nikkor 24-85mm f/2.8-4D IF. I designed both the Ai AF Zoom-Nikkor 24-120mm F3.5-5.6D IF and the Ai AF Zoom Nikkor 24-85mm f/2.8-4D IF. I submitted five optical design reports for the Ai AF Zoom Nikkor 24-85mm f/2.8-4D IF. I began designing the initial proposal in June of 1998, and the initial design was completed in July of the same year. I then designed a second version with a smaller filter diameter of 62 mm. However, because an extreme reduction in size was the goal, it was impossible to incorporate the 1:2 macro mechanism and I abandoned that design. I then fine-tuned the first design, making it easier to mass-produce. After completing a third and then a fourth version of the design, I finally settled on the fifth. I finished the design of that final version in February of 1999. 1999 was an incredible year that saw the release of the Nikon D1, the first practical digital SLR camera, which represented the starting point for global change. It was during this incredibly busy time that the Ai AF Zoom Nikkor 24-85mm f/2.8-4D IF was born. The prototype phase of development was authorized and initiated in May of 1999. Progress was smooth and mass-production trials began in June, even before the prototype phase was complete. These days, production begins without a physical prototype having ever been created, but at the end of the 20th century, simulation technology wasn't quite there yet. We did our best to reduce development time by overlapping the prototype phase with mass-production trials, skillfully allowing the two to run in parallel like the interweaving voices of a canon or a fugue. Mass production began in 2000, and the lens was released in Japan on September 5, 2000. The Ai AF Zoom Nikkor 24-85mm f/2.8-4D IF was a zoom lens released just as the 20th century was ending and the 21st century was upon us. Incredibly, the lens was not discontinued until August 31, 2020. It remained a current product on our websites through the end of August 2020. In reality, however, it continued to be sold through major camera retailers for several more years. The Ai AF Zoom Nikkor 24-85mm f/2.8-4D IF had an especially long sales life for an AF-D Zoom-Nikkor lens.
II. Lens construction and characteristics
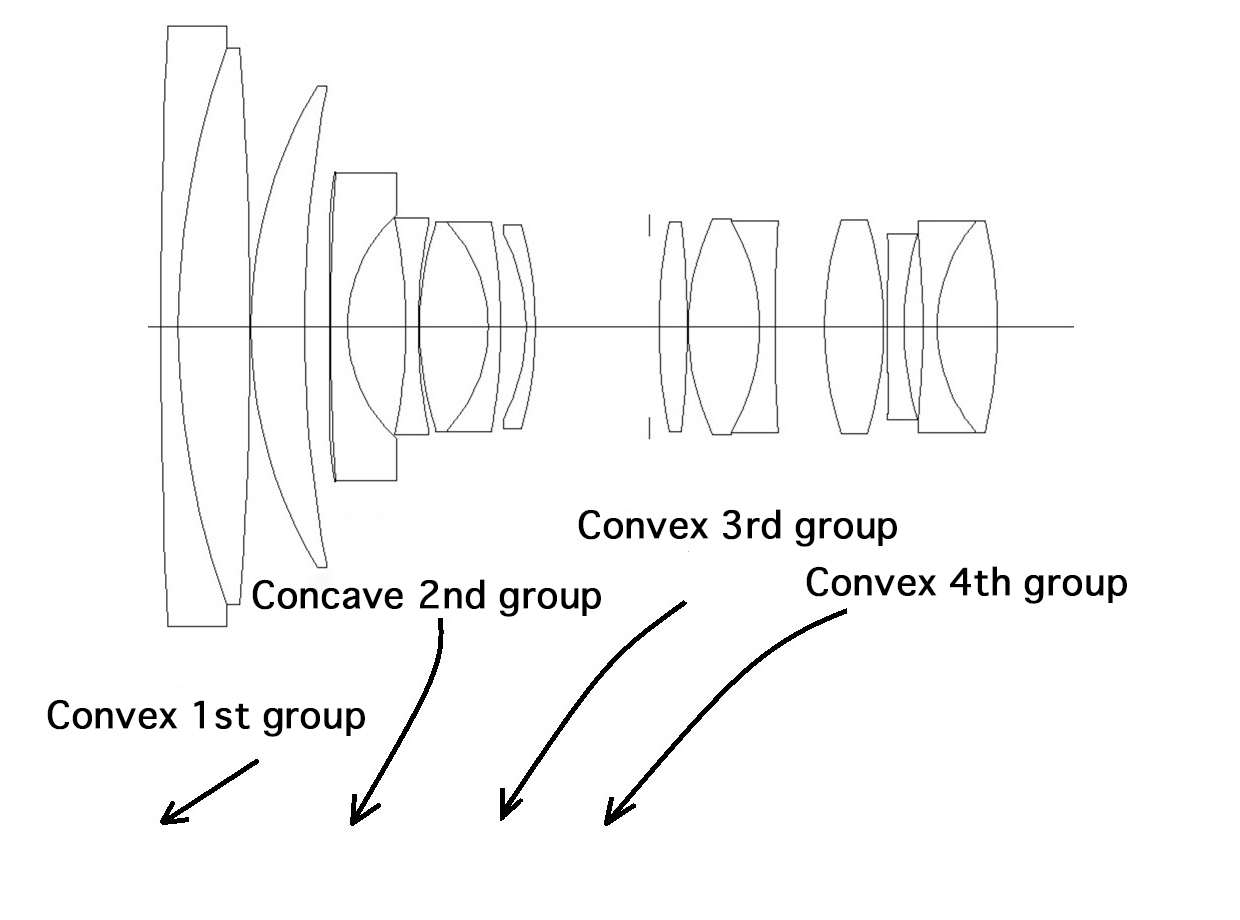
Now let's look at a cross-section of the Ai AF Zoom-Nikkor 24-85mm f/2.8-4D IF (Fig 1). Please forgive me if the following is quite technical. This lens belongs to the category of Nikkor lenses known as "convex-lead, four-group lenses". Basically, it is a zoom lens with four movable lens groups, the first of which is a convex or positive group. Specifically, it is made up of four groups arranged in a convex-concave-convex-convex sequence. The arrows in the diagram show the general path of group movement as the lens shifts from the wide-angle end to the telephoto end. As you can see, the first group moves linearly, while the second, third, and fourth groups move nonlinearly, each following a different function. The lens focuses by moving the second group, allowing for continuous focusing throughout the entire range, from infinity to a close-up distance of 0.5 m. Further, focus is extended without interruption between 35 mm and 85 mm. At 85 mm, macro photography with a maximum magnification of -1/2x (at a shooting distance of 0.21 m) is possible.
Now let's compare this with a cross-section of its larger sibling, the Ai AF Zoom-Nikkor 24-120mm F3.5-5.6D IF.
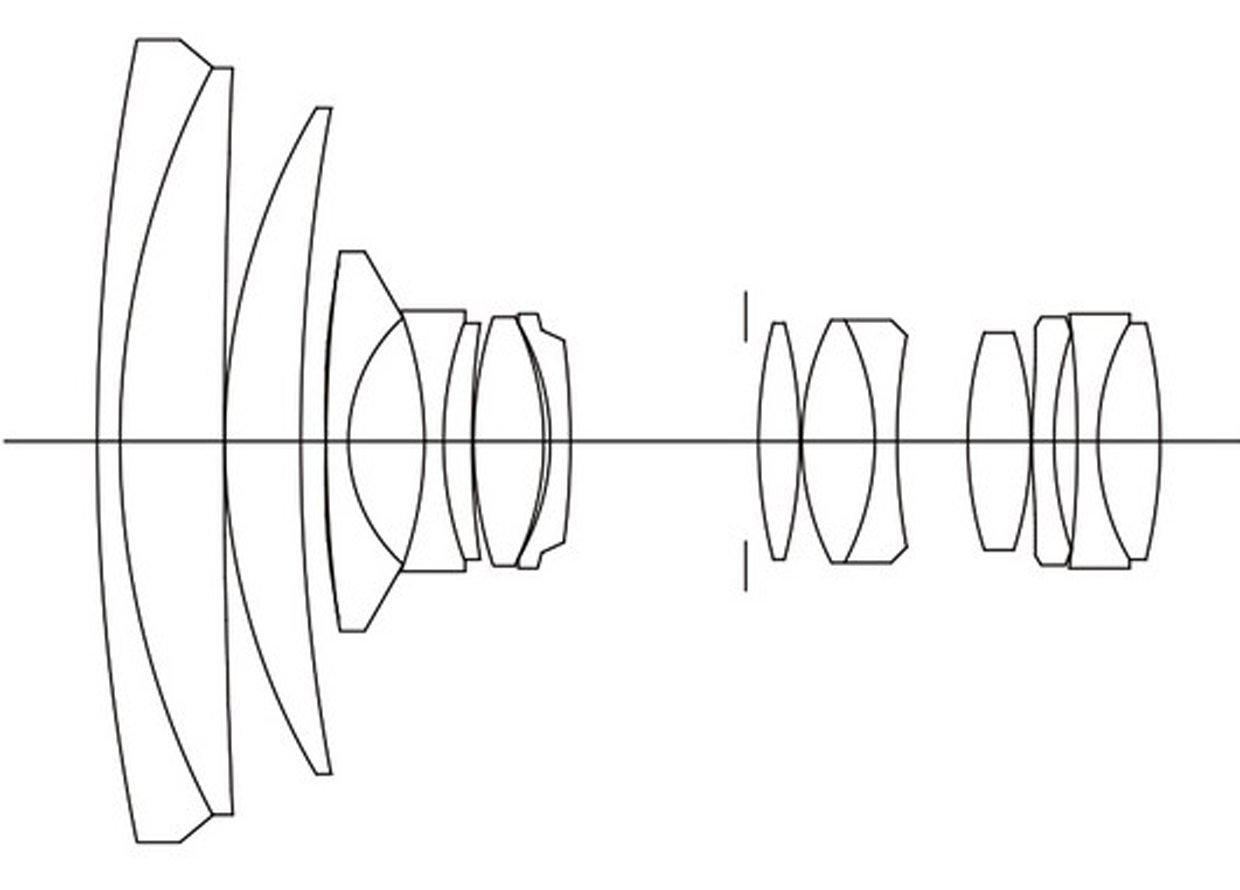
What do you think? While the two lenses are virtually identical on the outside, there are a number of significant differences in their optical design. The first improvement involved modifying the concave second lens group to make it easier to achieve a fast aperture. Specifically, the convex lens element in the center of the second group was changed to a cemented doublet made up of a convex element and a concave element. This serves as one of the elements that contribute to good aberration correction at f/2.8. Another major difference is the use of an aspherical lens element with a unique shape. The aspherical shape adopted for this design was defined by a special mathematical function that was not widely used at the time. In a way, effective utilization of this unconventional aspherical shape allowed us to achieve a faster aperture while maintaining the same number of lens elements and overall size. I'll explain the unique aspherical shape in further detail in the next section.
III. Evolution of aspherical shapes
First we'll consider the differences between spherical and aspherical surfaces. Mathematically speaking, a spherical surface is defined as the locus of points equidistant from a fixed point in space. But what does this mean? Put simply, it is a continuous set of points positioned at the same distance from a fixed point, much like the surface of a sphere. The simplest way to express a spherical surface is through its radius of curvature r. In optical design, rays are traced using this radius of curvature r, lens thickness or spacing d, and refractive index n to calculate geometric aberrations. The so-called five Seidel aberrations that arise with this process occur precisely because the surface is spherical. How, then, is an aspherical surface defined? Traditionally, an aspherical surface was defined as a rotationally symmetric optical surface with a varying radius of curvature depending upon the distance from the optical axis (in the radial direction). In recent years, however, surfaces lacking an optical axis, including free-form surfaces, have come to be considered aspherical surfaces. Therefore, at the risk of oversimplifying it, one could say that an aspherical surface is a collective term for any optical surface that is not spherical.
Let's look at the general equation for an aspherical surface. Let y be the height measured perpendicular to the optical axis, X(y) the distance along the optical axis from the tangent plane at the vertex of the aspherical surface to the surface at height y (the sag), r the radius of curvature of the reference sphere (the paraxial radius of curvature), k (kappa) the conic constant, and Cn the nth-order aspheric coefficient.

This equation consists of two initial terms, up to and including the C2 term, that define the paraxial radius of curvature. All subsequent terms are correction terms expressed as a power-series expansion. This aspherical equation has long been the industry standard, though the definition of the conic constant Κ, differs among manufacturers. However, through extensive use of this equation, I came to feel that it had a drawback: it was difficult to represent aspherical surfaces with large variations in sag. Therefore, I first focused on the effective use of the conic constant Κ. What makes the conic constant Κ so useful? Above all, a single value of Κ can readily define aspherical surfaces such as paraboloids, hyperboloids, and ellipsoids. What's more, Κ appears in the first, paraxial term of the equation. This makes it possible to create an aspherical profile that bends dramatically from the very base of the surface near the optical axis. At the time, neither Nikon nor our competitors had many designs or products that actively utilized the conic constant Κ, largely due to manufacturing and metrological constraints. I saw this as an untapped and fertile frontier. I was convinced that there must be a way to design aspherical surfaces that no one had yet discovered. With that sense of excitement, I took on the design challenge. However, things were not so simple, and the goddess did not smile on me so easily. So I gave the matter further thought. Next, I looked at the power-series correction terms. Beyond the 10th order came the 12th-, 14th-, 16th-, 18th-, and 20th-order terms. Increasing the order allows for more detailed expression of the aspherical surface. Yet something was still off. I felt I was overlooking something. Then it hit me: the odd-order terms, which were rarely used in optical design at the time. There were, of course, precedents for using odd-order terms in aberration design. However, I took the idea a step further by combining Κ with odd-order terms and putting the combination to effective use in aberration design. That was the design approach I eventually conceived. Yes, I added third-order C3 and fifth-order C5 terms between C2, C4, and C6. One example of the benefits of this approach is the third-order term. I believed that this term could be used to control aberrations of even lower order than third-order aberrations. As it turned out, my prediction was correct. By combining odd-order terms with Κ, zonal spherical aberration was dramatically reduced, and distortion at smaller field angles was also reduced. As a result, this new design approach, the active use of odd-order terms and Κ, enabled the Ai AF Zoom Nikkor 24-85mm f/2.8-4D IF to achieve a fast maximum aperture of f/2.8 without altering its basic structure or element count. My one regret, however, is that I was unable to extend the telephoto end to 120 mm. I had hoped to reach at least 105 mm, but once the focal length exceeded about 85 mm, sensitivity to decentering increased rapidly, easily outstripping the lens-barrel design and assembly technologies available at the time. An optical design is nothing more than a theoretical design if the lens barrel cannot be designed and manufactured. I therefore chose to file a patent application and make the concept public, leaving it in the hands of future generations of designers. I also documented this aspherical design method in internal reports and passed it on to the next generation of designers. Today, this design concept is no longer unusual. It has since been further developed and applied both within and outside Nikon. From a purely mathematical standpoint, it was merely a change in the way functions were utilized. For example, the effect of the odd-order terms could be approximated by continually adding higher-order even terms beyond the 10th order. Mathematically, however, exactly the same values cannot be represented. One could also have employed an entirely different function. Still, it took years of research for the academic and industrial communities to develop new functions suitable for practical use. I hope that the aspherical design technologies developed in the '90s, when practical optimization tools (automated design) were finally becoming available, have served as one of the foundations for optical design in the 21st century. Today, especially in the design of ultra-thin objective lenses such as those used in smartphones, designers make use of highly unconventional aspherical surfaces, including surfaces whose curvature reverses from convex to concave, to control the exit pupil characteristics of peripheral rays and create new aspherical design methods. Although the family of functions described above remains the dominant approach today, Forbes aspheres have recently emerged. They use functions that make it easier to represent aspherical surfaces with large sag heights while also offering advantages for inspection and quality control. This approach also appears to be becoming established in practical applications.
IV. Design performance and technical features
First let's look at design data. One of the most distinctive features of this lens is the manner in which spherical aberration is corrected. The key to minimizing zonal spherical aberration throughout the zoom range is to minimize variations in spherical aberration from the paraxial region of the pupil to its outermost diameter. This is a good time to explain, step by step, how the aspherical surface itself was designed.
We'll begin by looking at spherical aberration correction, which is the most important factor in achieving a faster aperture. In general, aberration correction is achieved by balancing the aberrations produced by the positive and negative components of an optical system, much like fighting fire with fire. As residual aberration can never be completely eliminated, designers usually settle on what is commonly known as "full correction". Let us begin by making a few modifications to the 24-85mm design and seeing what happens. First, let us remove the aspherical surface and see what happens. As shown in Fig. 3, the result is a full-correction-type spherical aberration profile with significant zonal spherical aberration remaining, appearing as a pronounced bulge in the spherical aberration curve. This configuration would not be expected to produce a sharp image. Next, let us restore the aspherical surface to its original position and redesign the lens without using the conic constant Κ or any odd-order terms. Fig. 4 shows the result of using low-order aspheric terms to reduce primarily third-order aberrations. As a result, a significant amount of positive flare caused by higher-order aberrations remains. Next, we sequentially introduce higher-order terms and redesign the lens using only even-order terms. The resulting spherical aberration is shown in Fig. 5. While zonal spherical aberration is reduced, the spherical aberration curve becomes noticeably undulating. Contrast improves, but resolution remains insufficient. Finally, we simultaneously introduce the conic constant Κ and odd-order terms. As shown in Fig. 6, this not only reduces the undulation of the spherical aberration curve, but also dramatically reduces zonal spherical aberration. As you can see, the skillful design and use of the aspherical surface made it possible to achieve a one-stop increase in aperture speed without adding lens elements or adopting a more complex zoom configuration.
I hope the concept is now clear. By carefully considering the placement of the aspherical surface, similar corrective effects can also be achieved for off-axis pupils. This aspherical design technology was the key to the lens.
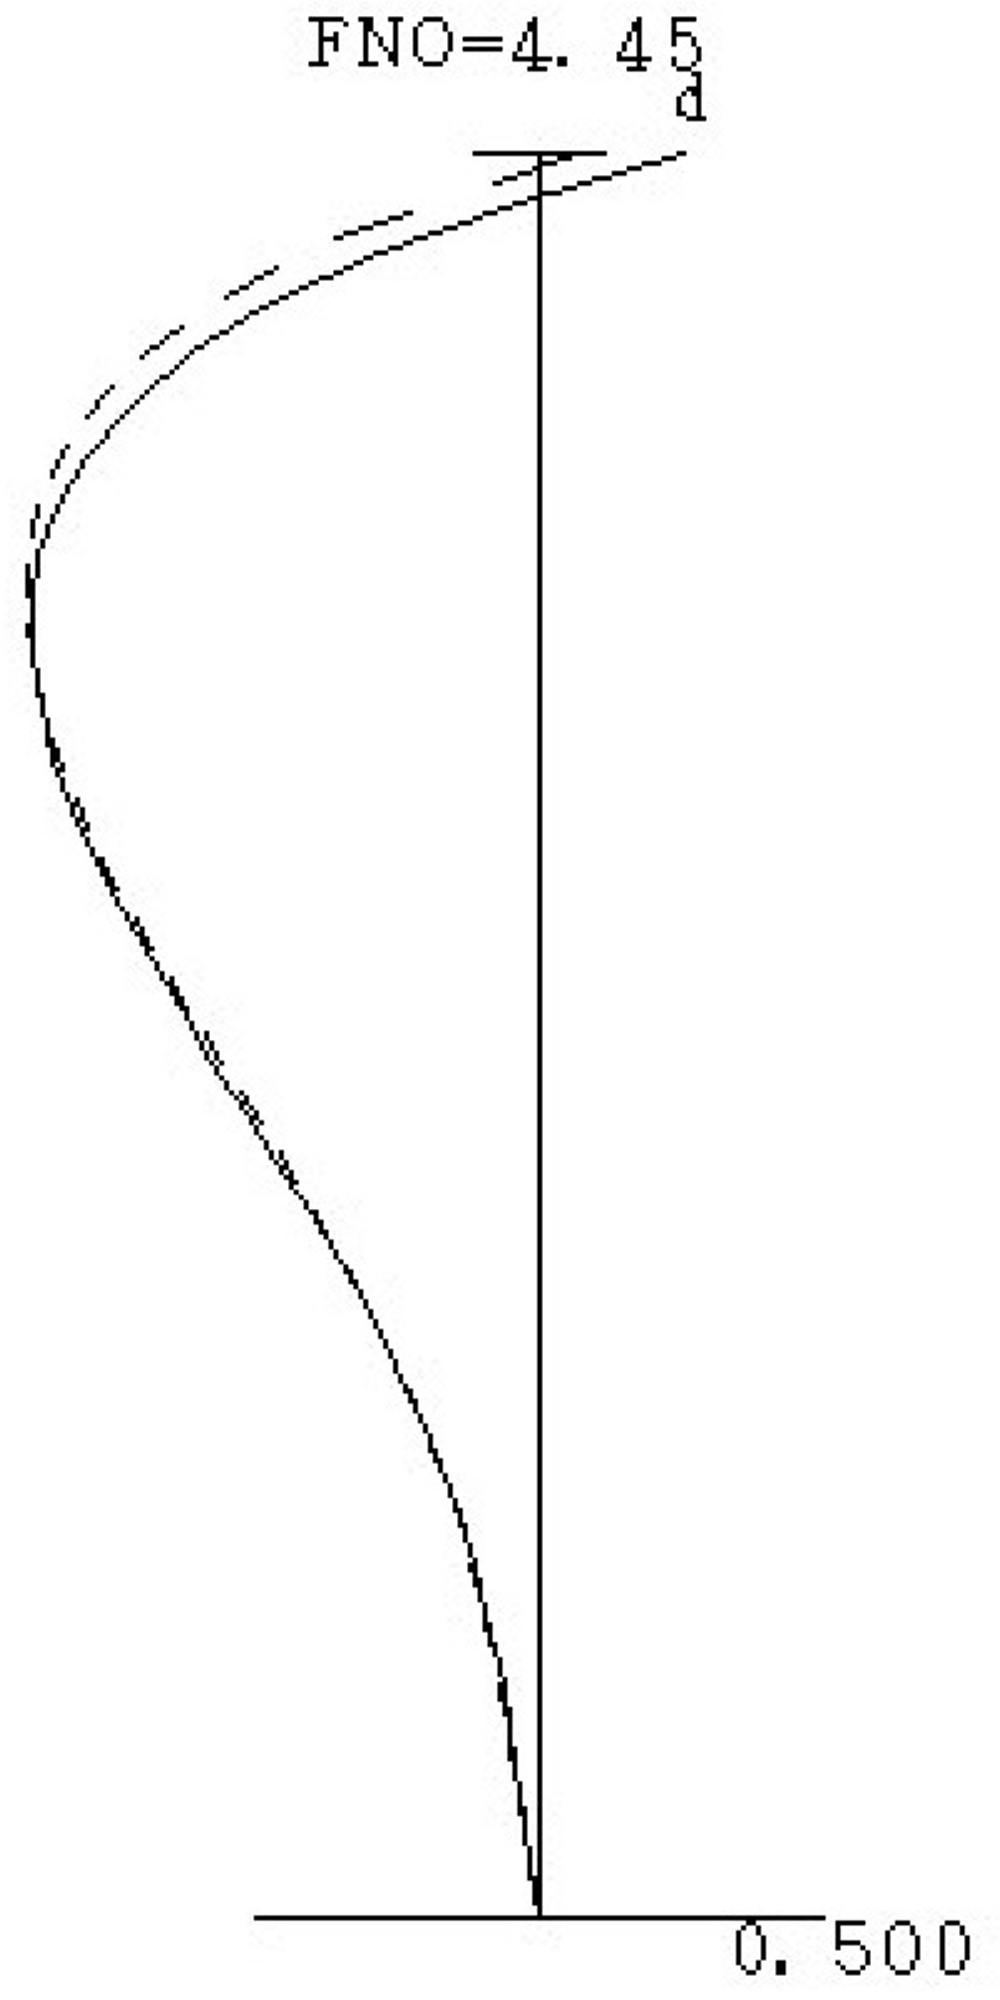
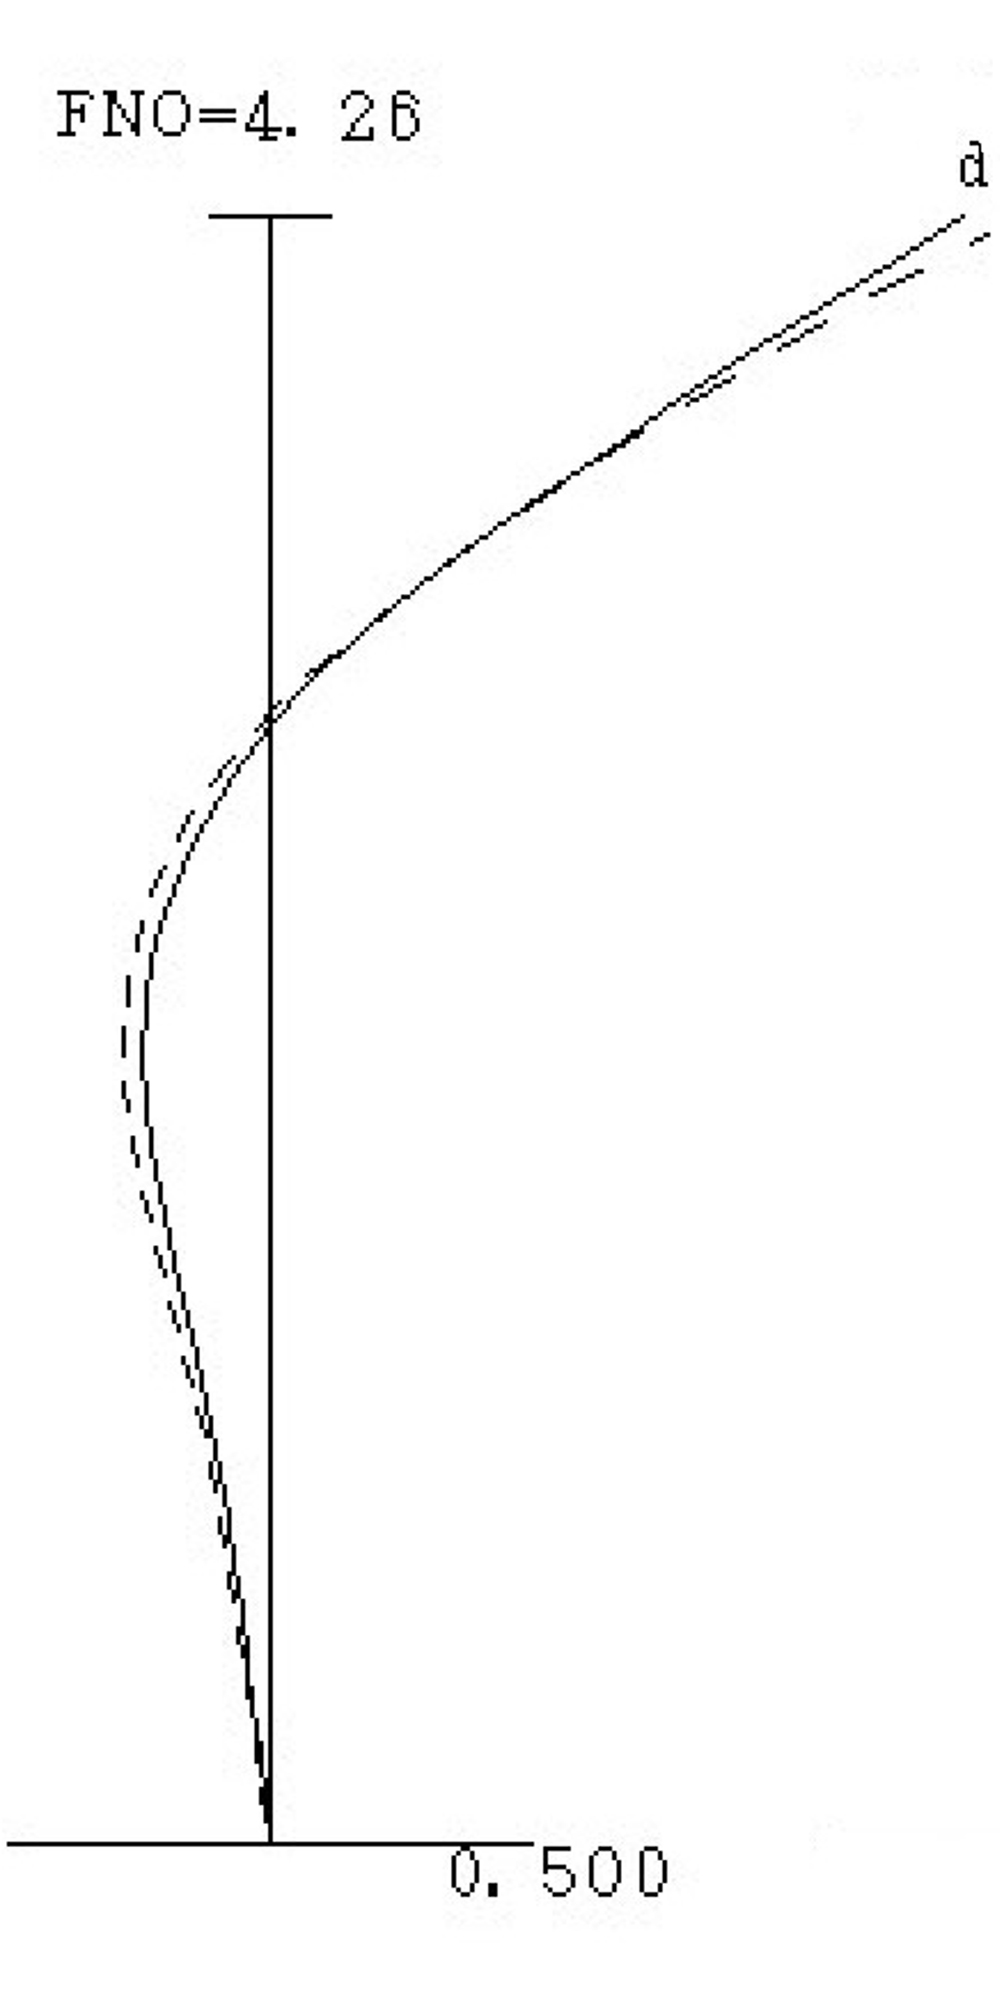
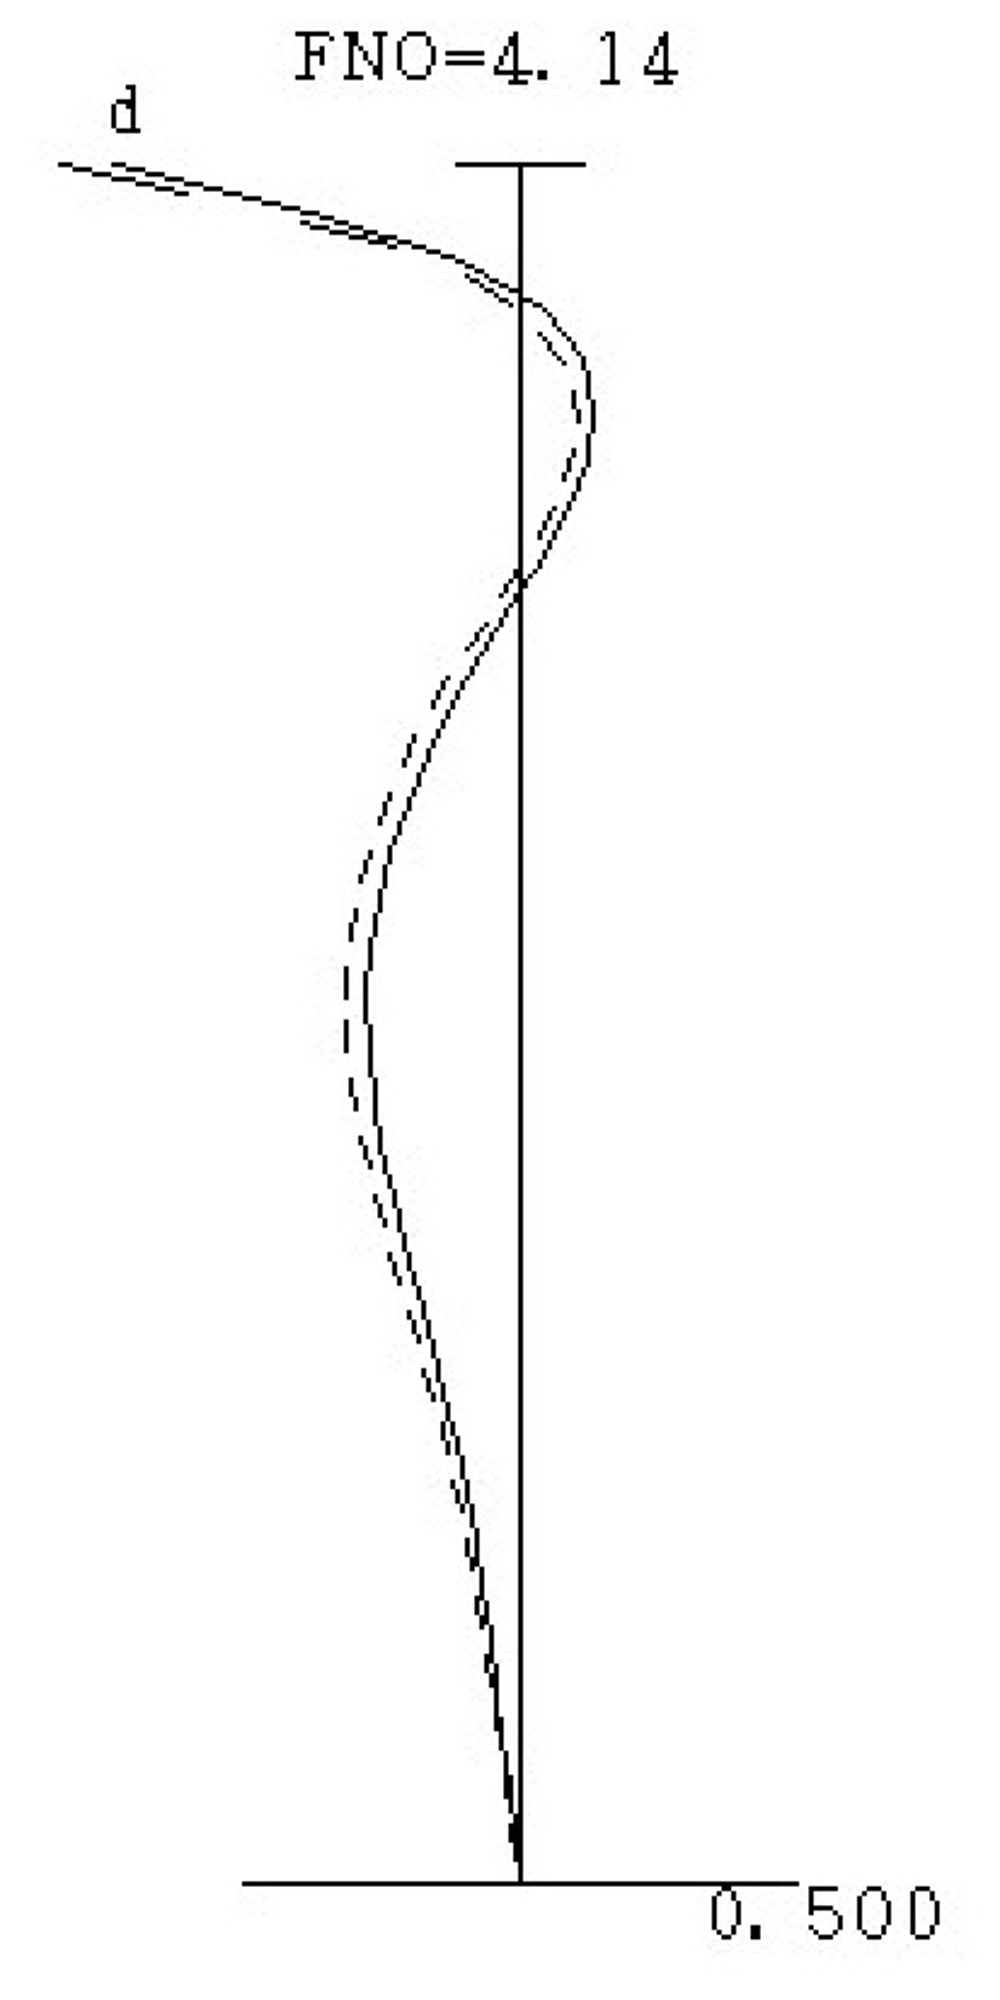
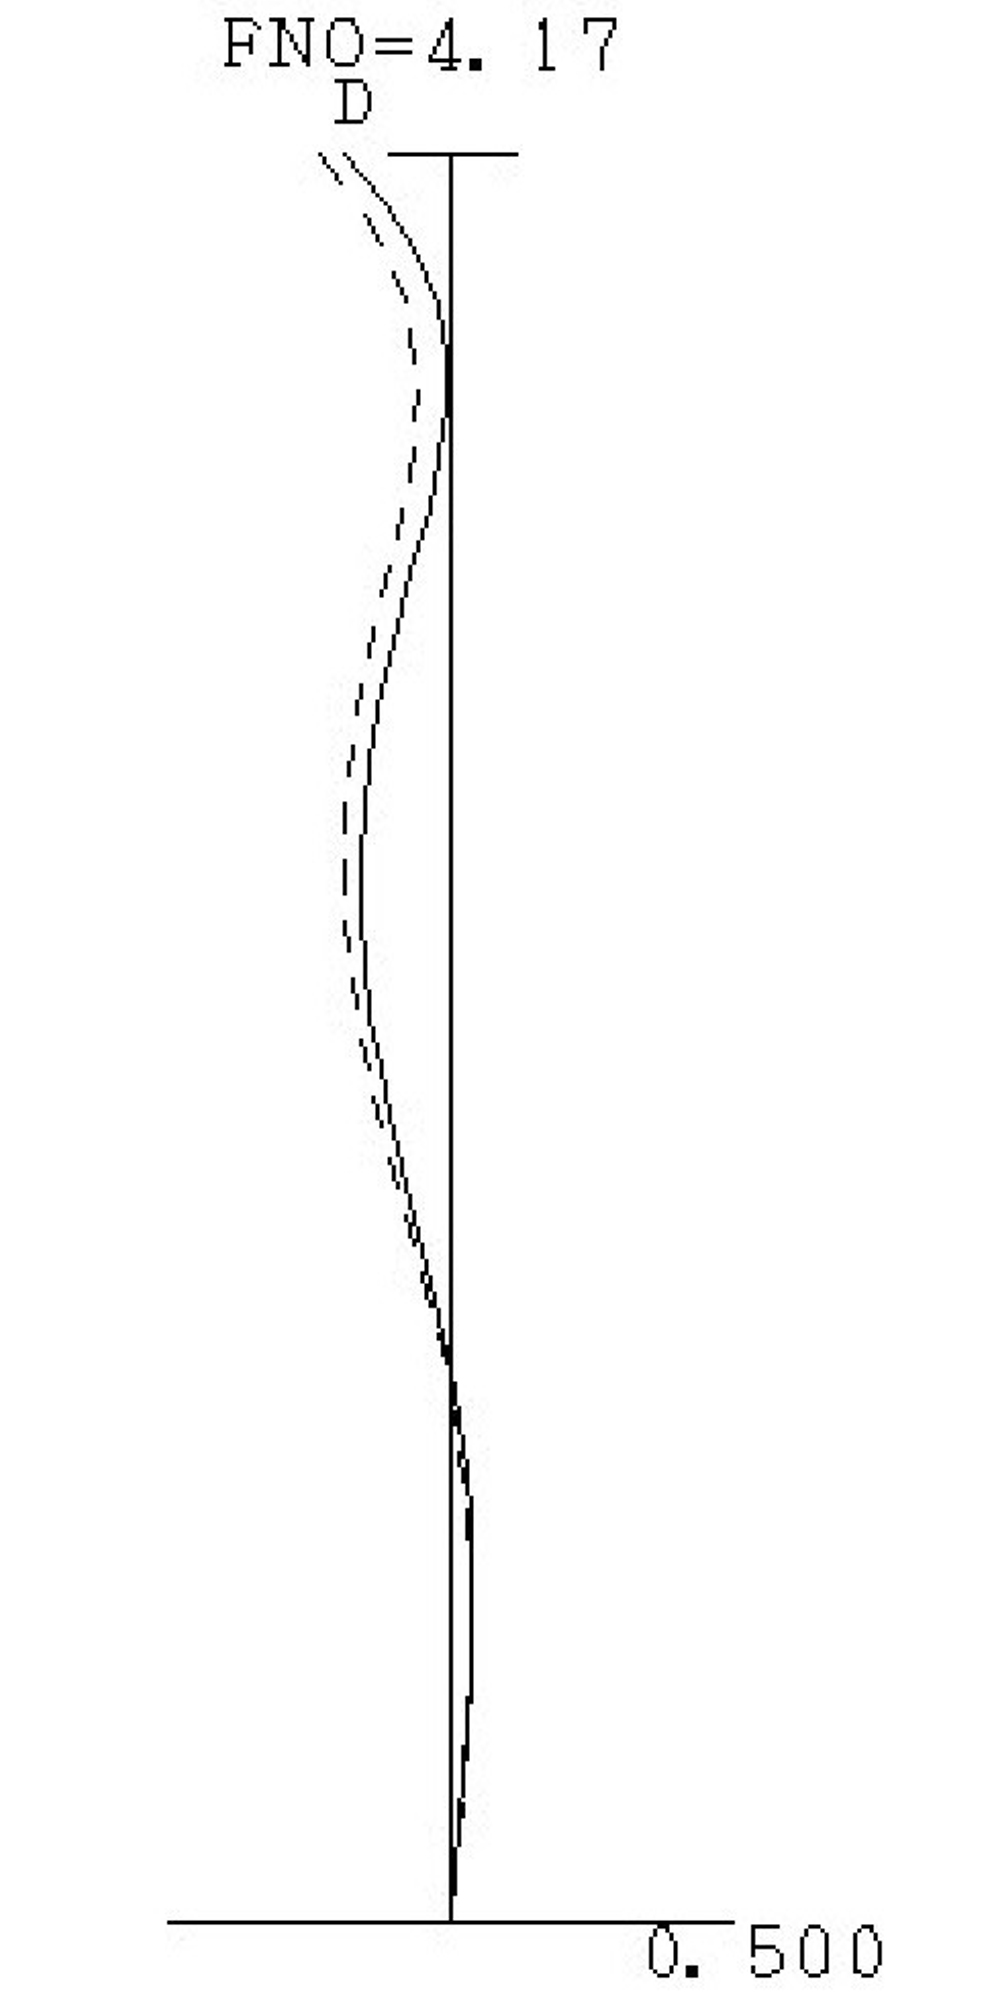
The effective use of Κ together with odd- and even-order terms allowed residual aberration to be reduced to a highly satisfactory level. Likewise, the increased design freedom afforded by the aspherical surface enabled other aberrations to be sufficiently suppressed as well.
V. Actual performance
Next let's look at results achieved with some actual images of distant scenes. I used a Nikon Zf to capture the sample images for this Tale. I will explain performance at each aperture setting in detail. Evaluations are subjective, and based on individual preferences. Please use my evaluations merely as a reference when viewing sample images.
At 24 mm (wide-angle end)
f/2.8 (maximum aperture)
The lens exhibits relatively good resolution throughout 70% of the frame (0-70% of the image height). The image gradually softens toward the edges of the frame, where a slight amount of flare is visible, but resolution remains reasonably good throughout the frame. No color fringing can be perceived from the center of the frame to the edges.
f/4
Stopping the aperture down by one stop increases contrast throughout the frame, and resolution increases noticeably throughout 70% of the frame (0-70% of the image height). The effects of flare and illumination fall-off at the edges of the frame are basically eliminated for a more pleasing image.
f/5.6
Sharpness increases throughout the frame, and resolution throughout 70% of the frame (0-70% of the image height) appears to improve even further. Resolution at the extreme edges of the frame also increases noticeably. Overall image quality is good across the entire frame. Moderate contrast and rich tones across the frame make this the aperture setting I would recommend for everyday use.
f/8 to f/11
Image quality is even better at f/8. Contrast increases further, particularly in the center of the frame, and resolution also improves. At f/11, however, resolution seems to drop slightly. It may be that the effects of diffraction are beginning to show.
f/16 to f/22
Image quality is uniform throughout the frame, but diffraction causes a drop in resolution.
At 50 mm (mid-range)
f/3.5 (maximum aperture)
Resolution is relatively good throughout 70% of the frame (0-70% of the image height). However, the effects of flare are slightly more noticeable throughout the frame than they were at 24 mm. The edges of the image gradually soften as resolution decreases. Resolution remains reasonably good, however, even at the extreme edges of the frame, and no color fringing is visible.
f/4
Stopping down by one-third of a stop greatly reduces flare, improves contrast, and increases resolution all the way to the extreme edges of the frame. Stopping down by one-third of a stop improves the image as a whole, from the center to the extreme edges of the frame, and delivers impressive image quality. This is an aperture setting I would recommend.
f/5.6
Sharpness increases throughout the frame and resolution increases noticeably, even at the extreme edges. Overall image quality is good across the entire frame. Moderate contrast and rich tones across the frame make this the aperture setting I would recommend for everyday use.
f/8 to f/11
Image quality is even better at f/8, especially in terms of contrast and resolution. Moderate contrast and rich tones make this the aperture setting I would recommend for everyday use. Contrast is even better at f/11 for a crisp image, but some may feel contrast is a little too high.
f/16 to f/22
Although image quality becomes uniform throughout the frame, resolution appears to decline slightly as the aperture is stopped down further. The decrease in resolution may be caused by diffraction.
At 85 mm (telephoto end)
f/4 (maximum aperture)
Resolution is relatively good from the center of the frame to the edges, with very little flare. The image gradually softens toward the edges of the frame, but flare isn't really an issue with this lens. There is some color fringing, but it is negligible.
f/5.6
Stopping the aperture down by one stop increases sharpness throughout the frame, and resolution increases noticeably from the center of the frame to the edges for impressive image quality.
f/8 to f/11
Image quality is even better at f/8, with improved contrast and resolution. Contrast is even better at f/11 for a crisp and clear image. Moderate contrast and rich tones across the frame make this the aperture setting I would recommend for everyday use.
f/16
Image quality remains consistently good throughout the frame, but contrast seems to drop a little.
f/22 to f/32
Resolution falls throughout the frame, likely due to the effects of diffraction.
VI. Sample images
Now let's confirm these rendering characteristics with some sample photos. I intended to capture all of these samples at maximum aperture, but samples 7, 9, and 10 were unintentionally taken with the aperture stopped down by about 1/3 to 1/2 stop. See the shooting info below each sample image for specific settings. As always, Picture Controls that apply less sharpening, such as [Portrait], are generally used so that readers may best judge the characteristics of the lens. In addition, I do not generally enhance sharpness or other characteristics, but I sometimes use [D-Lighting] to brighten shadows and make details more visible. I chose subjects with the typical user in mind and tried to cover a wide range of shooting distances, from short to long. These sample images were captured at Kamomioya (Shimogamo) Shrine in Kyoto.
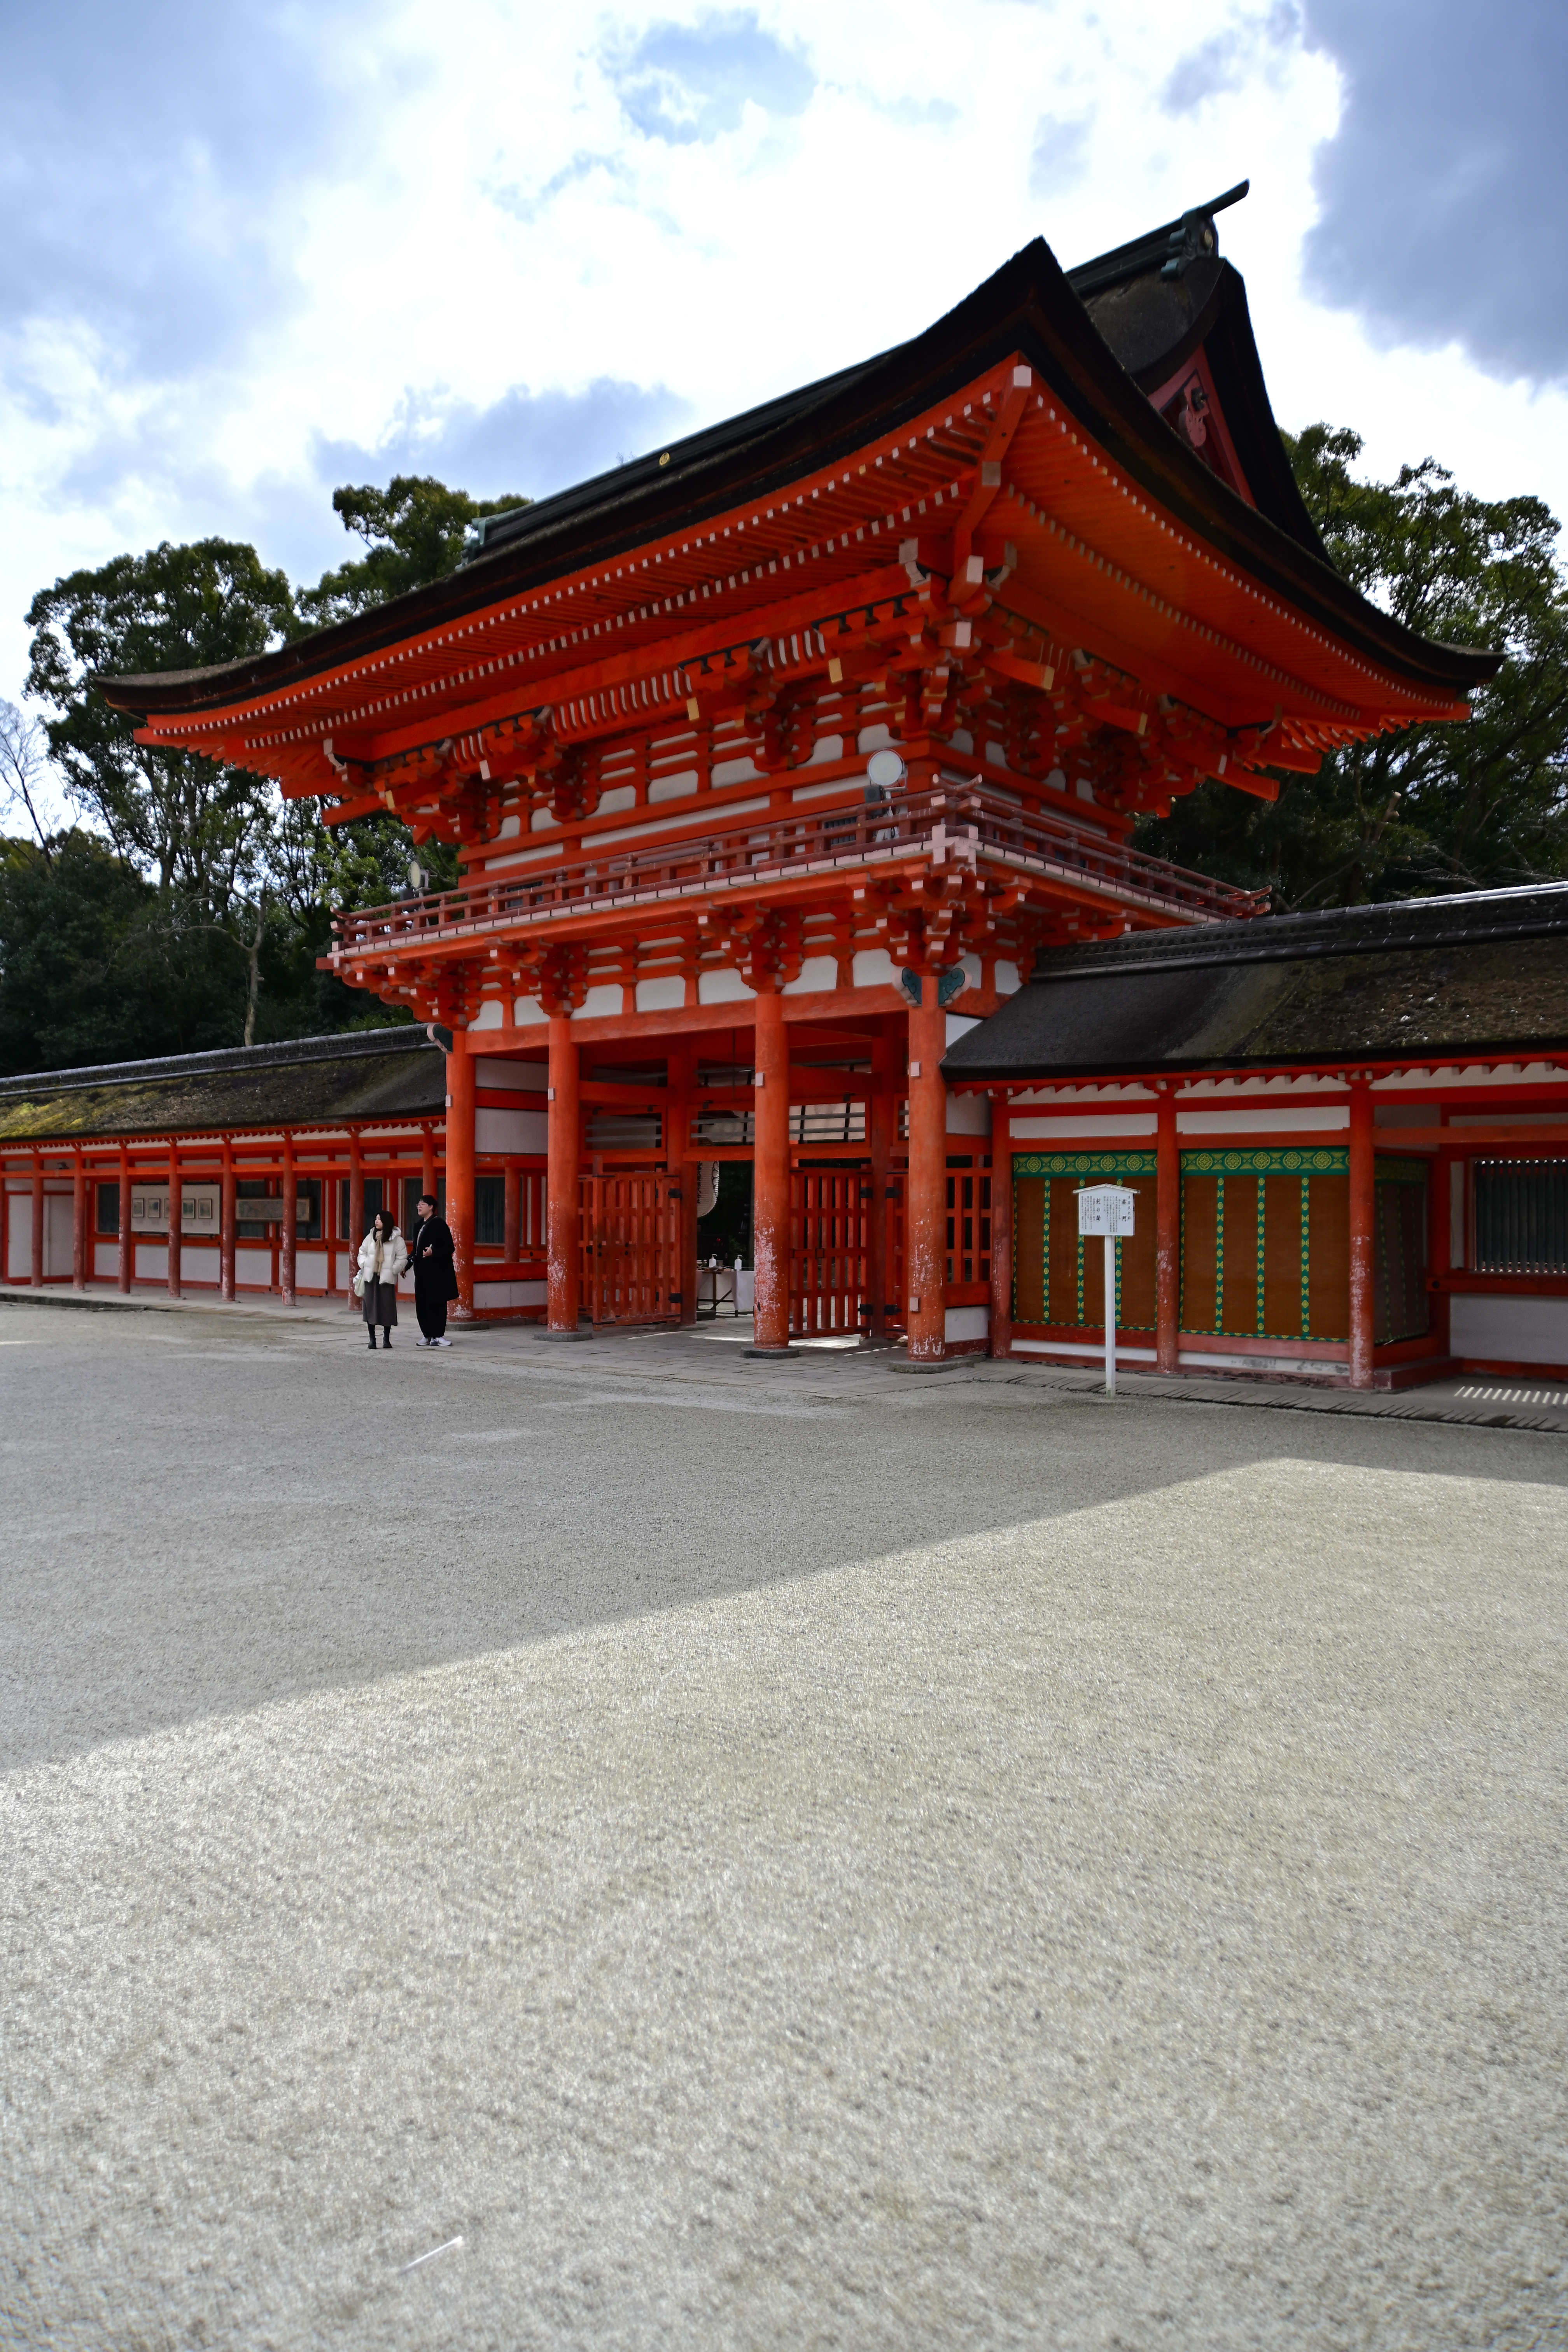
Zf + FTZ II w/ Ai AF Zoom Nikkor 24-85mm f/2.8-4D IF
Focal length: 24 mm
Aperture: f/2.8 (maximum aperture)
Shutter speed: 1/6400 s
Exposure compensation: -0.3 EV
Sensitivity: ISO 400
Image quality: RAW
White balance: Auto
D-Lighting: High
Picture Control: Rich Tone Portrait
Date of capture: March 2025
Sample 1
Sample 1 is a photo of a relatively distant subject captured at the maximum wide-angle focal length of 24 mm. I focused near the pillar. I used a high D-Lighting setting to lift the shadows and make it easier to judge image quality. You can see from the clarity with which details in the building are reproduced that resolution is excellent from the center of the frame to the edges. In addition, there is no distracting ghost or flare, despite the backlighting.

Zf + FTZ II w/ Ai AF Zoom Nikkor 24-85mm f/2.8-4D IF
Focal length: 50 mm
Aperture: f/3.5 (maximum aperture)
Shutter speed: 1/320 s
Exposure compensation: -0.3 EV
Sensitivity: ISO 400
Image quality: RAW
White balance: Auto
D-Lighting: Auto
Picture Control: Vivid
Date of capture: March 2025
Sample 2
Sample 2 was captured at the mid-range focal length of 50 mm. The subject was photographed at an intermediate distance, somewhat closer than in Sample 1. I focused on the nearest paper lantern. You can see how sharply details along the focal plane were reproduced and just how well shadows and tones were rendered.

Zf + FTZ II w/ Ai AF Zoom Nikkor 24-85mm f/2.8-4D IF
Focal length: 85 mm
Aperture: f/4 (maximum aperture)
Shutter speed: 1/2500 s
Exposure compensation: -1 EV
Sensitivity: ISO 400
Image quality: RAW
White balance: Auto
D-Lighting: Auto
Picture Control: Vivid
Date of capture: March 2025
Sample 3
Sample 3 was captured at the maximum telephoto position of 85 mm. I focused on the wooden lattice at the center of the frame. I chose a relatively flat subject that allows for an edge-to-edge evaluation of performance. This image exhibits superior resolution to the edges of the frame.

Zf + FTZ II w/ Ai AF Zoom Nikkor 24-85mm f/2.8-4D IF
Focal length: 24 mm
Aperture: f/2.8 (maximum aperture)
Shutter speed: 1/3200 s
Exposure compensation: -1/3 EV
Sensitivity: ISO 400
Image quality: RAW
White balance: Auto
D-Lighting: High
Picture Control: Rich Tone Portrait
Date of capture: March 2025
Sample 4
Sample 4 was captured at the maximum wide-angle position of 24 mm at a relatively close distance. You can see that sufficiently good resolution is maintained not only at the center of the frame, but also to the edges of the frame. However, slight distortion causes the top horizontal board of the rack-like structure to appear slightly curved.

Zf + FTZ II w/ Ai AF Zoom Nikkor 24-85mm f/2.8-4D IF
Focal length: 40 mm
Aperture: f/3.3 (maximum aperture)
Shutter speed: 1/1600 s
Exposure compensation: -0.3 EV
Sensitivity: ISO 400
Image quality: RAW
White balance: Auto
D-Lighting: Auto
Picture Control: Rich Tone Portrait
Date of capture: March 2025
Sample 5
Sample 5 was captured at the mid-range focal length of 40 mm at close range. I focused on the three face-painted wooden votive plaques in the center of the image. Resolution and contrast at this short distance are both excellent. While the background bokeh at this shooting distance cannot exactly be described as beautiful, there is no sign of double-line bokeh. The rendering is more than adequate for practical use.

Zf + FTZ II w/ Ai AF Zoom Nikkor 24-85mm f/2.8-4D IF
Focal length: 50 mm
Aperture: f/3.5 (maximum aperture)
Shutter speed: 1/640 s
Exposure compensation: -0.3 EV
Sensitivity: ISO 400
Image quality: RAW
White balance: Auto
D-Lighting: Auto
Picture Control: Rich Tone Portrait
Date of capture: March 2025
Sample 6
Sample 6 was captured at the mid-range focal length of 50 mm at close range, approaching very close range. The entire array of face-painted wooden votive plaques lies within the focal plane. Again, I chose a relatively flat surface. Good resolution, contrast, and color reproduction are maintained throughout the frame.

Zf + FTZ II w/ Ai AF Zoom Nikkor 24-85mm f/2.8-4D IF
Focal length: 85 mm
Aperture: f/4.5
Shutter speed: 1/125 s
Exposure compensation: ±0 EV
Sensitivity: ISO 450
Image quality: RAW
White balance: Auto
D-Lighting: Auto
Picture Control: Rich Tone Portrait
Date of capture: March 2025
Sample 7
Sample 7 was captured at the maximum telephoto position of 85 mm at close range. I focused on the knot in the red-and-white sacred rope. You can see that both resolution and contrast are good. While the background bokeh at this shooting distance cannot exactly be described as beautiful, the onset of double-line bokeh is barely kept in check. Overall, the rendering remains adequate for practical use.

Zf + FTZ II w/ Ai AF Zoom Nikkor 24-85mm f/2.8-4D IF
Focal length: 85 mm
Aperture: f/4 (maximum aperture)
Shutter speed: 1/125 s
Exposure compensation: -0.3 EV
Sensitivity: ISO 400
Image quality: RAW
White balance: Auto
D-Lighting: Auto
Picture Control: Rich Tone Portrait
Date of capture: March 2025
Sample 8
Sample 8 was captured at the maximum telephoto position of 85 mm at very close range. I focused on the near tea bowl and the top of the rear rice cake. You can see that both resolution and contrast are good, and that foreground and background bokeh are smooth, resulting in good three-dimensional rendering characteristics.

Zf + FTZ II w/ Ai AF Zoom Nikkor 24-85mm f/2.8-4D IF
Focal length: 85 mm (macro range)
Aperture: f/4.5
Shutter speed: 1/6400 s
Exposure compensation: ±0 EV
Sensitivity: ISO 400
Image quality: RAW
White balance: Auto
D-Lighting: Auto
Picture Control: Rich Tone Portrait
Date of capture: March 2025
Sample 9
Sample 9 is a macro shot captured at the maximum telephoto position of 85 mm. I focused on the cherry blossom stamens. Resolution along the focal plane is good, and while some color fringing is visible in blurred portions, the bokeh itself is smooth, resulting in good three-dimensional rendering characteristics.

Zf + FTZ II w/ Ai AF Zoom Nikkor 24-85mm f/2.8-4D IF
Focal length: 85 mm (-0.5x magnification)
Aperture: f/4.5
Shutter speed: 1/6400 s
Exposure compensation: ±0 EV
Sensitivity: ISO 400
Image quality: RAW
White balance: Auto
D-Lighting: Auto
Picture Control: Rich Tone Portrait
Date of capture: March 2025
Sample 10
Sample 10 is also a macro shot captured at the maximum telephoto position of 85 mm, near its maximum magnification of -1/2x. I focused on the cherry blossom stamens again for this shot. It is clear that the lens offers superior resolution, and while some color fringing is visible in blurred portions, color reproduction is excellent. Background bokeh is especially smooth, resulting in good three-dimensional rendering characteristics.
VII. What is a gull-wing aspherical lens?
What exactly is a so-called "gull-wing aspherical lens"? The term has been buzzing around the industry in recent years. You may well have heard about it. In this Tale, I'll provide an easy-to-understand explanation of this new lens technology. Take a look at Fig. 7.
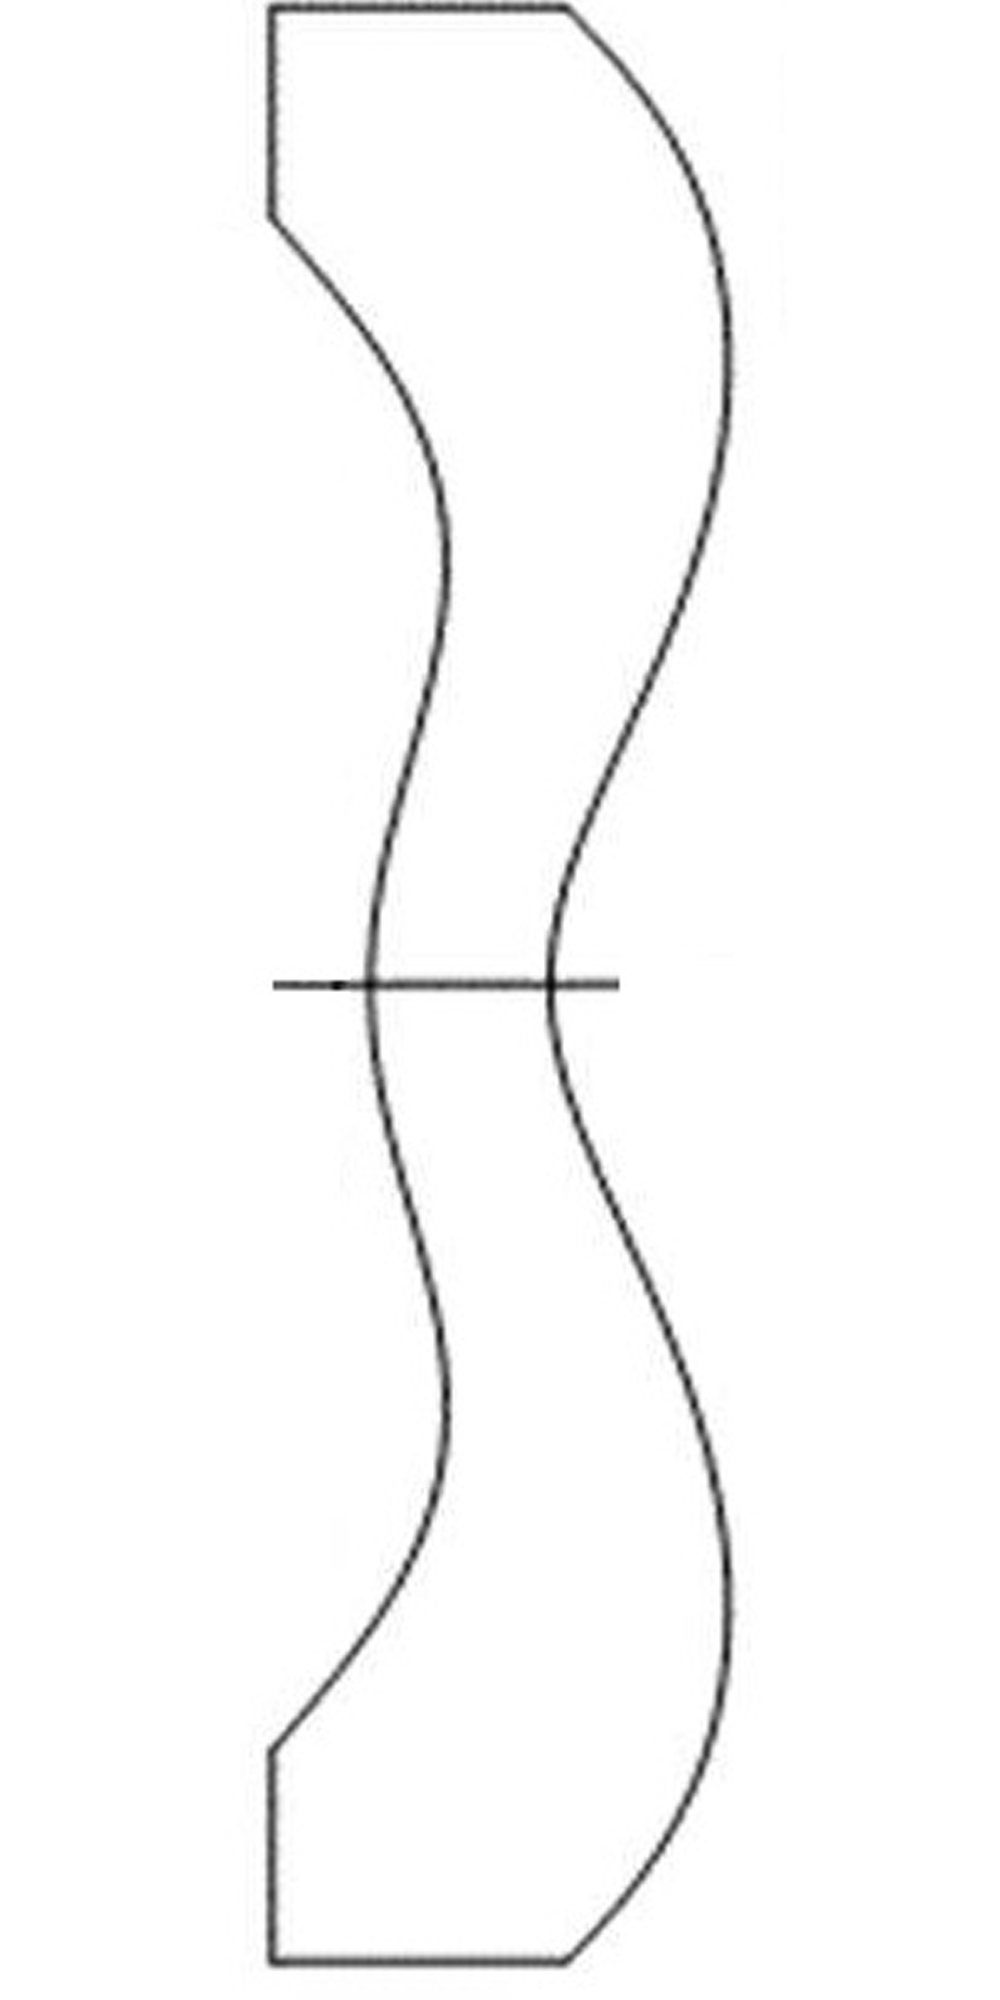
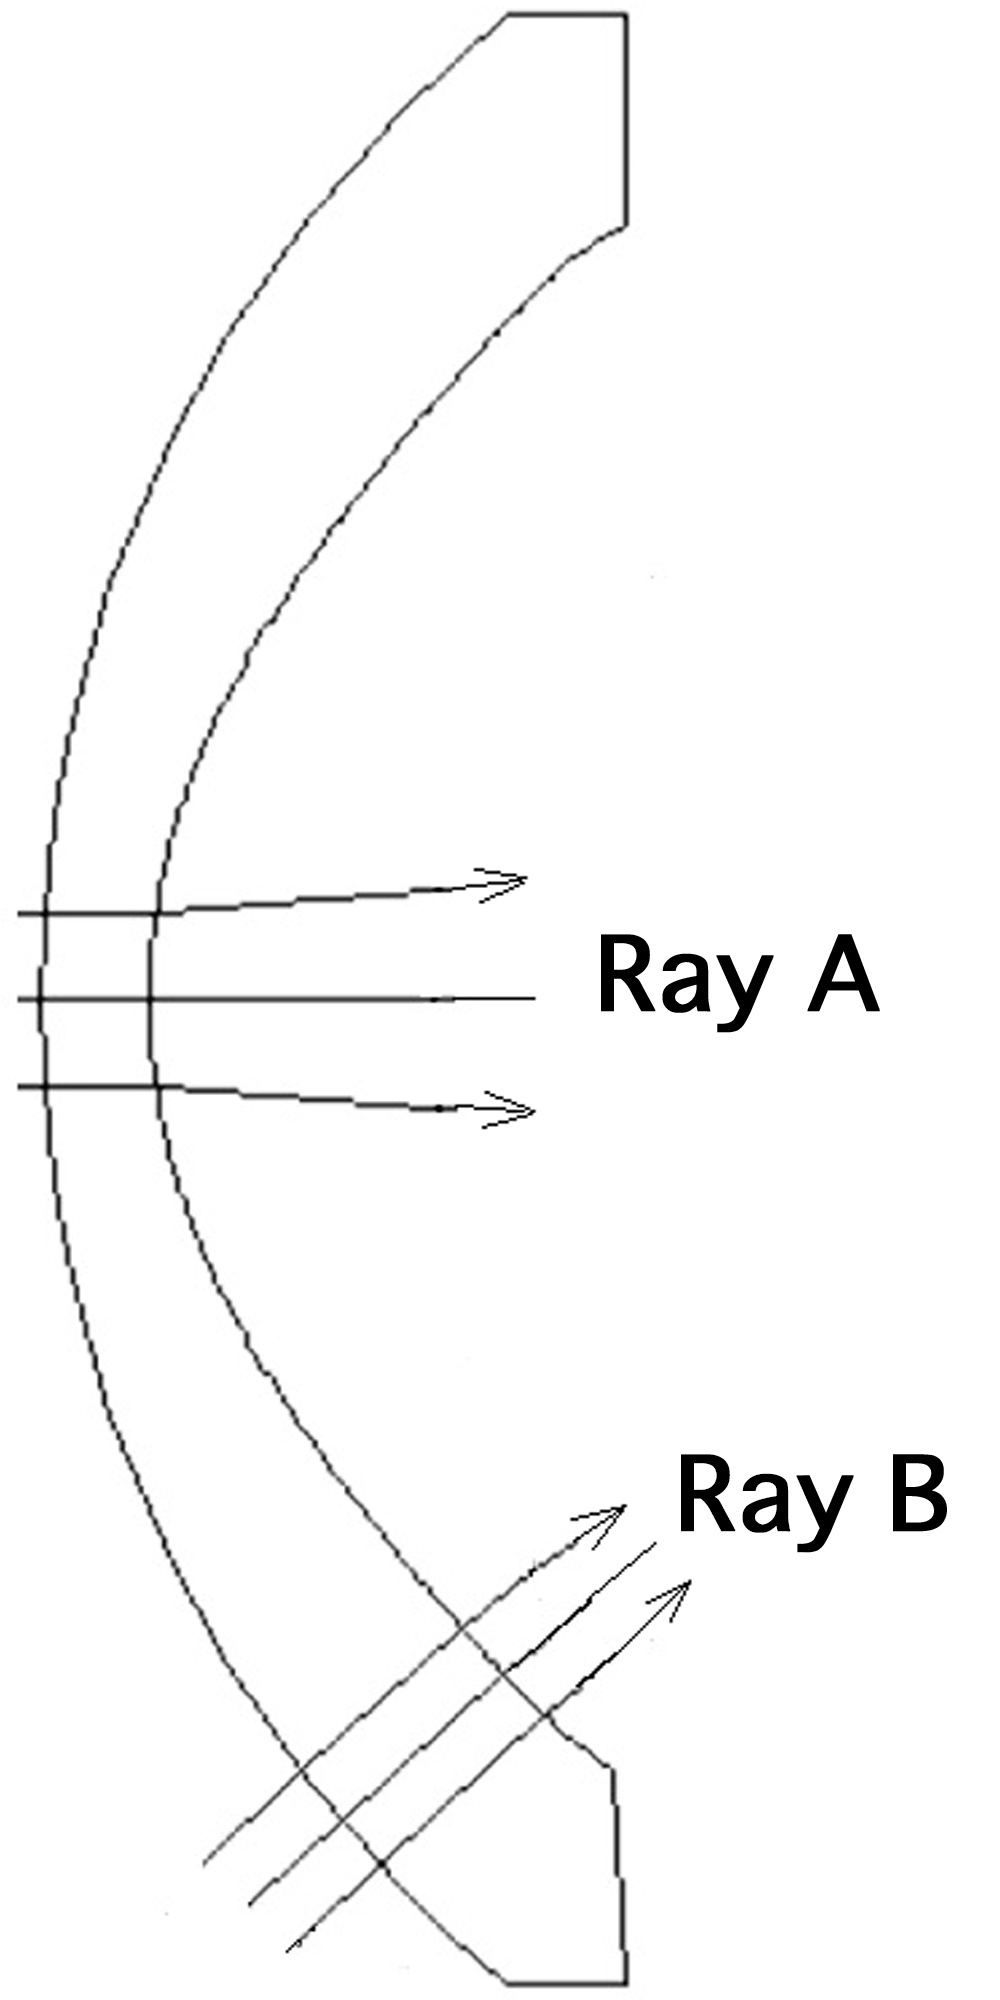
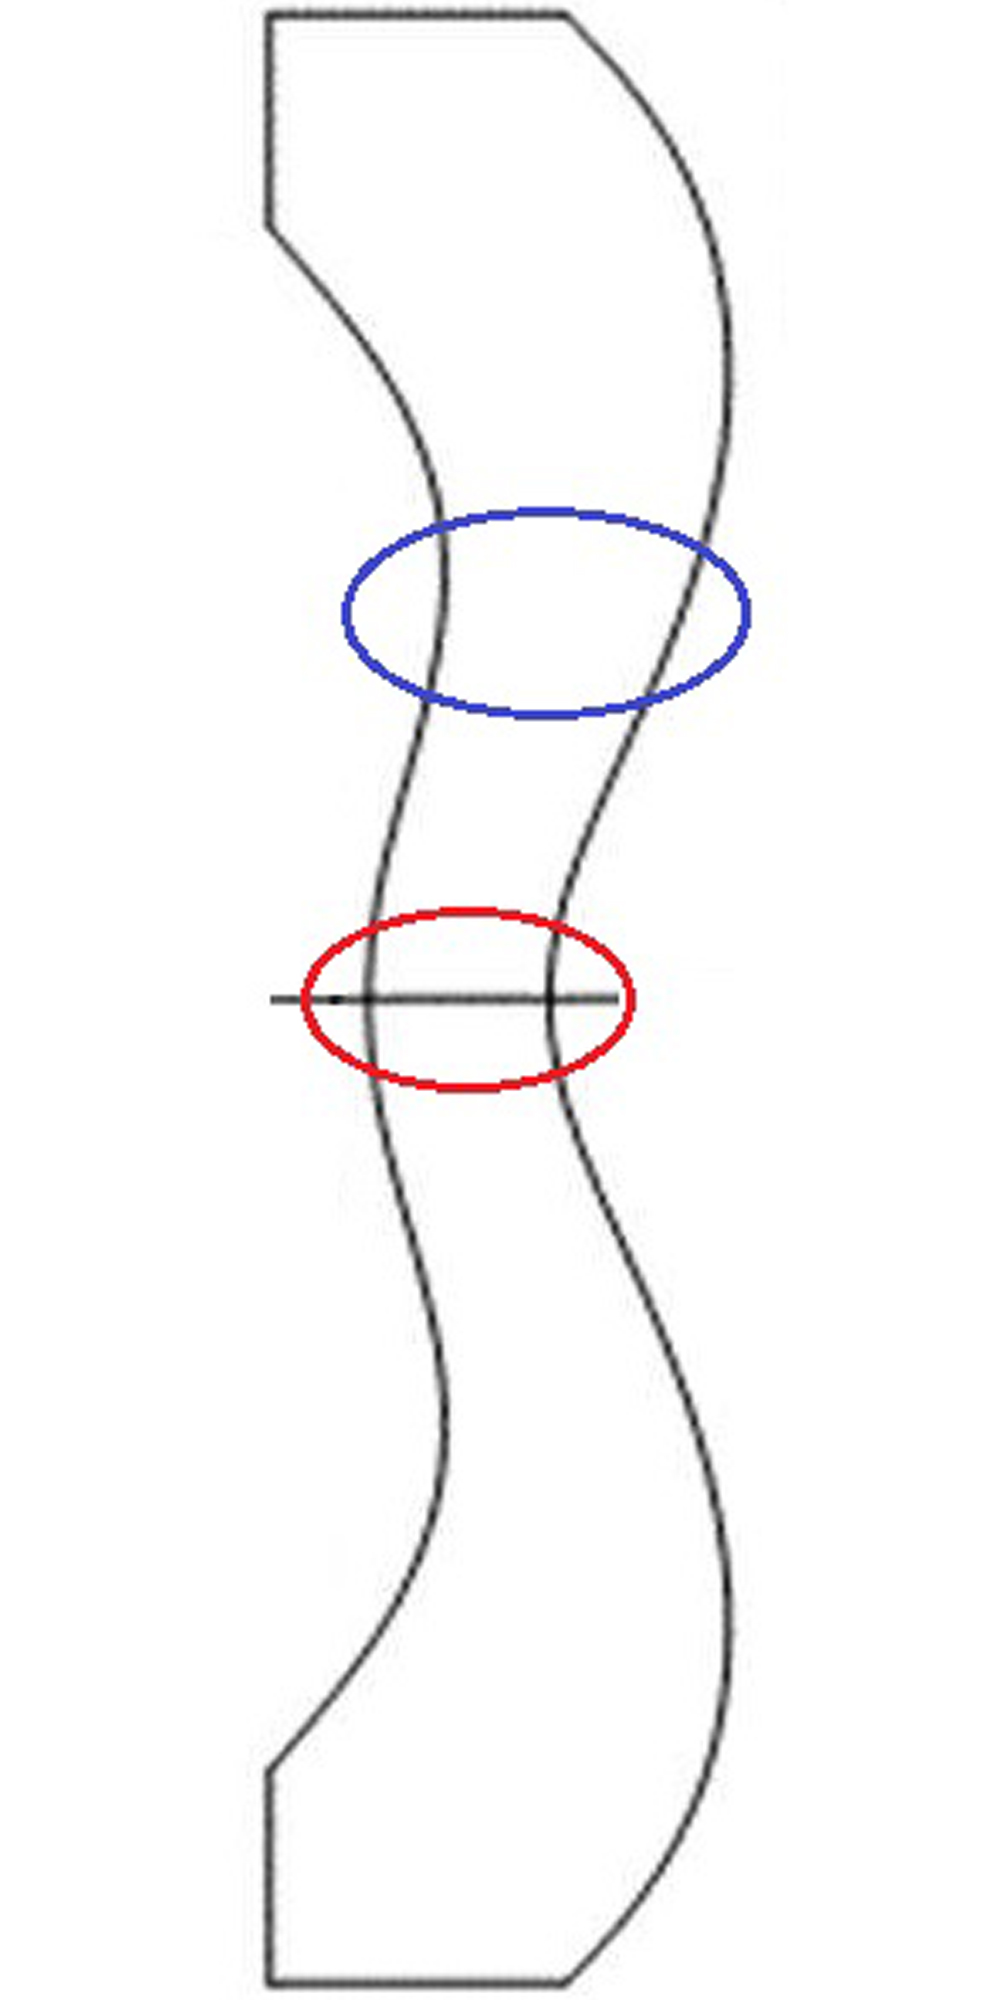
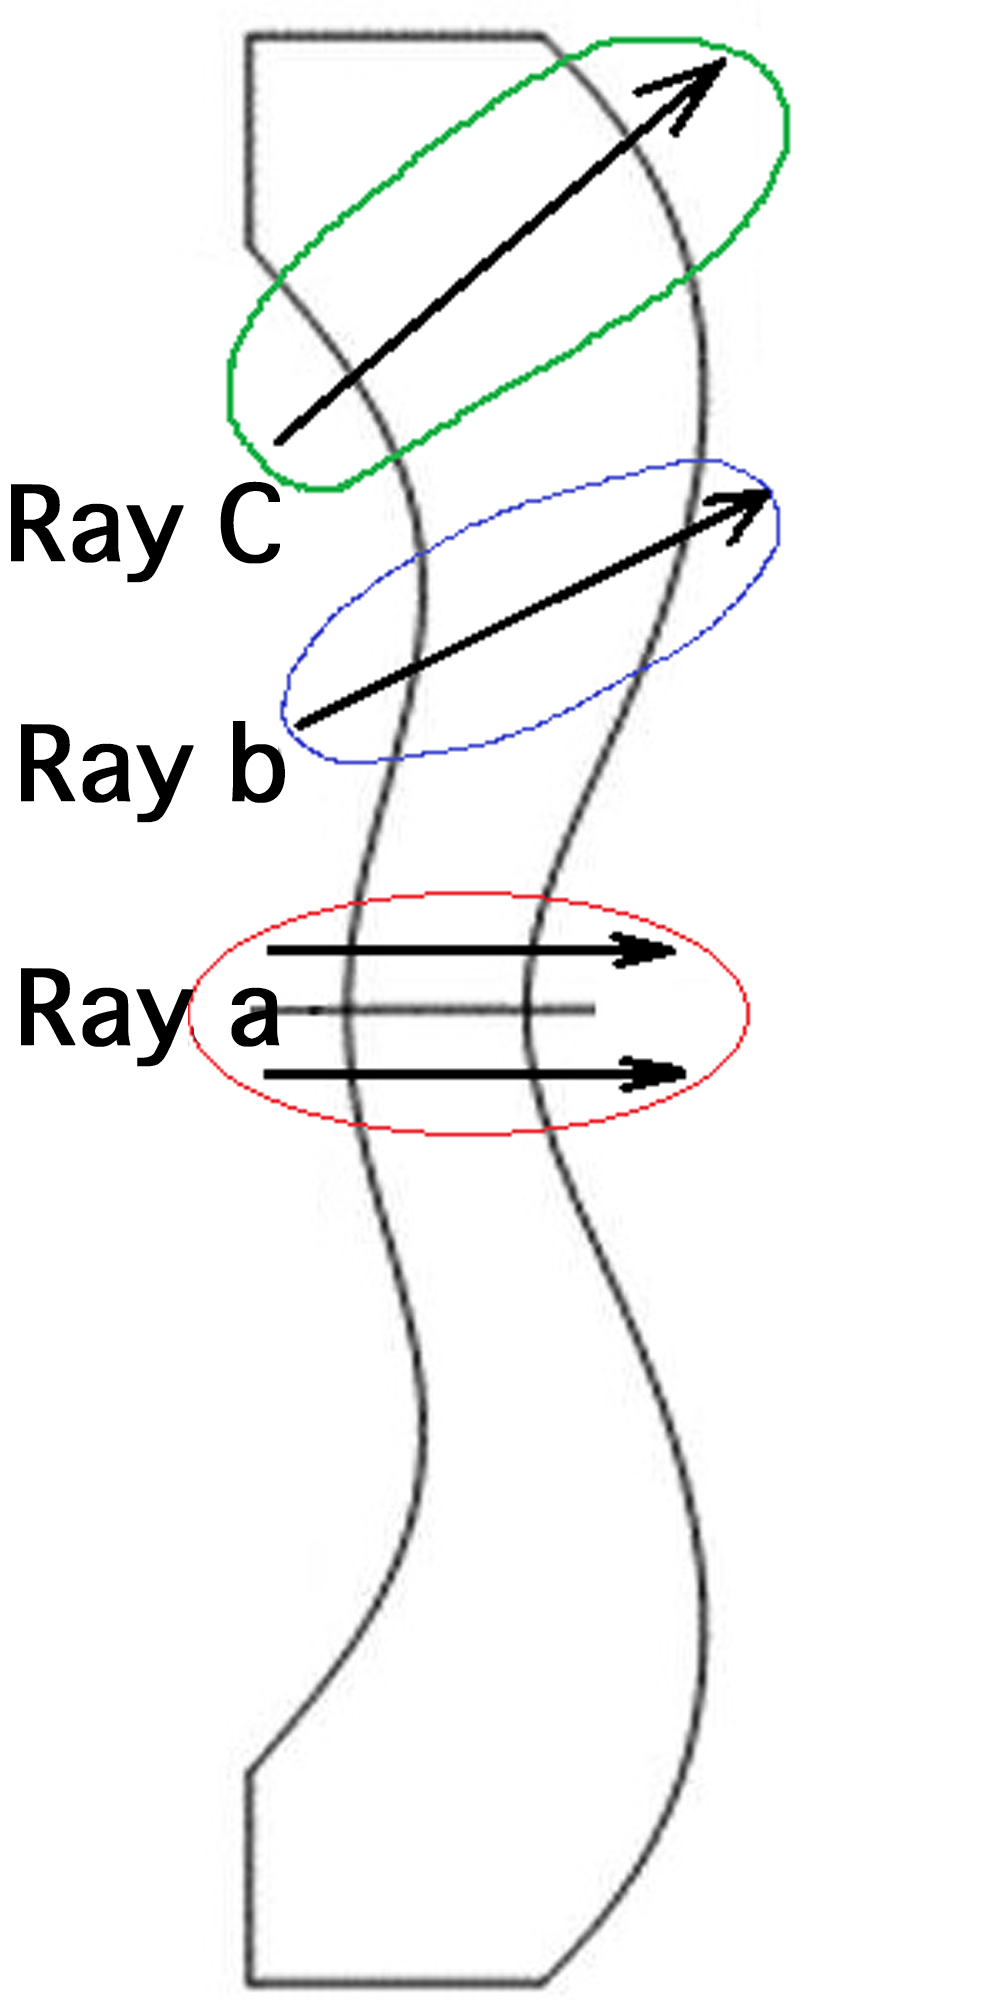
If you turn it on its side, doesn't it look like a seagull flapping its wings? These aspherical lenses, with their dramatically undulating shape that makes it difficult to tell whether they are convex or concave, are known as "gull-wing aspherical lenses". As I previously explained, we have gradually learned to design and manufacture aspherical lenses that are increasingly aspherical, eventually leading to the extremely shaped lens elements we see today. Such designs became possible only through advances in molded aspherical lens manufacturing technology. The development of new, unconventional aspherical lenses and advances in manufacturing technology are truly like the two wheels of a cart. Lens design is fundamentally dependent on manufacturing technology. So why are such dramatically shaped aspherical surfaces necessary? At first, aspherical lens design began evolving from simpler forms such as the one shown in Fig. 8. In the early days of aspherical lenses, their shapes were relatively simple. From the optical axis (the center of the lens) to the periphery, the concave or convex refractive power decreased only gradually. From an optical design standpoint, however, designers sought to make greater use of aspherical surfaces for aberration correction. This led to the development of a new way of designing aspherical lenses, illustrated in Fig. 8. Take a look at rays A and B in Fig. 8. Further refinement of the aspherical design method used for the 24-85mm lens produced an unprecedented aberration-correction effect. For ray A, the element functions as a concave lens, while for ray B it functions as a convex lens. A single optical element thus acts as a concave lens near the center and as a convex lens toward the periphery. Applying this aspherical design method may make it possible to design ultra-thin lenses that were previously impossible. This design approach proved particularly valuable in the development of smartphone camera lenses. The dedicated efforts of optical designers to refine their craft led to the evolution of aspherical design techniques that eventually produced shapes like that shown in Fig. 9, where refractive power changes drastically over localized regions. Take a close look at the red and blue portions in Fig. 9. What is happening in those small areas? Fig. 10 provides the answer. Ray a is subject to almost no refraction and passes straight through. Ray b, however, enters at a slight field angle. In this area, the lens effectively serves as a concave lens. Ray C, which enters at an even greater field angle, encounters a shape that acts as a gentle convex lens. Therefore, the gull-wing aspherical lens can be described as the result of subdividing the lens surface and optimizing imaging performance at each image point. Optical design evolved from the development of photographic objective lenses. Today, however, camera lens technology is benefiting from design and manufacturing techniques originally developed for smartphones. The two fields keep each other moving forward through mutual innovation and competition. The world of optical design continues to expand, finding applications in a wide variety of fields. Indeed, necessity is the source of innovation. It will be fascinating to see how this technology continues to evolve.
NIKKOR - The Thousand and One Nights
The history of Nikon cameras is also that of NIKKOR lenses. This serial story features fascinating tales of lens design and manufacture.