NIKKOR The Thousand and One Nights No.97
The Path to the Classic Standard Lens
-New Nikkor 50mm F1.4S-
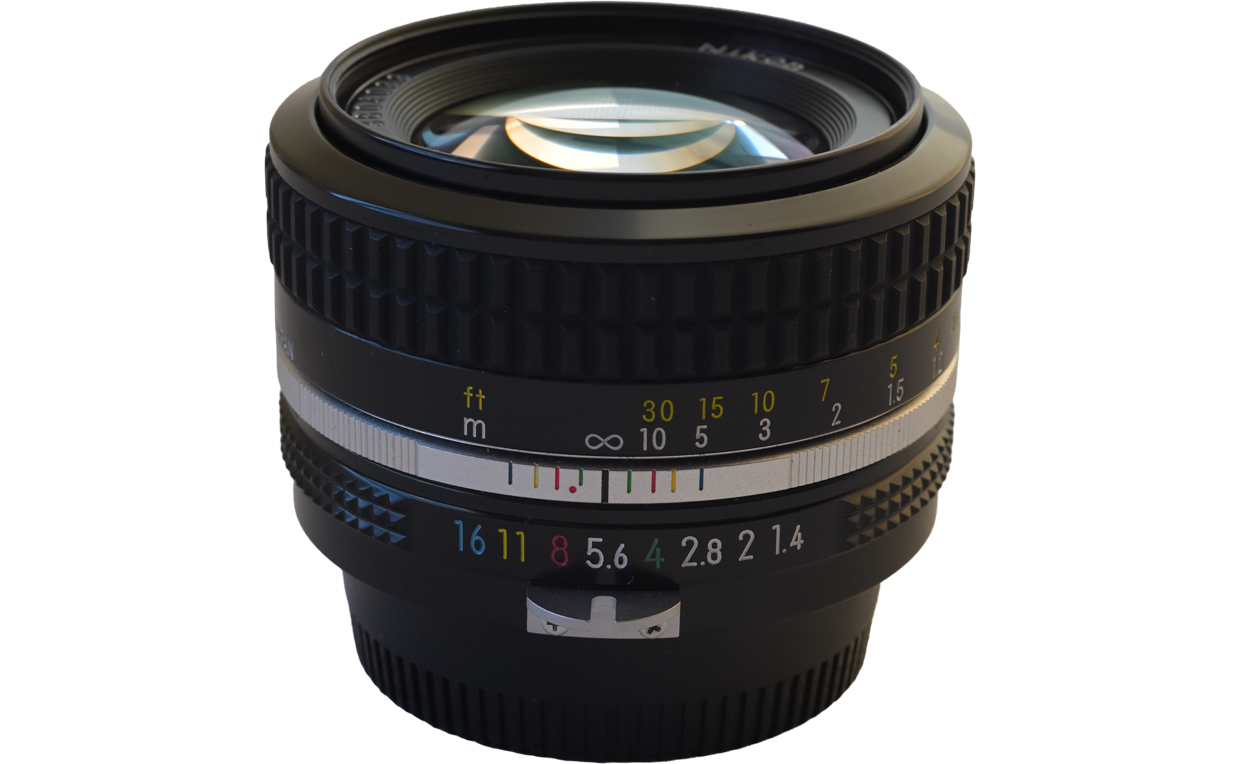
In Tale 97, we'll explore the new Nikkor 50mm F1.4S. It is a revamped version of the Nikkor-S Auto 50mm F1.4-Zenji Wakimoto's masterpiece, which became a global standard. Who was selected to design the new lens, and just what was this standard lens that would become the new face of the NIKKOR brand? This classic standard lens remained true to its fundamental design over the ages, from the Nikon F2 to the F5. What were the stories and challenges behind its development? In this Tale, we'll take a closer look at this classic standard lens, the new Nikkor 50mm F1.4S.
By Haruo Sato
I. Development history and the designer
Now let's take a look at the development history of the new Nikkor 50mm F1.4S. The optical design report for this lens was submitted on December 4, 1973. However, these reports were often submitted after design work had been completed and mass production had begun. This lens was no exception. It is highly likely that development planning and design began before 1972. Records show that the prototype production began, with prototype drawings issued, on February 2, 1973. Unfortunately, it seems the results were less than satisfactory. Records indicate that improvements to central resolution and flare were needed. The design was modified, and the second round of trial production began on November 24, 1973. This was the 50mm F1.4 optical system that was released to the world. In addition to the modification of the optical system, efforts were made to make the lens barrel more compact and to further refine the exterior design. After a complete redesign of the lens barrel, the new Nikkor 50mm F1.4S-commonly referred to as the later version-was made even smaller, with major updates not only to the optical system but also to the internal barrel structure and external appearance. After the release of the mass production drawings, production of the new Nikkor 50 mm F1.4S began on March 29, 1975. The lens was successfully released in Japan in April of 1975.
Who designed the optics? It was Yoshiyuki Shimizu, a protégé of Zenji Wakimoto, who designed this next generation standard lens. Shimizu further refined his mentor's design, improving upon the Nikkor-S Auto 50mm F1.4, which truly became a global standard. These further improvements were the greatest challenge. As a loyal protégé of Wakimoto, Shimizu was torn. It seems that Shimizu often continued Wakimoto's work. In fact, the patent for the Nikkor-S Auto 50mm F1.4 was filed jointly by Wakimoto and Shimizu. Shimizu was likely charged with assisting Wakimoto with design and mass production planning. Given this mentor protégé relationship, Shimizu must have felt conflicted. Part of his inner conflict was the unparalleled joy he felt with this assignment. Such feelings-beyond what words can express-must have run deep in Shimizu's heart. I learned a new fact while researching the prototype and mass production histories for this lens. According to records, Shimizu was, without a doubt, in charge of the first two prototypes. With improvements extending even to the lens barrel, the new lens marked a major milestone for the NIKKOR. However, once mass production began, management of the lens was turned over to Sei Matsui. I suspect Shimizu was very busy and productive, so probably left mass production to his colleague as he began work on the next new design. For many years, I was convinced that Matsui had designed the new Nikkor 50mm F1.4S. It was only after a thorough investigation that I discovered the truth.
II. Lens construction and characteristics
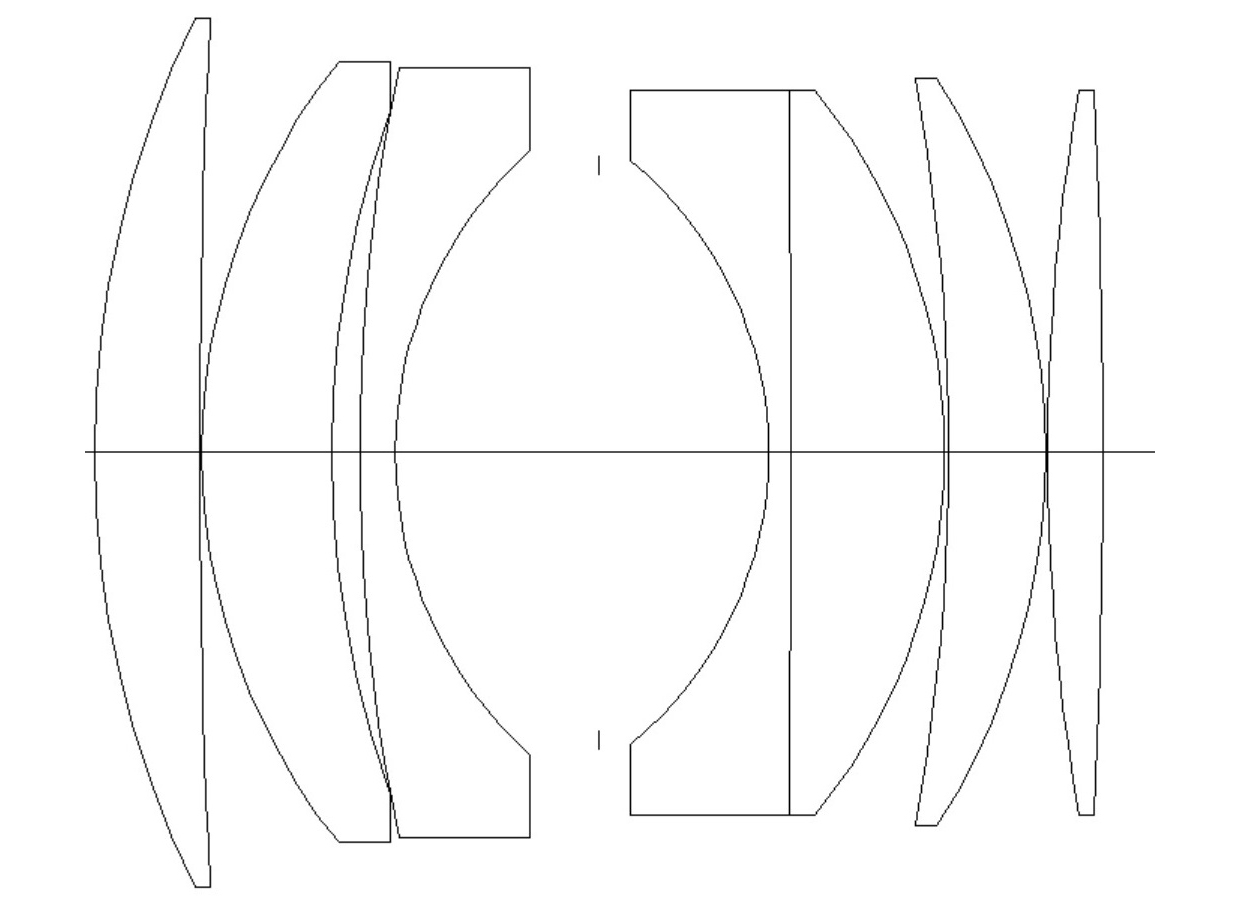
Now, take a look at the cross section of the new Nikkor 50mm F1.4S (Fig. 1). Please forgive me if the following is quite technical. This cross section shows a typical Gaussian optical system. The portion in front of the aperture consists of three separate (convex-convex-concave) elements, while the portion behind the aperture is made up of a cemented concave-convex doublet and two separate convex elements. As a distinctive design technique, the concave element in the front group uses glass with a lower refractive index than that of the two convex elements. Likewise, in the cemented doublet of the rear group, the concave element also has a lower refractive index than the convex element — an arrangement known as the "new achromatic doublet" design. The two convex elements at the rear of the structure also have high refractive indexes, but the sixth element is made of glass with a slightly lower refractive index than that of the second concave element. General readers may not grasp the meaning of this, but this paraxial quantity is the key to optical design. A paraxial quantity can be likened to the foundation work in skyscraper construction. If foundation work is neglected, the intended building can't be built. As the analogy goes, paraxial quantities are the basis of optical design. The key point here is the Petzval sum, which is one of the principal paraxial quantities. This is a good opportunity for a simple explanation.The Petzval sum is calculated using the following simple formula as a paraxial quantity:
Formula 1: P.S. = Σ(1/(nxf))
where n is the refractive index of the glass and f is the focal length (mm) of each element.
When the value is 0, the image plane is flat in the paraxial region. The image plane determined by this value is called the Petzval surface. Therefore, without optimizing the refractive indices of the glass and the focal lengths of the convex and concave elements, curvature of field cannot be eliminated, regardless of the amount of aberration correction attempted. Further, even if an objective lens consists of many elements, it is, as a whole, a convex lens. Therefore, in typical aberration-corrected objective lenses, spherical and other aberrations are qualitatively expected to remain negative. If this is the case, using a slightly positive (higher than 0) Petzval sum makes it possible to expand the range of good image quality to the edges of the image plane. Narrow-angle telescopes and slow telephoto objective lenses can be designed without much concern for the Petzval sum, but the wider the angle of view, the more dominant the Petzval sum becomes in determining optical performance. However, in the case of cemented convex-concave doublets (and concave-convex doublets), good spherical aberration correction is not possible unless the refractive index of the convex element is lower than that of the concave element. Therefore, in the Gaussian type, if the refractive index of the convex element in a cemented doublet is higher than that of the concave element, the cemented interface cannot be expected to contribute to the correction of spherical aberration. As a result, the cemented interface may limit the use of faster (larger) apertures. The practical solution is to use separate convex and concave elements instead of a cemented doublet. However, it's not that simple. The issue here is the achromatic effect. Cementing the elements remains the most effective way to correct chromatic aberration. Here's a little more knowledge for you- the achromatic condition (the two wavelength achromatic condition):
Formula 2: Σ(1/(vdxf)) = 0
where vd is the Abbe number (a measure of the dispersion of the glass material) and f is the focal length (mm) of each element.
For example, an objective lens for an astronomical telescope with a convex-concave two-element structure:
Formula 3:
1 f1v1 + 1 f2v2 =0
The first element is a convex lens with a positive focal length, whereas the second element is a concave lens with a negative focal length. Therefore, this equation holds for a concave-convex two element configuration.
The issue here is the degree of flexibility in glass selection. Take a look at the following chart. As shown below, optical glasses are represented on a glass map using nd and νd. The vertical axis shows the d line refractive index (nd), and the horizontal axis shows the Abbe number (νd).
As you can see, there is a certain trend in the distribution of the glasses that can be used.

As you can see, glasses with larger Abbe numbers (lower dispersion) have lower refractive indices. As the refractive index increases, the Abbe number tends to decrease (higher dispersion). To achieve achromatism in an objective lens, the convex element must be constructed of a low-dispersion glass and the concave lens of a high-dispersion glass. These days, thanks to the tireless efforts of glass manufacturers, there is a tremendous number of glasses available. However, in the days in which Petzval himself lived and defined the Petzval sum (around 1840), the only optical glasses available were the K (crown glass) and F (flint glass) shown on the glass map (Fig. 2). Therefore, the refractive index of the convex element was naturally lower than that of the concave element. When a doublet was taken as the basic configuration, it was impossible to satisfy both the conditions for achromatism and the Petzval sum simultaneously. In contrast to Petzval's time, the invention of LaSK and LaSF glasses has made it possible to use materials with a higher refractive index for convex elements than for concave ones. Ironically, it was Petzval himself who ended up struggling the most with the concept he had conceived.
What do you think? I know this explanation was very technical, but I hope it gives you some idea of the issues raised. The successful development and mass production of new optical glasses, such as LaSK, have made it possible to achieve both achromatism and a favorable Petzval sum, even in cemented convex-concave doublets. One major problem remained. That is the correction of spherical aberration. As I explained earlier, when the refractive index of the convex element in a cemented convex-concave doublet is higher than that of the concave element, the cemented interface cannot correct negative spherical aberration. That's right. Cemented elements make it difficult to correct negative spherical aberration, preventing the use of faster (larger) apertures. Design flexibility can be secured by separating the cemented doublet's convex and concave elements and leaving a small air gap between them. The use of this separated doublet produced a design that achieved an optimal Petzval sum and effective achromatic correction, while also allowing for spherical aberration correction. The key is that this new achromatic separated doublet, using novel glasses, offers the greatest design flexibility of any convex-concave achromatic doublet.Back to the main topic of this Tale. Remember the structure of the new Nikkor 50mm F1.4S. The earlier Nikkor-S Auto 50mm F1.4 also had a cemented doublet in the front group, as in the rear. However, that doublet was separated with the new version of the lens. Shimizu was well versed in the design of fast-aperture Gaussian lenses. The goal was to ensure maximum flexibility with Petzval sum optimization to achieve superior performance all the way to the edges of the frame with a fast f/1.4 aperture and 46° angle of view. It is clear that the design and selection of glass made this possible.
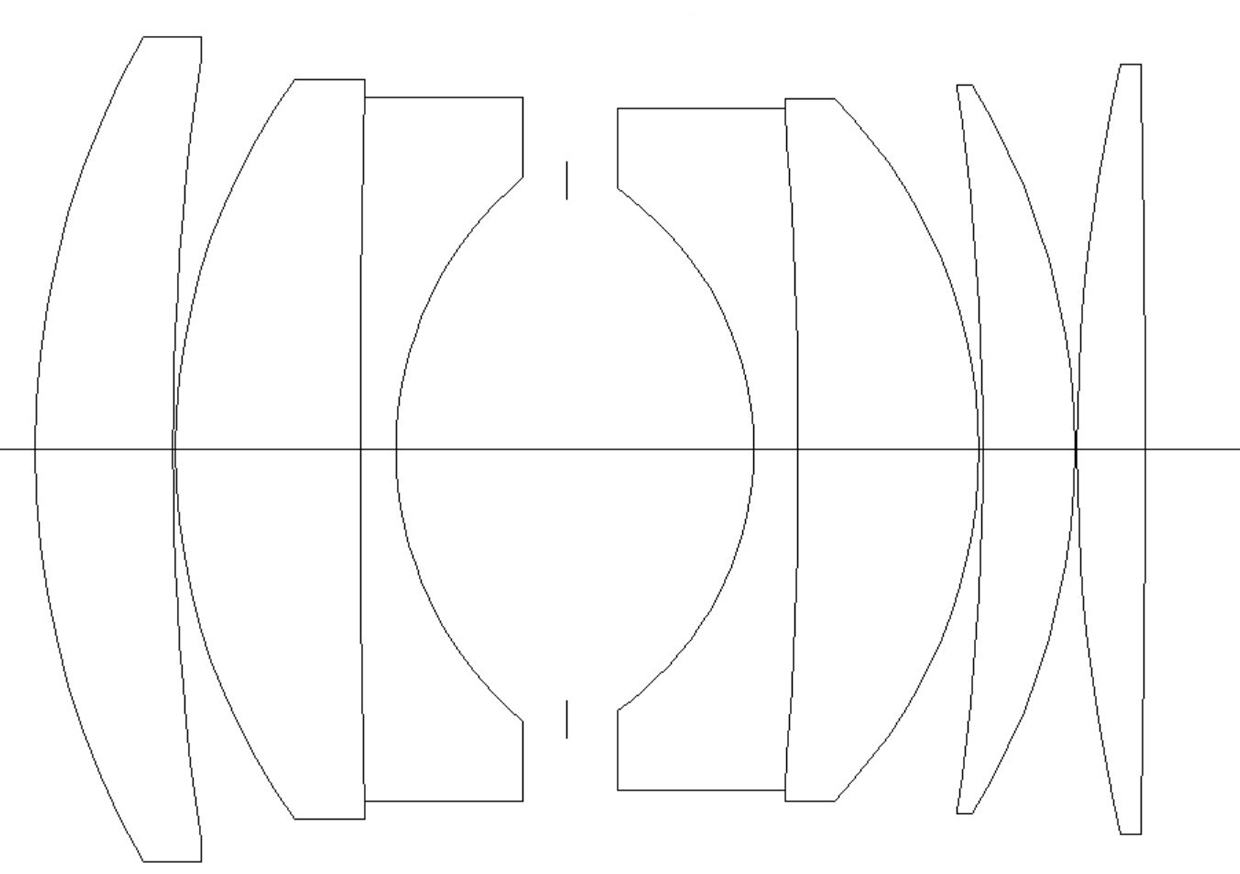
Fig. 3 shows a cross section of the Nikkor-S Auto 50mm f/1.4. See? The second and third elements are cemented. The glasses used ensured a higher refractive index for the convex element than for the concave element, which makes this the so-called new achromatic cemented doublet. That means that the cemented interface cannot correct negative spherical aberration. The same goes for the glasses used for the rear cemented doublet. This structure allows for greater flexibility in Petzval sum optimization, enabling better correction of off-axis aberrations including curvature of field and astigmatism, and offering great potential for increasing peripheral performance. However, this structure is at a disadvantage when it comes to correcting spherical aberration. I believe that achieving a fast f/1.4 aperture in particular would have presented great challenges. It is only now that I feel I have come to understand a part of Wakimoto's extraordinary efforts.
Going back to the original discussion, at first glance, the new Nikkor 50mm F1.4S might appear to differ from the Nikkor-S Auto 50mm F1.4 only in that the second and third lens elements have been separated. In fact, the glasses used are completely different, and the refractive indices of all the lens elements are higher across the board. Generally, the higher the refractive index of a lens, the greater the flexibility in correcting the five monochromatic Seidel aberrations. Further, this also increases possibilities for slimmer and more compact lenses because the optical path length increases in proportion to the refractive index. Naturally, Shimizu wasn't about to overlook this flexibility. He further enhanced the performance of his mentor Wakimoto's signature lens and, with a more compact design, he created a new Nikkor classic standard lens.
III. Design performance and evaluation
First let's look at design data. As I have always stated, evaluations are both subjective and relative. Please use my own evaluations merely as reference.
Let's take a closer look at the aberration correction characteristics of the new Nikkor 50mm F1.4S at infinity and at short distances. We'll begin with aberration performance at infinity. First, we'll look at axial chromatic aberration and spherical aberration. These two aberrations have tremendous influence over image quality at the center of the frame. While there is actually little axial chromatic aberration, it tends to be over-corrected. The g-line is over-corrected for light rays that fill the pupil. This means of correction effectively reduces the apparent secondary dispersion of axial chromatic aberration. As a result, point images for each color are more tightly concentrated, color reproduction improves, and the white MTF value increases. There is, however, one drawback. The likelihood of purple fringing increases. Gaussian lenses themselves are inherently incompatible with extra-low dispersion glass. This incompatibility remains a persistent issue and a major source of frustration for optical designers. Now let's look at spherical aberration. Spherical aberration reflects the balance preferred by Wakimoto with light rays around the edges of the pupil over-corrected. While there is some flare at maximum aperture, users can expect high-resolution images. Next, we'll look at aberrations that greatly impact performance at the edges of the frame. First, curvature of field and astigmatism. Curvature of field is slightly negative, but astigmatism is minimized for the optimal balance for a fast-aperture lens. Astigmatism is corrected up to approximately 90% of the image height. Asymmetric coma is well corrected to the extreme edges, maintaining the symmetry of point images in the meridional direction. Lateral chromatic aberration is almost negligible up to 80% of the image height, indicating excellent optical performance. However, sagittal coma, a shortcoming particular to Gaussian lenses, still occurs. Due to sagittal coma, point images become seagull-shaped from about 50% of the image height toward the edges, with the degree varying by position. Finally, distortion remains as low as approximately -1.5% at infinity.
Now we'll look at fluctuations in aberration at short distances. I previously noted that spherical aberration reflects the balance preferred by Wakimoto with only very slight overcorrection at the extreme edge of the pupil at infinity. This "Wakimoto balance" is not adopted simply to achieve high resolution at infinity. Qualitatively, in symmetrical objective lenses such as Gaussian lenses, when the aberration state at infinity focus is taken as the baseline, extending the entire lens to focus on a near object causes most aberration fluctuations-including spherical aberration, curvature of field, distortion, and chromatic aberration-to shift in the negative direction. In addition, off-axis lateral aberration often tends to shift toward outward coma. Wakimoto's research into the ever-present challenge of suppressing aberration fluctuations caused by changes in magnification led to his aberration correction balance. The "Wakimoto balance" can be described as an aberration correction method with which each type of aberration is slightly over-corrected at infinity. The "Wakimoto balance" appears to have been a general term for aberration correction methods that take even the fluctuations in aberration into account. Shimizu's proposed design also adheres to the very essence of the "Wakimoto balance." Moreover, he succeeded in suppressing fluctuations in aberration even better than Wakimoto did.
IV. Actual performance
Next let's look at results achieved with some actual images of distant scenes. I used a Nikon Zf and FTZ II mount adapter to capture the sample images for this Tale.
I will explain performance at each aperture setting in detail. Evaluations are subjective, and based on individual preferences. Please keep in mind that my opinions on sample images and evaluations are for reference purposes only.
f/1.4 (maximum aperture)
The lens exhibits relatively good resolution throughout 70% of the frame (0-70% of the image height). Flare, which is typical of older fast lenses, is present throughout the frame, but there is significantly less flare than with similar lenses. Purple fringing results from chromatic aberration associated with spherical aberration, rather than from axial or lateral chromatic aberration. However, it is in no way excessive when compared with similar lenses.
f/2
Stopping down the aperture one stop greatly reduces flare and contrast increases. Conversely, resolution near the center seems to have dropped slightly, while that at the edges of the frame had increased. This may be the results of a slight shift in the optimal focus position at the center of the frame. Color fringing remains only at the edges, but is completely eliminated at the center.
f/2.8
Flare is almost completely eliminated through the entire frame, and resolution at the center has been restored. Good image quality is achieved throughout the frame, though some color fringing does remain. With moderate contrast across the frame and rich tonal rendition, I would recommend this aperture setting for portraits.
f/4
Image quality is further increased. In particular, resolution is increased with more contrast at the center of the frame. Color fringing is almost eliminated even at the extreme edges of the frame.
f/5.6
Image quality seems even sharper throughout the frame. Image quality is perfect! Color fringing is completely eliminated.
f/8
Image quality seems even sharper throughout the frame. Images seem even sharper than they did at f/5.6. Image quality is perfect!
f/11
Consistently good image quality is maintained throughout the frame. Image quality is perfect! The recommended aperture settings for this lens are f/5.6 to f/11, especially when sharpness is required.
f/16
Contrast is good. There is a drop in resolution with some roughness, which reduces overall image quality. That is likely the result of diffraction. It is probably better not to stop down the aperture this much with normal shooting.
V. Sample images
Now let's confirm these rendering characteristics with some sample photos. This time I captured all samples with the aperture set to the maximum aperture of f/1.4.
As always, Picture Controls that apply less sharpening, such as [Portrait], are generally used so that readers may best judge the characteristics of the lens. I also avoided applying any special correction or sharpening adjustments.

Zf + FTZ II w/ new Nikkor 50mm F1.4S
Aperture: f/1.4 (maximum aperture)
Shutter speed: 1/8000 s
Exposure compensation: ±0 EV
Sensitivity: ISO 360
Image quality: RAW
White balance: Auto
D-Lighting: Extra high
Picture Control: Portrait
Date of capture: January 2025
Sample 1
Sample 1 is a photo of a relatively distant subject. The sacred straw rope (shimenawa) was the focal point. I used a high D-Lighting setting to lift the shadows and make it easier to judge image quality. You can see from the leaves, roof tiles, and other details that resolution is excellent not only at the center of the frame, but at the edges as well. Foreground bokeh is also pleasing and impressive, and there is no sign of the so-called swirly bokeh.

Zf + FTZ II w/ new Nikkor 50mm F1.4S
Aperture: f/1.4 (maximum aperture)
Shutter speed: 1/4000 s
Exposure compensation: ±0 EV
Sensitivity: ISO 400
Image quality: RAW
White balance: Auto
D-Lighting: Auto
Picture Control: Portrait
Date of capture: January 2025
Sample 2
Sample 2 was taken a little closer to a distant subject. The photo is completely backlit. I focused on a kumquat. Resolution along the focal plane is good, but I want to check rendering characteristics in front of and behind the focal point with this photo. First, the continuity of foreground bokeh is natural and very pleasing. Rendering of background bokeh can't always be considered good. Clear edges are visible around individual bokeh spheres. Background bokeh in this image was backlit, had a very high contrast ratio, and contained numerous small, high-frequency components. These are about the harshest conditions there are for evaluating bokeh. Despite that, no double-line bokeh is visible. Therefore, I would describe rendering of background bokeh under these conditions neither good nor bad.

Zf + FTZ II w/ new Nikkor 50mm F1.4S
Aperture: f/1.4 (maximum aperture)
Shutter speed: 1/2000 s
Exposure compensation: -0.7 EV
Sensitivity: ISO 400
Image quality: RAW
White balance: Auto
D-Lighting: High
Picture Control: Portrait
Date of capture: January 2025
Sample 3
Sample 3 was captured at an even closer, mid-range distance. The eyes of the lion were the focal point. Resolution at the center of the frame is clearly excellent.

Zf + FTZ II w/ new Nikkor 50mm F1.4S
Aperture: f/1.4 (maximum aperture)
Shutter speed: 1/800 s
Exposure compensation: -0.7 EV
Sensitivity: ISO 400
Image quality: RAW
White balance: Auto
D-Lighting: High
Picture Control: Portrait
Date of capture: January 2025
Sample 4
Sample 4 was captured at an even closer distance. Again, the focal point is the eye on the lion sculpture. You can see that superior resolution is maintained not only at the center of the frame, but also in intermediate portions. Background bokeh is decent. The bokeh quality varies depending on the subject's spatial frequency content and the luminance ratio of the scene. Sample 2 was backlit, had a very high contrast ratio, and contained numerous small, high-frequency components for about the harshest conditions there are for evaluating bokeh. Sample 4, however, has a relatively low contrast ratio and there isn't much detail. This shows that the new Nikkor 50mm F1.4S produces good background bokeh under conditions like those seen in Sample 4.

Zf + FTZ II w/ new Nikkor 50mm F1.4S
Aperture: f/1.4 (maximum aperture)
Shutter speed: 1/1250 s
Exposure compensation: -0.7 EV
Sensitivity: ISO 400
Image quality: RAW
White balance: Auto
D-Lighting: High
Picture Control: Flat
Date of capture: January 2025
Sample 5
Sample 5 is a close-up. I focused on the eyes of the komainu (lion dog). Resolution and contrast in intermediate portions of the frame are both good. Bokeh at this shooting distance isn't exactly beautiful. It falls just short of double-line bokeh. The background bokeh shows a luminance ratio and spatial frequency components roughly between those of Samples 1 and 4. In terms of three-dimensional rendering, this lens definitely seems quite practical.

Zf + FTZ II w/ new Nikkor 50mm F1.4S
Aperture: f/1.4 (maximum aperture)
Shutter speed: 1/1600 s
Exposure compensation: -0.7 EV
Sensitivity: ISO 400
Image quality: RAW
White balance: Auto
D-Lighting: Auto
Picture Control: Flat
Date of capture: January 2025
Sample 6
Sample 6 was captured at almost the minimum focus distance. The focus is on the eyes of the Ksitigarbha statue. Resolution, contrast, and colors are all pleasing. The three-dimensional rendering characteristics, including foreground and background bokeh, are excellent. Just look at this Sample. I have nothing more to add. I may be a bit biased, but I believe this sample fully showcases the rendering characteristics of the new Nikkor 50mm F1.4.

Zf + FTZ II w/ new Nikkor 50mm F1.4S
Aperture: f/1.4 (maximum aperture)
Shutter speed: 1/640 s
Exposure compensation: ±0 EV
Sensitivity: ISO 400
Image quality: RAW
White balance: Auto
D-Lighting: Auto
Picture Control: Portrait
Date of capture: January 2025
Sample 7
Sample 7 was captured at the minimum focus distance of 0.45 m. I focused on the bottom character on the bamboo ladle. You can see that both resolution and contrast are good, but areas with a high luminance ratio exhibit bokeh spheres with strong edges in both foreground and background bokeh. However, bokeh is gentler in areas with a low luminance ratio. Compare this with Sample 6 bokeh. It's hard to believe they are the result of the same lens. As you can see, evaluating bokeh is very difficult. The luminance ratio, and the scene's frequency components and defocus value must be standardized before you shoot under a variety of conditions, and then make a comprehensive determination using a large number of images.
VI. The benefits of air lenses
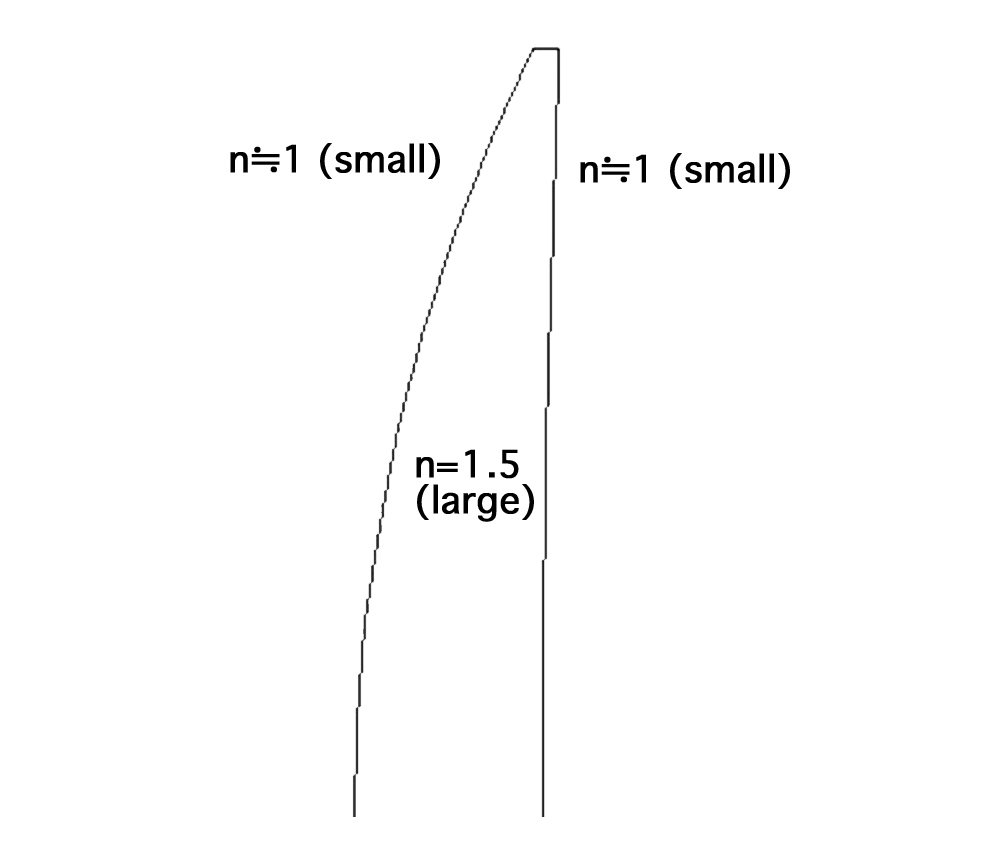
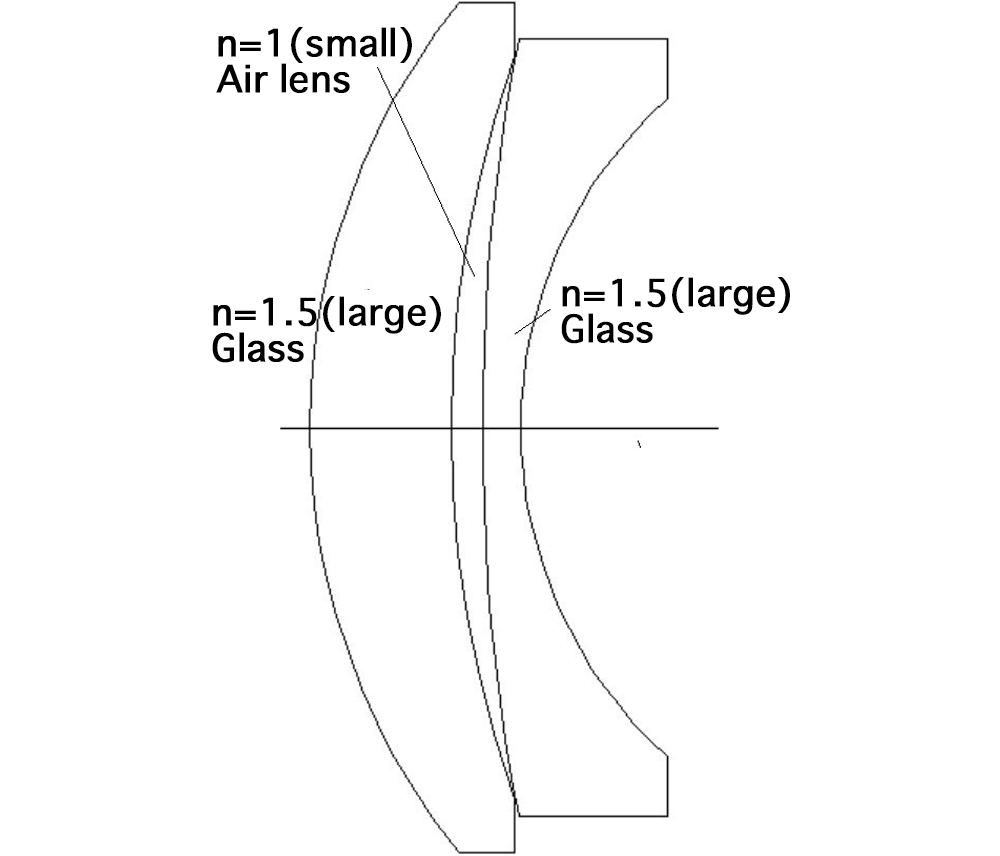
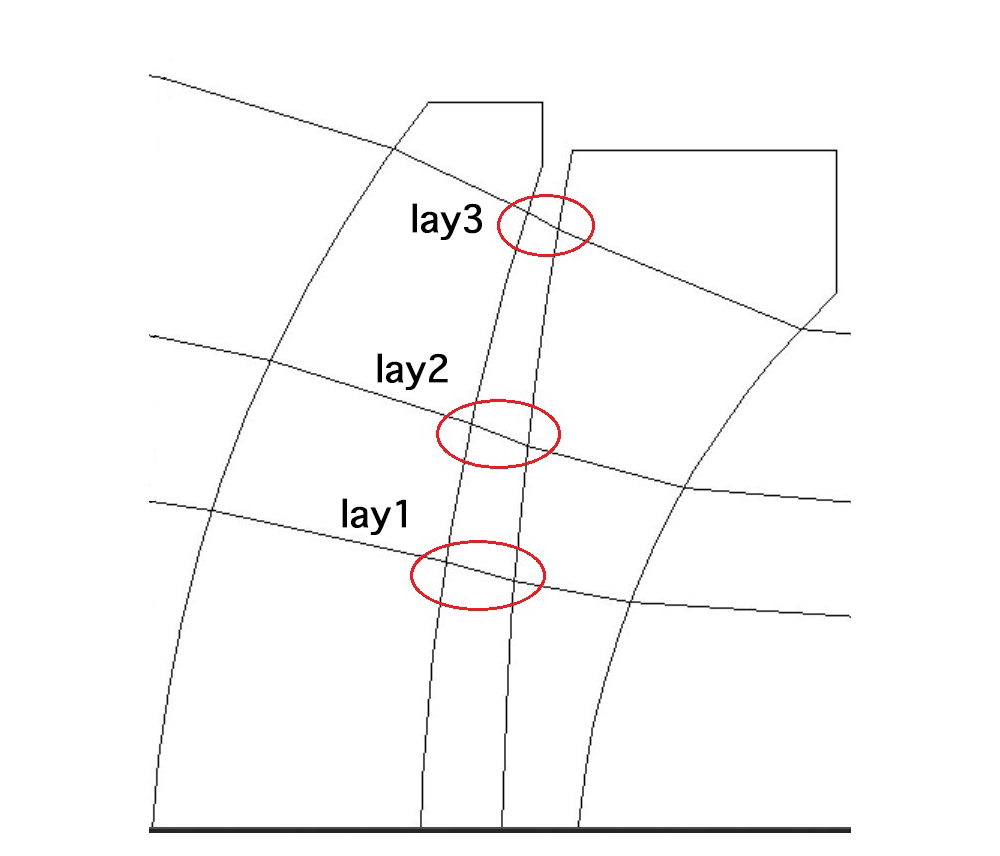
Have you ever heard of an "air lens"? Let me explain it. Take a look at Fig. 4. This is a typical lens element. When it is placed in air, the (relative) refractive index is 1.0 because there is air in front of it and behind it. Imagine a piece of glass with a refractive index of 1.5 placed in air. In this case, light rays are refracted at the interface between air and glass in accordance with Snell's law. Next, look at Fig. 5. Two lens elements are placed close together. Think of refraction for each element in the order glass-air-glass, just like air-glass-air in Fig. 4. If you look at a lens diagram with no explanation, it is natural to think of multiple lens elements lined up as you see in Fig. 5, without considering the air gap between them. However, as I explained earlier, you can also think of this narrow space as a lens element. That is why optical designers came up with the "air lens" concept for this air gap and defined it. This is the idea of treating the air gap between the two glass elements in Fig. 5 — the glass (n = large)-air (n = small)-glass (n = large) structure — as an optical element that refracts light in the opposite way to the normal arrangement. This is called an "air lens". The reason this concept is so useful is that it means a convex air gap serves as a concave lens element. In addition, the thinner the air lens, the stronger the local surface refractive power generally is. Therefore, it is thought that air lenses are more likely to generate large aberrations, especially those of higher orders. However, that drawback can be utilized. Consider the expression, "fight fire with fire". When used properly, these large, higher-order aberrations can help greatly with aberration correction. Fig. 6 shows an example of light rays passing through the group. Rays 1, 2, and 3 are parallel rays beginning at infinity. Look at the differences in refraction angle in the air lens portion of the illustration. It may be a little hard to see, but Ray 3's angle of refraction is steeper than Rays 1 and 2. The deflection angle can be made to vary in an extremely nonlinear manner rather than increasing linearly. For example, if only the outer rays are refracted sharply, extremely large aberrations can be generated for rays with high incident heights. In this way, the air lens enables control of higher-order aberrations. The "air lens" defined by our predecessors is not merely an air gap between two lens elements, as might appear at first glance. Rather, the air lens was proposed as a design concept in which bringing the lens elements closer together generates strong refractive effects at both surfaces of the air gap, enabling control and correction of higher order aberrations. Shimizu was able to surpass Wakimoto's 50 mm F1.4 lens, achieving even higher performance without increasing the number of elements, thanks to his effective use of the air lens.
Next time you look at an optical path diagram, see if you can figure out exactly what's happening. Optical path diagrams are every bit as fascinating as mystery novels. Once you become hooked, you might find yourself obsessed with optical path diagrams. They might even become your favorite topic of conversation over drinks. Before you know it, you'll be a proud member of the optics enthusiasts' club.

NIKKOR - The Thousand and One Nights
The history of Nikon cameras is also that of NIKKOR lenses. This serial story features fascinating tales of lens design and manufacture.