NIKKOR The Thousand and One Nights No.94
Striving to be the smallest and lightest
The Nikon Mini AF600QD/Lite-Touch AF
Even though it's not an interchangeable lens, this Tale covers the ultra-compact Nikon Mini AF600QD, or Lite-Touch AF as it was known outside of Japan. Upon its release, the Nikon Mini/Lite-Touch was the world's smallest and lightest 35mm compact AF camera. A commercial featuring Medama-Oyaji from the manga series GeGeGe no Kitarō that aired in Japan created buzz domestically. However, the camera was a best-seller both in Japan and abroad. What were the ideas and intent behind this camera, and how was it made to be so compact and lightweight? Let's unravel the secrets behind the Nikon Mini AF600QD/Lite-Touch AF (hereafter "Nikon Mini").
By Kouichi Ohshita
Nikon compact cameras
I began working at Nippon Kogaku K.K., as the company was known at the time, in 1985 under the instruction of Koichi Wakamiya, which led to my involvement in the optical design of compact cameras. Wakamiya was in charge of optical designs for early Nikon compact cameras, including the first Pikaichi L35AF lens featured in NIKKOR - The Thousand and One Nights, No. 33, as well as lenses for the second and third Pikaichi cameras, the L35AD2 and L35AD3, and the lens and viewfinder for the Pikaichi Tele Excel TW2D, a dual focal-length compact AF camera released in 1987. He also designed interchangeable lenses like the AI UV-Nikkor 105mm F4.5S and the UW Nikkor 20mm F2.8 for Nikonos cameras, both released in 1985. Before his transfer to the interchangeable-lens design department, Wakamiya designed astronomy telescopes. As a new employee, one of the things I enjoyed most about working under Wakamiya was learning about photographic lens and viewfinder design while listening to him talk about old cameras, lenses, and telescope design.
As Sato stated in No. 33, Nikon's history with compact AF cameras began with the 35mm, f/2.8 Pikaichi L35AF, released in 1983. In 1984, Nikon released the Pikaichi Mate L135AF/AD, a more popular version of the camera with a 35mm f/3.5 lens. In response to demand for a compact camera capable of telephoto shooting, Nikon released the Pikaichi Tele L35TWAF/AD, a dual focal-length camera that allows users to switch between the original 35mm f/3.5 and the telephoto 65mm f/5.6 by sliding the teleconverter into place, in 1986. In that same year, Nikon completed its initial line of compact cameras with the Pikaichi Carib L35AWAF/AD, which was waterproof to a depth of 3 m.
The next major trend in the compact camera market was the shift to zoom lenses. Nikon followed other manufacturers with the release of its Pikaichi Zoom TW ZoomQD in 1988. After that, dual focal-length cameras were replaced by zoom cameras, prime cameras became popular, and the primary focus of compact camera development shifted to zoom cameras.
Back to the basics
Unfortunately, zoom camera development reached a dead end after a few years. One of the reasons for this was the growing size of camera bodies. Zoom lenses for compact cameras are based on a convex-concave two-group zoom structure. Increasing the zoom ratio with this type of structure dramatically increases the amount of lens movement, which requires a larger lens barrel mechanism. In addition, because the aperture is incorporated in the first lens group with this convex-concave two-group zoom structure, maximum aperture inevitably decreases (f/number increases) at the telephoto end as the zoom ratio increases. If maximum aperture for a 35-70mm zoom lens is f/4 at the wide-angle end, it will be f/8 at the telephoto end, decreasing to f/12 at the telephoto end of a 35-105mm zoom lens. While ISO 400 negative color film was widely available at the time, there was a general sense within the company that a maximum aperture slower than f/11 was not acceptable. Another issue was AF accuracy. As anyone who uses a rangefinder camera knows, the longer the focal length and the larger the maximum aperture, the more precision is required for focusing. In particular, the required focusing accuracy increases in proportion to the square of the focal length, which is why it was difficult to incorporate lenses with focal lengths longer than 100mm, as is the case with rangefinder cameras.
With a return to the basics, a project to create a true ultra-compact camera was launched. This, however, was not the first compact camera project. Shortly after I started at the company, plans for a slim camera were proposed. I was in charge of designing slim lenses and even developed a prototype for such a camera. Ultimately, however, the plans were scrapped. There were many reasons for this, but the biggest was the high cost of photographic lenses. The lens for the first Pikaichi was constructed with five elements in four groups. Lenses for the second- and third-generation Pikaichis were constructed with four elements in three groups, which reduced costs, but a new lens designed for an ultra-compact camera incorporated a plastic aspherical lens element, which made the lens slimmer, in a five-element, four-group structure. High cost must have played a significant role in the decision to discontinue development.
The compact camera market is very competitive in terms of cost. Soon after starting work, I was put in charge of designing the viewfinder for the Pikaichi 3 (L35AF3/AD3). The new design was for the same Albada viewfinder used for the Pikaichi 2 (L35AF2/AD2), but it reduced cost by tens of yen per unit. Wakamiya was very pleased. Compact cameras are inexpensive, but large quantities are sold. A cost reduction of tens of yen per unit adds up.
I've gone off on a bit of a tangent talking about the original Nikon compact cameras. Let's get back to the new (at the time) ultra-compact Nikon camera. Hidenori Miyamoto of the Design 5, the Camera Designing Department was put in charge of developing the Nikon Mini. When I started at the company, the Camera Designing Department was divided into five sections, and the Design 5 was in charge of designing compact cameras. Miyamoto started at the company in 1980, and in addition to development of the Nikon Mini, he was involved in designing the Pikaichi Tele (L35TWAF/AD) released in 1986, the Zoom 85 Panorama QD (TW Zoom 85QD), which was the first Nikon camera to feature a panorama mechanism, released in 1992, and the compact Nuvis S APS camera released in 1998. He was one of several designers who led the development of Nikon's compact film cameras for many years. He was later transferred to the production technology department and overseas factories, and finally to the quality assurance department. He was of great help to me.
Miyamoto's vision for the camera was simply to develop the world's smallest compact AF camera. Being in charge of designing the optics, his vision resonated with me. I am also a fan of compact cameras and used the Rollei 35 and Minox as back-up cameras. A camera is useless if you don't have it with you when you want to take a picture. Therefore, I wanted to create the ultimate compact camera that users could carry with them at all times, was not burdensome, could quickly be pulled from a bag or pocket, and captured beautiful photos with a click of the shutter. I'm sure Miyamoto felt the same. He often said he didn't want to simply shave one or two millimeters off current cameras to achieve specs that could be advertised as "the world's smallest". He wanted users and potential users to actually feel a difference in size and weight when they picked up the camera. Otherwise, there was no point in making it the world's smallest. The concept behind the Nikon Mini set it apart from previous compact AF cameras with its focus on a compact size and light weight.
Striving to be the smallest
Now let's discover the secrets behind the small size of the Nikon Mini. First, we'll take a look at the camera's layout. The layout is important in determining the camera's height and width. Photo 2 shows the front of the camera.
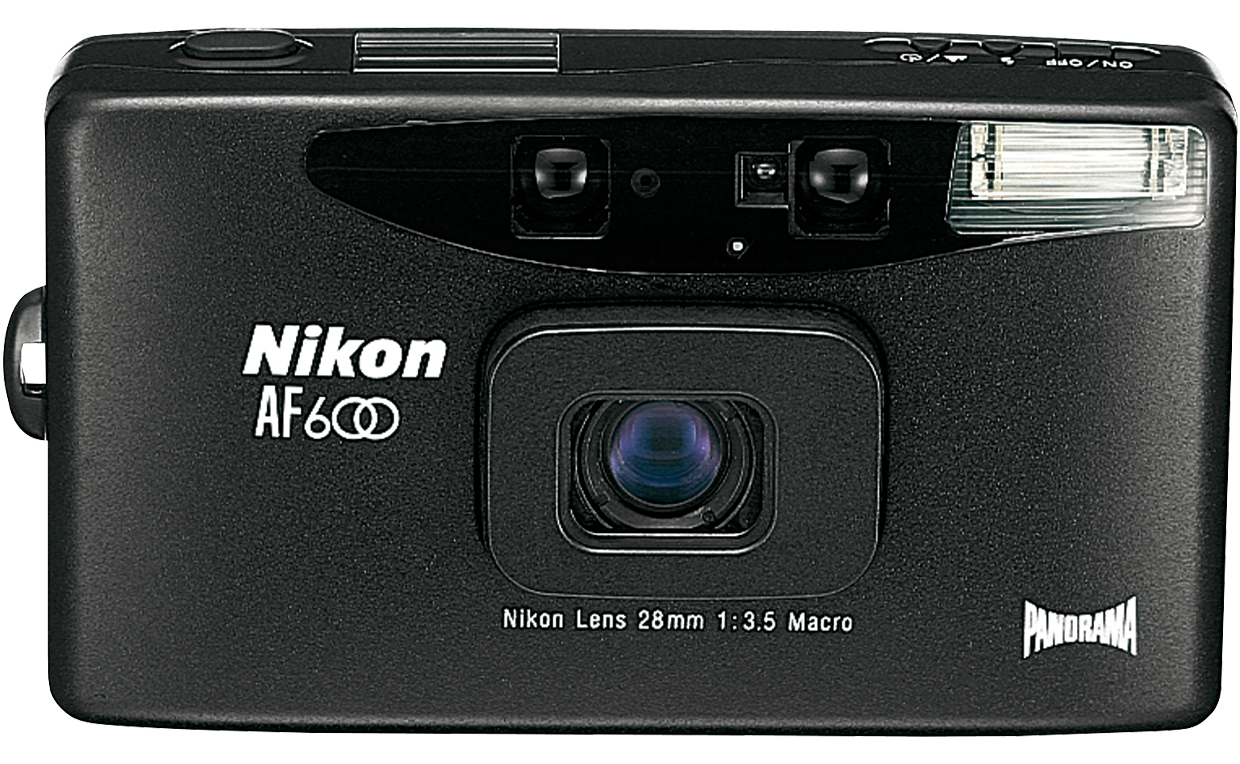
The Nikon Mini measures (W x H x D) 108 x 62 x 32 mm, and while it is approximately 10 mm wider than the Rollei 35 ultra-compact camera from the manual focusing days, it is a few millimeters shorter and slimmer. In addition, it houses an automatic film-loading mechanism, AE and AF mechanisms, and a built-in Speedlight. A significant amount of engineering plastics was used on the Nikon Mini, including its exterior, so it was incredibly light at just 155 g.
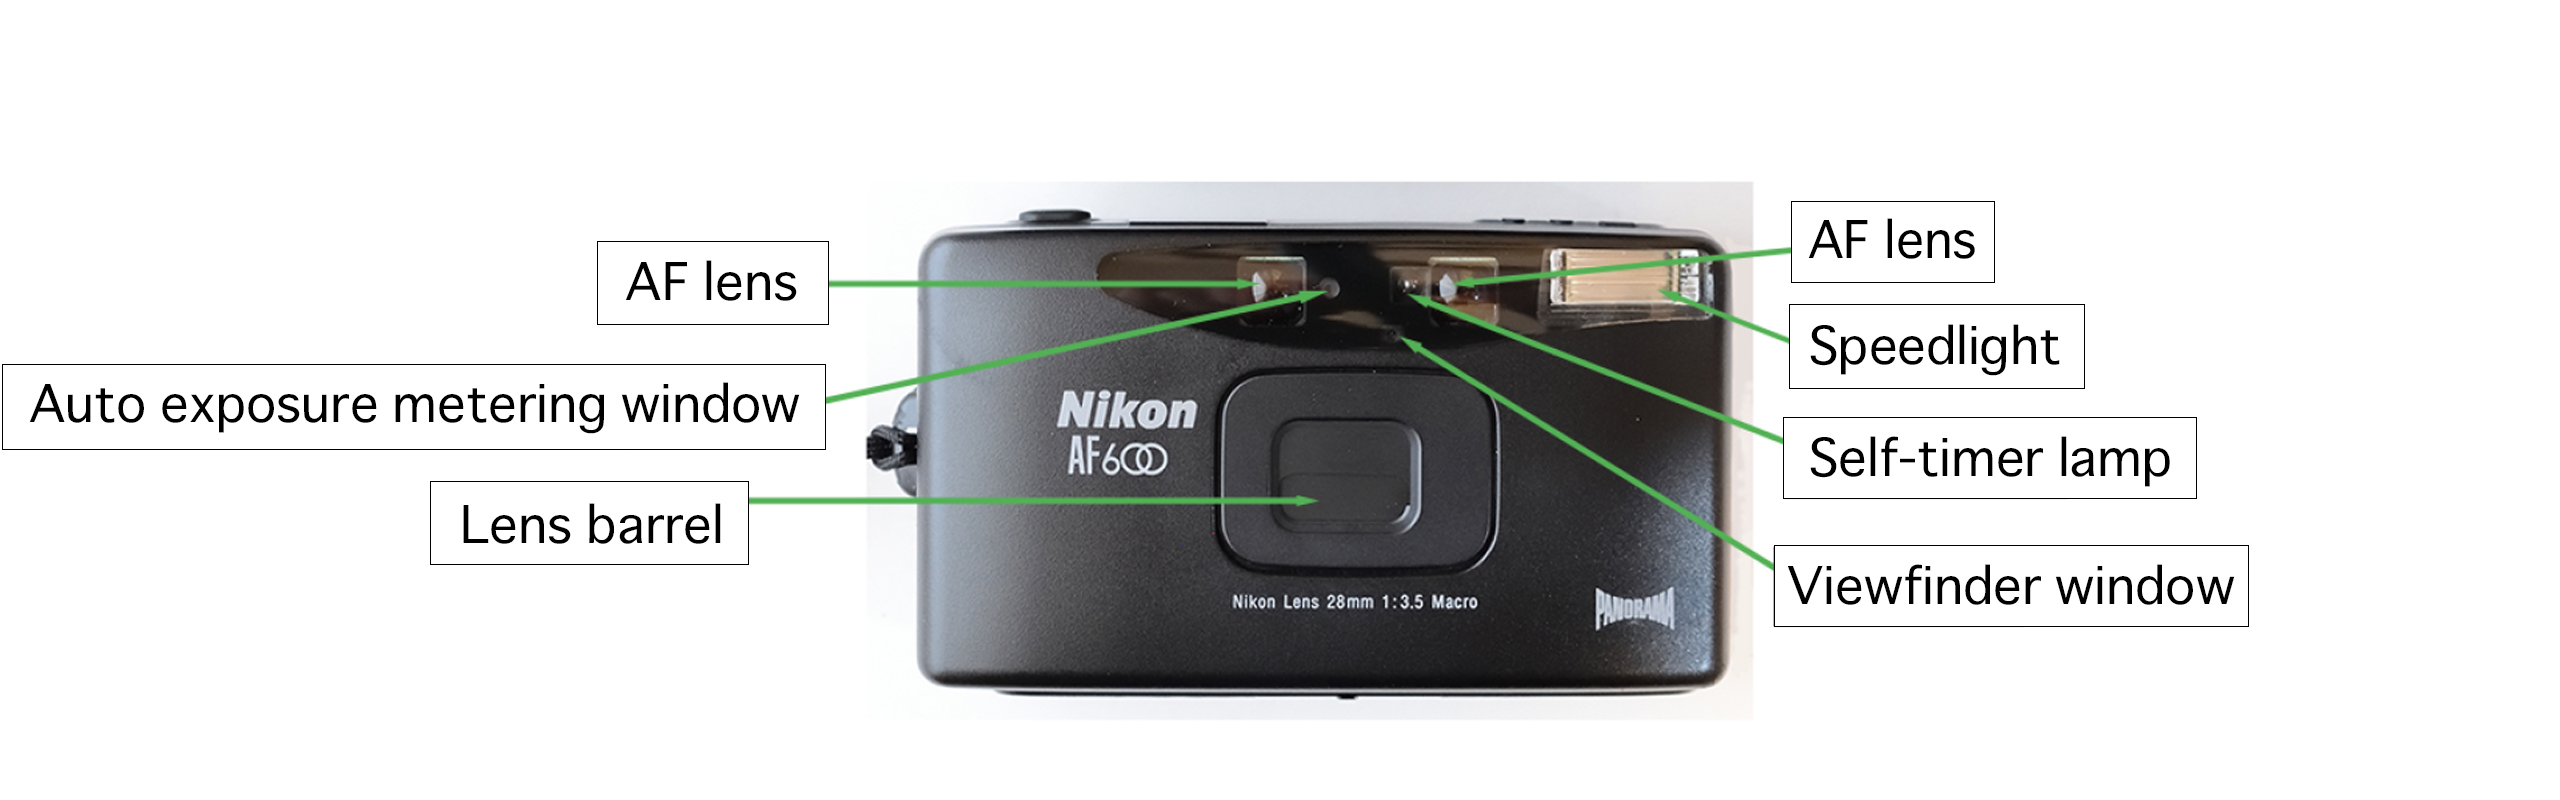
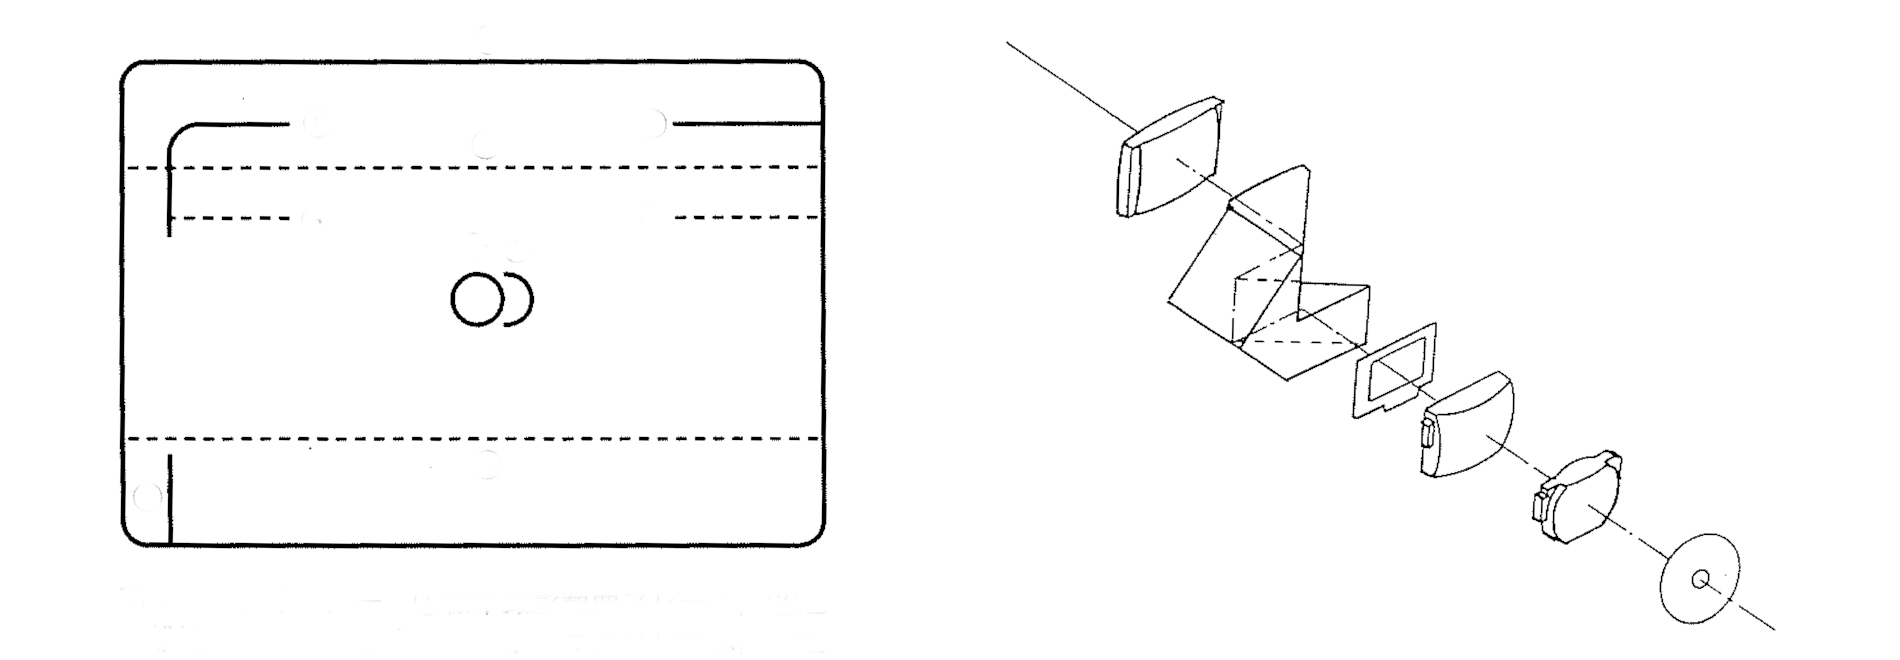
The first thing you'll notice when looking at the front of the camera is the absence of a viewfinder window. The most noticeable aspects are the lens barrel that houses the photographic lens, followed by the Speedlight unit at top right, and finally, the two AF lenses at top front. If you look closely, you'll see three windows between the two AF lenses. The square window beside the AF lens at right is the self-timer lamp, which also serves as a red-eye reduction lamp. The round window to the right of the AF lens at left is the AE metering window. The approximately 1-mm window just above the lens barrel is the viewfinder window. I'll explain the viewfinder in more detail later, but for now, know that this condensed arrangement of these components required of an AF compact camera enabled a lower height.
Next, let's see how they managed to reduce the width of the camera. Photo 3 shows the rear of the camera with the back cover open.
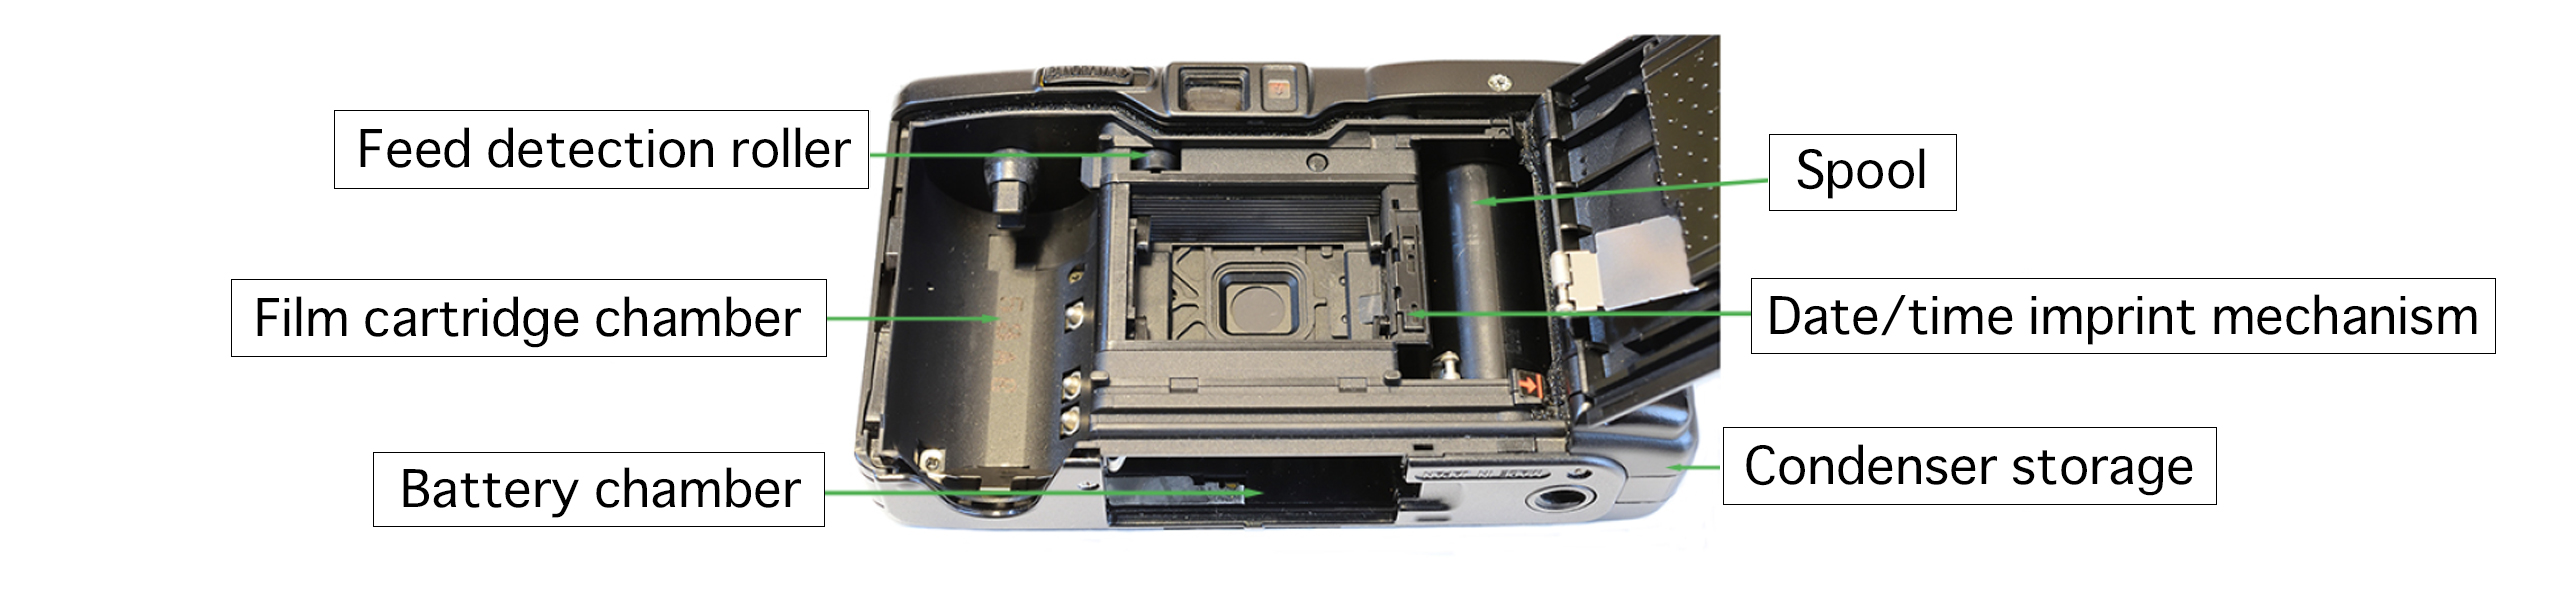
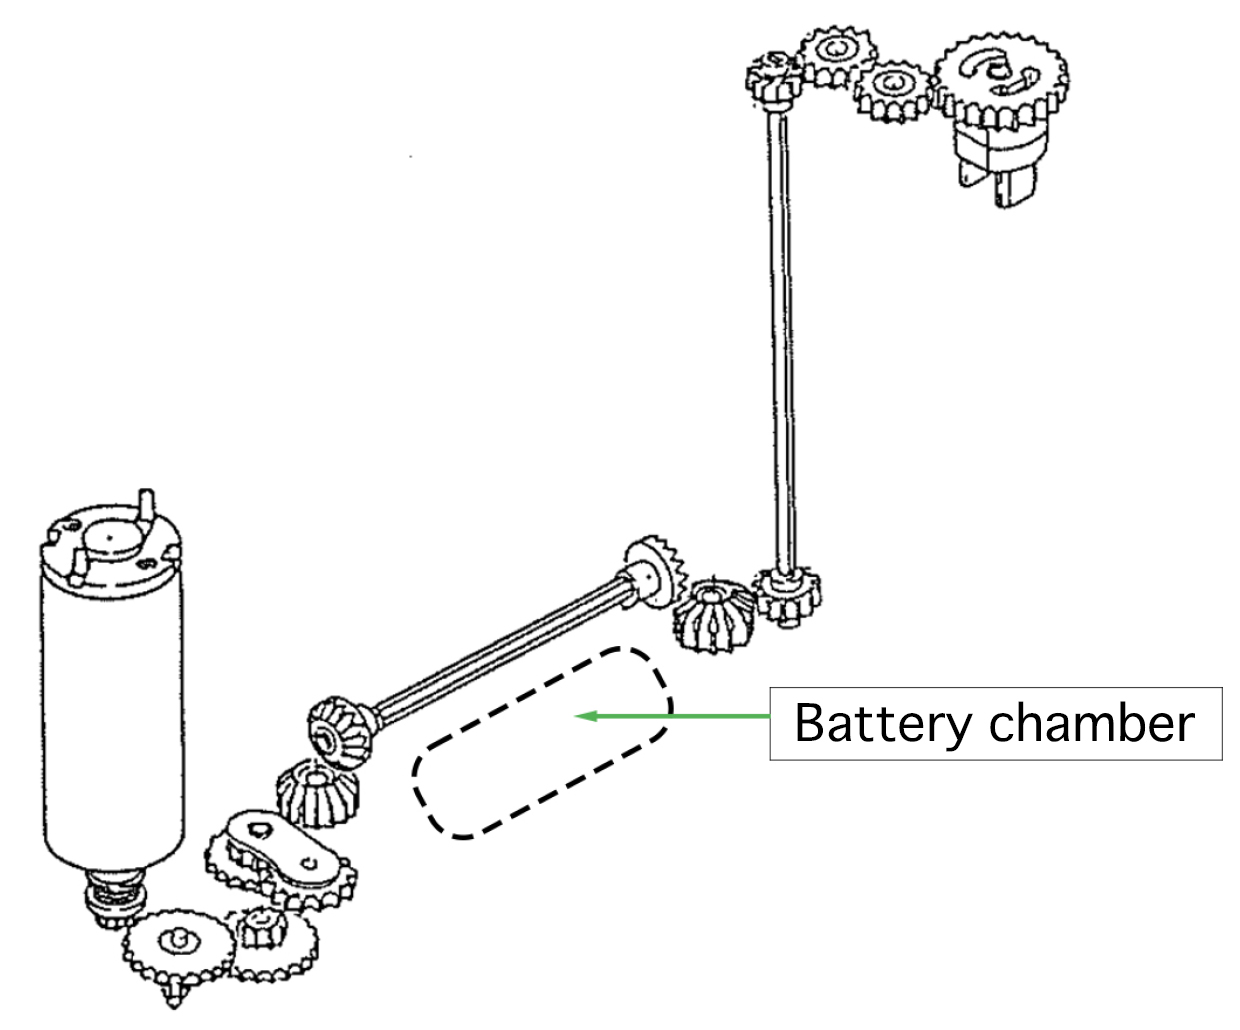
The film cartridge chamber is on the left and the spool that winds the exposed film is on the right. If you're familiar with 35mm cameras, there may be some things that look strange to you. 35mm film has regular perforations above and below the photosensitive surface, and film is normally advanced by sprockets engaging with these holes. However, the sprockets were eliminated with the Nikon Mini to reduce the width of the camera and achieve accurate film advance. Instead, a feed detection roller was installed just below and to the left of the viewfinder eyepiece. Accurate film advance is achieved by reading the rotation angle of this feed detection roller. Unfortunately, this alone was not enough to reduce the camera's width. Miyamoto positioned the battery chamber, which is normally placed next to the spool, on the bottom of the camera, and divided the condenser needed to fire the Speedlight into two thin condensers that he positioned to the right of the spool tube shown in Photo 3 for a significant reduction in camera width. In fact, this logical layout ensures there is no chance the battery chamber will block the path light takes to the lens, even with it on the bottom of the camera. However, positioning the battery chamber on the bottom does interfere with film rewind. After a certain number of frames have been captured with 35mm film, the film must be rewound in the cartridge. To rewind the film, the driving force of the motor located inside the spool is normally transmitted to the rewind shaft by a gear train on the bottom of the camera. As shown in Fig. 1, however, this problem was solved by positioning the loading mechanism in the Nikon Mini using bevel gears and shafts to avoid the battery chamber on the bottom of the camera.
In addition, a mechanism that imprints the date and time from the emulsion side rather than from the film pressure plate side was adopted for the Nikon Mini to help make it slimmer and give the back of the camera a cleaner look. This mechanism, shown in Photo 3, uses a lens prism placed inside the column between the spool and the lens opening to expose the LED array on the circuit board at the top of the camera, one row at a time, as the film is being loaded. Feed detection roller control is essential as precise film loading is important for sharp exposure of the text on the film.
The photographic lens
The Nikon Mini is equipped with a 28mm f/3.5 Nikon lens. These were the specs originally conceived for the camera to respond to those looking to capture wider angles of view when shooting panoramas, and because the wide-angle 28mm is better suited to cameras that users frequently carry with them for snapshots. Another reason for these specs was that they allowed for a slimmer lens than would be possible with a 35mm focal length. To make the Nikon Mini the world's smallest compact camera, it was decided from the beginning that the lens would be motorized for retraction and that the entire lens would be extended by the retraction motor for focusing. However, there is a limit to how far the lens can be extended, even if it is retracted. Miyamoto also really wanted to reduce the minimum focus distance. The Nikon Mini's minimum focus distance is 35 cm, which is very short for a compact camera. To achieve this, a 28mm lens would only need to extend by approximately 2.7 mm, but a 35mm lens would need to extend by about 4.4 mm. That's 1.7 mm longer. Adoption of a 28mm lens was vital to realizing the world's smallest camera because the overall length of the lens had to be reduced, not with shooting at infinity, but when shooting at the minimum focus distance.
Fig. 2 is a cross-section of the Nikon 28mm f/3.5 lens.
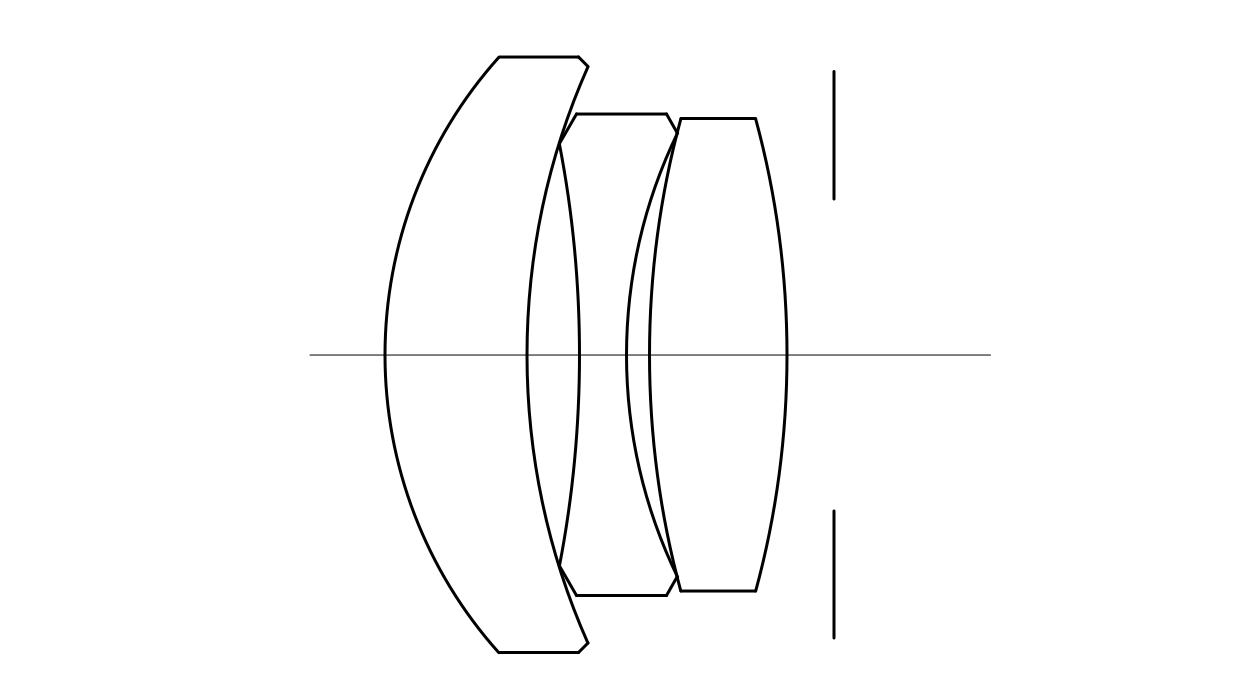
This lens was constructed with the aperture behind a lens triplet (rear-aperture lens). As I have mentioned before, a triplet is the smallest lens structure capable of correcting all forms of aberration, including chromatic aberration. Despite being the world's smallest camera, the Nikon Mini would be sold within the standard price range. Therefore, the three-lens structure was chosen from the beginning. Elements in this structure are positioned closely to one another, and spacing is determined by contact at the edges of the elements. At Nikon we call this a "butting" structure. Because the spacing between the lens elements is determined solely by the precision with which the elements are processed, it contributes to highly precise and consistent lens production. Incidentally, the curvature radius of both the front and rear sides of the biconvex third element is exactly the same, which eliminates the need to distinguish between the front and rear with assembly.
Minimizing the spacing between lens elements was essential to achieving the 28mm specification with a triplet structure. Generally speaking, there are two completely opposite ways to reduce the focal length of a lens: increasing spacing between lens elements to gently bend rays of light, and reducing spacing between lens elements to minimize the occurrence of high-order astigmatism at the extreme edges of the frame. The former can only be used when there are many lens elements, so the latter is naturally adopted for triplet-only designs with as little spacing between each element as possible. To further suppress high-order astigmatism, the refractive power of the first element, through which light that forms the image at the edges of the frame, is reduced as much as possible. Conversely, the refractive power of the third convex element, which is closer to the aperture, is then increased. Reducing lens spacing also increases the Petzval sum, which is a measure of curvature of field. Therefore, low-dispersion glass with a high refractive index is used for the third convex element to ensure a flat image plane.
Allow me to briefly explain the rendering characteristics of this lens. This lens does not render images exhibiting consistently high resolution all the way to the edges of the frame because it has a triplet structure. Considering the intended users of this camera, the lens was designed to produce images exhibiting good contrast, even with shooting at maximum aperture, in the main portions of the frame. It was thought that vivid, high-contrast images would appeal more to those who primarily enjoy their photos as 3.5 x 5 prints than would higher resolution. If resolution is low at the center of the frame where the primary subject is located, a difference in quality would be clear even in 3.5 x 5 and 5 x 7 prints. Therefore, resolution and contrast were balanced as much as possible at the center of the frame. There is still some curvature of field and astigmatism, and resolution drops somewhat in the middle of the frame with shooting at maximum aperture, but increases again in 60–70% of the frame, falling only at the edges of the frame (outside 20%). This loss of resolution can be reduced to some extent by stopping down the aperture.
Axial and lateral chromatic aberration result in cloudy colors, so they have been sufficiently corrected, but color coma remains at the edges of the frame with shooting at or near maximum aperture and is actually visible in photos captured at night. The visibility of this coma can also be reduced by stopping down the aperture. There is little enough distortion that it isn't even visible in the majority of the frame, but the extreme corners do exhibit just over 1% of negative barrel distortion.
Perhaps the most distinctive feature of this lens is the peripheral illumination. In general, rear-aperture lenses are bound to exhibit peripheral illumination falloff. This lens is no exception. Vignetting was reduced as much as possible from maximum aperture, but even when stopped down to 100% aperture efficiency, a significant amount of peripheral illumination falloff remains and may be noticeable with capture of some scenes.
The AF system
The two windows above the photographic lens are the AF lenses. They were also newly designed to make the Nikon Mini the world's smallest compact camera. An infrared LED was positioned on the focal plane of one of the lenses to project infrared light toward the subject. A light-receiving sensor known as a position sensitive device (PSD) was placed at the focal position of the other lens, which receives the infrared light reflected off the photographic subject. These two lenses are separated by 25mm, and the distance to the subject is triangulated. This type of AF system is known as active infrared AF.
The signal from the PSD is transmitted to the camera's internal CPU, which calculates the distance to the subject. The motor that retracts the photographic lens then moves the lens accordingly. Lens extension is performed in 100 steps from infinity to the minimum focus distance of 35 cm. The amount of extension at the minimum focus distance is approximately 2.7 mm, ensuring sufficient accuracy.
The viewfinder
Fig. 3 illustrates the Nikon Mini's viewfinder structure.
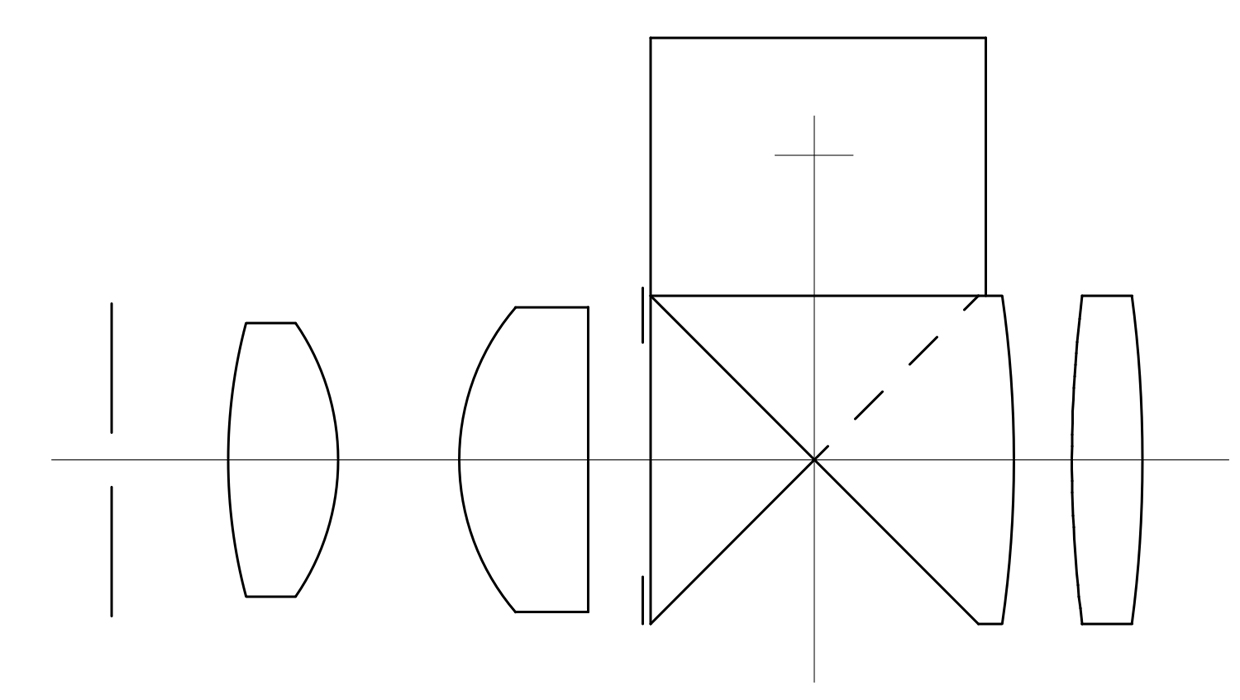
Fig. 3 shows how light passing through the aperture diaphragm from the left is formed on the field of view by the objective lens, which is constructed of two convex aspherical lens elements. The image is then inverted by an erecting prism and viewed through the eyepiece on the right. All of these components are made of plastic, thus contributing to a lighter camera weight. A viewfinder that projects the actual image formed by convex objective lens in this way is known as a real-image viewfinder. Real-image viewfinders were available as universal external viewfinders during the age of the rangefinder camera, but because an image erection prism was required to re-orient the image, which was costly, inverted Galilean (virtual-image) viewfinders consisting of a concave objective lens and a convex eyepiece lens were the norm for early compact film cameras. This trend changed at the end of the 1980s. One reason was the shift to zoom lenses for compact cameras. Zoom viewfinders can also use a virtual image, and Nikon's first compact zoom camera, the Pikaichi Zoom TW ZoomQD, was equipped with this virtual-image viewfinder. However, when designers attempt to increase the zoom ratio or achieve a wider angle for a camera equipped with a virtual-image viewfinder, camera size increases because the overall length and diameter of the front lens element cannot be reduced. That is why the second-generation compact zoom, the Pikaichi Zoom 35-70 TW Zoom 35-70QD, was equipped with a real-image viewfinder. Another reason was the fact that advances in plastic molding technology enabled low-cost molding of high-precision prisms. This was how real-image viewfinders suddenly became so common.
Real-image viewfinders have the following characteristics. The viewfinder objective window can be small, their field of view is bright because a half-mirror isn't required to display the field-of-view frame, and the field-of-view frame clearly separates the field of view. The Nikon Mini viewfinder also utilizes these characteristics, providing a bright and sharp display, while allowing for positioning of the objective window at the very front allows for the crowding of other components in a small space without interfering with AF lenses or the self-timer lamp. Fig. 4 is an illustration of the viewfinder field of view and an oblique drawing of the viewfinder structure.
Does the oblique drawing better illustrate the prism structure, which may have been difficult to grasp in Fig. 3? This type of erecting prism is known as a Porro II prism, which is often used for large binoculars. The original structure was comprised of three right-angle prisms bonded together, but when molded from plastic, they can be molded into a single complete prism, which reduces costs immeasurably.
Lens rendering
Now let's take a look at the rendering characteristics of this lens with actual images. Many sample images used in NIKKOR The Thousand and One Nights to date have been shot with a digital camera. This time, however, I've digitized negative film that was shot in the past. Film was originally digitized using a film scanner like the COOLSCAN. Now, however, it is possible to convert film into high-resolution digital data by photographing it with a digital camera and a Micro lens. The images below were digitized using an AF-S DX Micro NIKKOR 40mm f/2.8G on a Nikon D3300. The negative film was shot at a reproduction ratio of approximately 1:1.5. Negative film can easily be digitized using the D850 or D780 with in-camera reversal of tones, but NX Studio can be used to edit negative film images captured with other Nikon digital cameras as well. It requires a little more work, but allows for greater flexibility when digitizing negative films.
I'll briefly introduce the method I used, though others may have a different way of digitizing films. First, I placed the film in a light box with good color rendering and point the camera and lens directly at it. An ES-2 Film Digitizing Adapter is very convenient when photographing the film, but the camera can also be mounted on a tripod or otherwise stabilized. As I explained in No. 74, it's important to use a mirror to keep the subject and the sensor surface parallel. Processing images of negative film is also easier if the base color of the unexposed portions is also captured by using a focal length that is slightly shorter than that needed to capture the actual frame. The samples below were shot at f/8 and ISO 400 in aperture-priority auto ([A]) mode (approx. 1/30 s), and recorded in RAW format.
I used NX Studio to process the images. I first used the gray point sample tool to adjust white balance by clicking on an unexposed portion of the film to make the background gray. Next, I used the tone curve to reverse the tones. I grabbed the tone curve handle in the bottom left corner and dragged it up to about the mid-point. I then grabbed the handle in the top right corner and dragged it to the bottom right corner, and grabbed the left end of the straight line and pulled it all the way up to create an image with reversed tones. Once this was done, I used the crop tool to eliminate the edges containing only unexposed parts of the film. All that was left was to adjust each of the R, G, and B tone curves to achieve the desired colors and tones. Finally, I used the retouch brush to remove any dust or dirt reflected in the image. Saving the image in 16-bit TIFF format results in a larger file size, but I recommend it so that fine adjustments can be made later using another software application.
I tried to adjust colors so they looked natural, but the images still seem to have the soft colors and tones unique to color negative film and not possible with digital cameras.

Nikon Mini AF600QD
Nikon Lens 28mm f/3.5, programmed auto, Fuji G 400
Digitized with Nikon D3300 + AF-S DX Micro NIKKOR 40mm f/2.8G

Nikon Mini AF600QD
Nikon Lens 28mm f/3.5, programmed auto, Fuji G 400
Digitized with Nikon D3300 + AF-S DX Micro NIKKOR 40mm f/2.8G
Sample 1 is distant view captured during the day under clear skies. ISO 400 film was used, so the aperture was probably stopped down to around f/11. As a result, the image is well-defined to the corners, which still exhibit some illumination falloff. The aperture efficiency of the lens was 100% at f/8, but even then, there is little increase in peripheral illumination. Such is the fate of compact rear-aperture lenses like this one. On the other hand, the lens exhibits just over 1% of negative barrel distortion from the center of the frame to the edges, and since the absolute value is so small, it is usually barely noticeable.
Sample 2 is a night landscape captured in Las Vegas. All the neon lights make it a very bright night landscape, but the image must still have been shot at maximum aperture. There is some flare around light sources that is unique to film images, but otherwise, the image is very sharp throughout most of the frame, despite having been shot at maximum aperture. Resolution does decrease gradually toward the edges of the frame and there is little distortion in the shape of reddish light sources. However, if you look at a white or blue light source at the edge of the frame, such as the white streetlight at bottom left, you can see that blue coma flare toward the center of the frame occurs, distorting the shape of the light source. This type of aberration is called chromatic coma flare. It is difficult to correct with rear-aperture lenses that do not allow for placement of a lens element between the aperture and the image plane. Incidentally, this chromatic coma flare can be eliminated by stopping down the aperture, making it much less noticeable when shooting during the day at an aperture setting of f/8, f/11, or higher. It isn't noticeable in Sample 1 because a smaller aperture was used.

Nikon Mini AF600QD
Nikon Lens 28mm f/3.5, programmed auto, Konica X400
Digitized with Nikon D3300 + AF-S DX Micro NIKKOR 40mm f/2.8G

Nikon Mini AF600QD
Nikon Lens 28mm f/3.5, programmed auto, Fuji G 400
Digitized with Nikon D3300 + AF-S DX Micro NIKKOR 40mm f/2.8G
Sample 3 is a photo of a huge giraffe sculpture near Tokyo Station. 28mm wide-angle lenses are very useful for capturing this sort of image. The photo was taken during the day, but because the subject was shaded and not under direct sunlight, the aperture was not stopped down much. I expect the photo was captured somewhere between f/5.6 and f/8. The giraffe is sharply rendered from head to toe. However, if you zoom in on the upper left corner of the image, you'll notice red and blue fringing along the edges of the building. This is a remnant of the chromatic coma flare explained with Sample 2. When I took another look at the optical simulation for this lens, I found that the aperture would have had to have been stopped down to between f/11 and f/16 to completely eliminate the chromatic coma flare all the way to the extreme corners of the image.
Sample 4 is a photo of peach blossoms that bloom in the spring around the same time as cherries. As you can see from the blue sky, the photo was taken on a clear day, so the aperture was likely stopped down to f/11 or higher. As a result, the flowers are clearly and consistently rendered all the way to the corners of the frame. The only drawback is the peripheral illumination falloff. After carefully considering the scenes that would be captured with the camera, the lens was balanced to deliver optimal performance at mid-range distances.

Nikon Mini AF600QD
Nikon Lens 28mm f/3.5, programmed auto, Fuji G 400
Digitized with Nikon D3300 + AF-S DX Micro NIKKOR 40mm f/2.8G

Nikon Mini AF600QD
Nikon Lens 28mm f/3.5, programmed auto, Fuji G 400
Digitized with Nikon D3300 + AF-S DX Micro NIKKOR 40mm f/2.8G
Sample 5 is a photo of the family dog. The dog's shadow is evidencing the photo was taken on a sunny day, likely with ISO 400 film. Therefore, an aperture value higher than f/11 was likely used. That brought the background into focus to a certain extent and resulted in sharp and clear rendering of the dog's fur. However, its face is too close to the top of the frame, which left some space at the bottom. Thinking back, this was probably the result of incorrectly reading the viewfinder parallax. With SLR and mirrorless cameras, the photographic lens also serves as the viewfinder, so the image is captured just as it appears in the viewfinder or camera monitor. The optical axis of the viewfinder built into a compact camera, however, is not parallel to the optical axis of the photographic lens. This results in parallax. Therefore, the image displayed in the viewfinder and the final image differ when shooting at short distances. To compensate for this, the viewfinder has parallax compensation marks (shown in Fig. 4). I think I must not have paid attention to these marks when taking the picture, and that is why the top of the frame looks cramped. The Nikon Mini has a small lens and viewfinder, so there is little parallax. At shooting distances closer than 1 m, however, I definitely recommend using the parallax compensation marks to frame images.
Sample 6 is a close-up shot at an even shorter shooting distance. Judging from the size of the Nikon F in the photo, I estimate the shooting distance to be approximately 50 cm. Because the person was in the shade on a slightly cloudy day, the aperture was probably not stopped down much. I would estimate a setting of around f/5.6. The texture of the imitation leather on the Nikon F and the processing details on the dials are sharp and clear. The denim fabric and the wood grain, which is slightly out of focus in the foreground, also exhibit pleasing rendering. Bokeh in the trees in the background is natural, and though the 28mm f/3.5 doesn't produce much bokeh, it is a feature of the lens I like to use with my own photos.
The ideal back-up camera
There is no record of when development of the Nikon Mini began, and I don't remember, but the concept upon which it would be built was introduced in mid-1991. We considered the photographic lens, the viewfinder, and the AF system one after the other. The concept design was almost complete in the fall of 1991. Compact camera development was at its peak then, and Nikon released four new products in 1992 and five in 1993. To reduce the burden on the design staff, it was common for different designers to be assigned to the photographic lens and the viewfinder. As the Nikon Mini would be equipped with a prime lens, however, I was fortunate enough to be put in charge of the viewfinder and AF lenses in addition to the photographic lens. Of all the compact cameras I have designed, this model is particularly memorable.
It should be noted that compact camera design is not complete once the concept design is finished. If we lay out the photographic lens, viewfinder, AF module, circuit board, and other mechanisms, issues such as the interference of one component with another and protrusions emerge. These issues were resolved with one compromise and design correction after another until the design was finalized. At the same time, costs were calculated and had to be kept within a specified budget. As the design leader, this fell on Miyamoto. In response to requests from Miyamoto, design of the optics was changed to modify the glass material used for the photographic lens; there were four changes to the viewfinder, and three changes to AF lenses. The specific optical design was ultimately finalized in the early summer of 1992. However, Miyamoto's struggle to make the camera smaller and to have it released continued. He must have been under so much pressure until the camera was announced and released. This is because in order to make the claim that the Nikon Mini was the world's smallest compact camera, no other manufacturer could release an even smaller and lighter camera before the Nikon Mini was released. While I was confident that no camera in the price range could be made any smaller, I was also concerned about whether we would be able to describe the Nikon Mini as the world's smallest camera.
The Nikon Mini AF600QD/Lite-Touch AF was successfully release as the world's smallest compact AF camera in March of 1993. It went on to receive a great deal of praise both in Japan and abroad. I, of course, bought one and used for many years to take family photos, to carry with me on an everyday basis, and as a back-up to my SLR. It was so small and light that it was easy to carry even when I didn't really feel like taking pictures, so the Nikon Mini was always with me. The compact size and light weight unique to this camera even made taking it along on short walks with the children possible. Its sleek, compact body expresses the passion of Miyamoto and the development team, which worked hard to create the world's smallest and lightest camera.

NIKKOR - The Thousand and One Nights
The history of Nikon cameras is also that of NIKKOR lenses. This serial story features fascinating tales of lens design and manufacture.