NIKKOR The Thousand and One Nights No.93

Beyond 25-50! The first step to becoming a NIKKOR designer
Ai AF Zoom Nikkor 24-50mm F3.3-4.5S
Tale 93 is about the Ai AF Zoom Nikkor 24-50mm F3.3-4.5S. The Nikon F-501, a popular AF camera, was released in 1986. The Ai AF Zoom Nikkor 24-50mm F3.3-4.5S was designed to cover the wide-angle range of the new AF system built into the camera. What sort of lens was it, and what were the stories and human relationships behind its development?
In this Tale, we'll unravel the secrets of this first wide-angle AF zoom lens that was the first AF Nikkor.
By Haruo Sato
I. Surpassing the rendering performance of the Ai zoom Nikkor 25-50mm F4 at half the size and cost
In Tale 46, my partner in this series introduced the Ai zoom Nikkor 25-50mm F4 as the ultimate wide-angle lens. Its concave-convex two-group zoom structure was the world-famous invention of Takashi Higuchi (see Tale 56). His immediate successor was none other than Soichi Nakamura, who designed the 25-50mm. In fact, the 24-50mm, Nikon's first wide-angle AF zoom lens was designed under Nakamura's direction. The history of Nikon's concave-lead wide-angle zoom lens designers is as follows.
Takashi Higuchi (original designer) → Soichi Nakamura (2nd generation) → Kiyoshi Hayashi (3rd generation) → Haruo Sato...
As you may have already noticed, I designed the 24-50mm, Nikon's first wide-angle AF zoom lens. In fact, I was asked to design the lens just around six months after starting at Nikon. The 24-50mm was my first lens and marked the beginning of my career as a designer of NIKKOR lenses. While I look back on the experience with nostalgia now, my stomach ached with the stress at the time. After all, Nakamura was effectively my direct manager, and he had a long-standing reputation as a renowned designer at Nikon and beyond. In addition, my mentor, Hayashi, who provided the on-the-job training for me, was also known for designing many legendary Nikkor lenses. I, on the other hand, was a very anxious novice designer. With Hayashi's encouragement, however, I vowed to complete the design with the assistance of the 2nd- and 3rd-generation designers. As soon as I made that vow, Nakamura added to the project. "Oh, I forgot to tell you this. You can design the lens you want any way you want, but it must surpass the 25-50mm in terms of performance." I was at a loss with those words. My inner voice kept saying, "Impossible, no way, it's hopeless!" I was completely overwhelmed. Nakamura's statement was soon followed by Hayashi's. "These days," he said, picking up the 25-50mm, "this size just won't do." "Besides, don't you think ¥100,000 is too expensive? Can you afford it?" I picked up the lens, "No. It is big, and I can't afford it." Hayashi replied, "Okay, then. Let's make the new lens half as long and at least half the price." My mind was a complete blank. I thought to myself that this is what you get for answering honestly. I remember that exchange well. It was followed by Hayashi patting me on a stiff shoulder and smiling. "Well, let's get started," he said.
While I had studied optics a little at university, the project and its goals were clearly beyond the skill of a beginner with no practical experience. Naturally, Hayashi was very aware. I think that he had me design this challenging lens as part of his determination to pass on the NIKKOR zoom lens design method. That was where the one-on-one instruction truly began. I was fortunate to later have the opportunity to learn the design methods for many NIKKOR lenses.
II. Development history and the designer
So that was how designing the 24-50mm began. It was November of 1985, just six months after I joined Nikon. Design considerations, which were also educational, were wide-ranging. I remember presenting a total of three design proposals around July of 1986. The three proposals were "good", "better", and "best". One of the proposals prioritized optical performance by using aspherical lenses. Documents from that time show that the optical design report was submitted in July of 1986.
When I started at Nikon, I was assigned to the development section of Optics Designing Department. My field was not photographic lenses, but rather the somewhat ambiguous research and development of Nikkor lenses for high-definition TV (video) and future optical systems. Even today, there are very few universities with a proper optical department. Therefore, it was customary, even at Nikon, to study optics after starting work, and new employees usually studied optics-related technologies for about a year before doing any work as an actual optical designer. As a result, personnel was rarely transferred during the first year. However, in August, just four months after starting work at Nikon, I was transferred to the 1st Optical Section, Optical Designing Department, which was responsible for designing photographic lenses. A transfer in the middle of the training period was extremely unusual. It meant that the person providing my on-the-job training would be replaced. This was a huge problem for me, but part of me was also thrilled. It was as if I had wished the transfer into reality. I really wanted to design photographic lenses. I had been working hard since middle school for the job at Nikon. At 13 years old, my dream and goal was to become a Nikkor designer! I was so happy that I asked my manager why I'd been transferred. He replied with some annoyance, "You're always going on about photographic lenses this and photographic lenses that. Even the higher-ups knew of your great interest, so we decided to give you a chance." I felt apologetic, happy, and grateful all at once. It wasn't my wish that made the transfer a reality, but rather continuously saying it out loud without even realizing I was doing so. Looking back, the memory is a little embarrassing.
Anyway, I think the design, which also served as training, took about a year. Two prototypes were made. Production of the first prototype began with its drawings submitted in September of 1986. Sadly, upon completion, it failed quality assurance testing. That first design was ultimately a failure. The reason was ghost and the sudden drop in performance at the extreme wide-angle end. The gatekeeper for Nikkor lens quality, which was the quality assurance section, harshly judged that the first prototype was not worthy of the Nikkor name. The manager of the section at that time was none other than Michio Kariya. As many of you know, he would later become the president of the company. Kariya had helped me with various occasions, beginning with optical measurements and data gathering for my graduation thesis. This, however, was the first time I had dealt with him on a professional level. His words were clear. "Users would buy this lens because they want to use the 24 mm focal length, right? In that case, performance at infinity at the maximum wide-angle position has to be good all the way to the extreme edges of the frame. In addition, wide-angle shots are usually captured with some degree of backlighting. Too much ghosting is bad as well." He was absolutely right, of course. What else would you expect of a fierce quality assurance manager in charge of upholding Nikkor standards? His reasons were clear. It was the age of film. I had tried my best to maintain MTF performance in up to the 80% range of the frame, and ended up designing a lens with which MTF performance would drop sharply in the remaining 10%. I thought it was a good idea at the time. The basis for my effort was that the remaining 10% of the frame is cut off with a mask when photos are enlarged. I assumed that was what everyone did. I thought that if the edges won't be used, it's better to concentrate on making the 80% range at the center of the frame as sharp as possible. I really thought that was the way to go at the time. I was wrong, though, because the effective angle of view extends to the extreme edges of the frame. Kariya clearly pointed out what was likely the folly of youth and inexperience. I had no choice but to give up. Meanwhile, ghost was caused by inaccurate simulations. The quality-assurance ghost test involves continuous angle-of-view observations as well as close observation of the entire angle of view at all aperture settings. It was here that ghost I had overlooked with simulations was found. I was once again thoroughly defeated. I found that ghost was indeed present with another detailed simulation. I quickly revised the design. Ultimately, I was able to increase performance at the extreme edges of the frame at the cost of a slight increase in distortion and a slight decrease in abundant peripheral illumination. This resulted in a design with which performance does not drop sharply at the extreme edges of the frame. I also used a multi-layer coating on all nine lens elements to combat ghosting. The second prototype was then produced based on the improved proposal. This prototype passed testing, and with Kariya's approval, permission was finally given for mass production. The 24-50mm lens was released after mass-production trials that began in March of 1987 and actual mass production that began in August of 1987.
III. Lens construction and characteristics
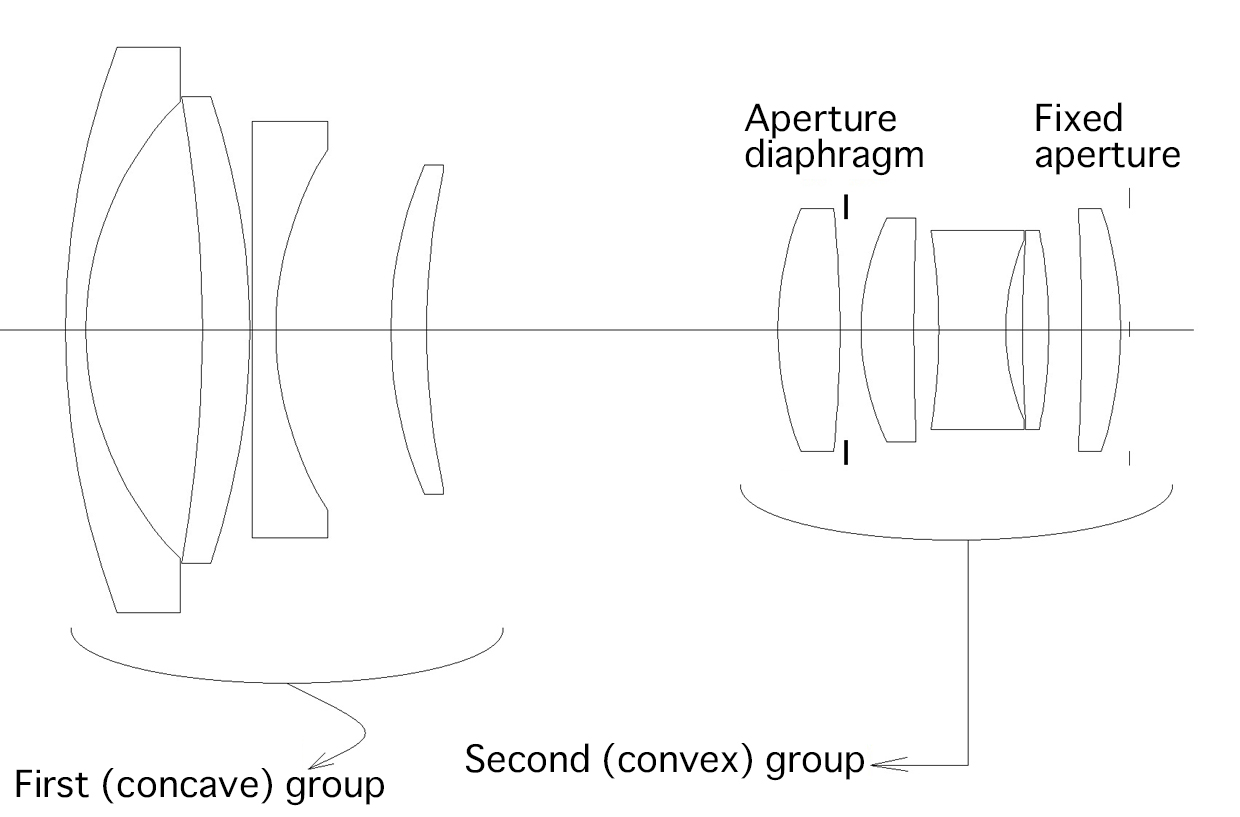
Now let's take a look at a cross-section (Fig. 1) of the lens. This is a typical concave-convex (negative-positive) two-group zoom-lens optical system. Naturally, it has the smallest group structure among zoom lenses, but as the design was originally based on that of a retrofocus group configuration, it is a zoom type that is advantageous for wide-angle applications. It is also the best zoom type for achieving a compact size while maintaining the back focus SLR cameras required. A concave-convex two-group zoom lens achieves wide angles with the concave front group first acting as a wide-angle converter that applies magnification to the convex rear group, which serves as the master lens. The concept is easy to understand if you think of this as a continuous change in the composite focal length because changing group spacing changes the magnification applied to the master lens. If this change in spacing were linear, the focus position would shift. To keep the focus position from changing, the first concave group is moved in a nonlinear manner to match the focal point. This nonlinear operation becomes what is known as the zoom solution curve.
Now let's take a look at first and second group structures. The first group is made up of four elements (concave-convex-concave-convex). This is the same structure as the 25-50mm lens. the basic first-group structures for wide-angle and ultra-wide-angle zoom lenses can generally be divided into two types: a convex-lead convex-concave-concave-convex configuration, and a concave-lead concave-convex-concave-convex configuration. Each of these types has its own advantages and disadvantages. I wanted to reduce the filter size as much as possible to achieve downsizing, so I chose the concave-lead configuration with which Nakamura was so skilled. For more in-depth information, re-read "V. The secret of the front lens element" in NIKKOR the Thousand and One Nights, Tale 55.
This concave-lead structure prevented a sudden change in distortion and prevented mustache distortion. There was quite a lot of absolute distortion, but photos looked better than if they had exhibited mustache distortion. Similarly, we were able to keep the lateral chromatic aberration simple and to a minimum quite successfully for a wide-angle and ultra-wide-angle lens that doesn't use a single cemented lens element.
The second group has a standard convex-convex-concave-convex Ernostar or Tele-Sonnar structure with a convex element added at the rear. This convex-convex-concave-convex-convex configuration is often used to this day. Separating the last convex element of the retrofocus structure into two elements was one of Wakimoto's great innovations (see NIKKOR The Thousand and One Nights, Tale 12). This structure has the same design benefits. The complete angle-of-view at the maximum wide-angle position of 24 mm is 84°, which is already an ultra-wide angle. Therefore, better compensation for coma and other off-axis aberrations than was the norm for other photographic lenses was required. That was also the reason for the convex-convex-concave-convex-convex structure. The design also called for only the most common glass materials available at the time. The nine-element configuration with no cemented elements was our effort to reduce both size and cost. I remember that this lens had the fewest number of elements of any 24-50mm-class lens available in those days.
IV. Making autofocus more practical: a huge innovation in the industry
Technically speaking, the idea of autofocus (AF) has been around for quite some time. Let's look at some common examples. Canon first announced a camera prototype with built-in AF at Photokina in 1963. Nikon's AF-NIKKOR 80mm F4.5 was the first prototype to incorporate an autofocus lens into a single-lens reflex camera, enabling fully automatic focusing. A functional final version of this lens was exhibited at Photo Expo held in the U.S. in April of 1971. This autofocus system used a photoconductive element to detect the position where the image at the center of the viewfinder was sharpest and then adjusted focus accordingly. After Photo Expo 71, the lens was exhibited at Photokina the following year. However, neither company's product reached mass production, so these systems were more like a report on technological development than products intended for release. The first autofocus camera to reach mass production and release was the Konica C35AF, also known as the Konica "Jasupin", developed by Konishiroku Photo Industry Co., Ltd. (Konica). This revolutionary camera was not expensive, so it quickly found its way around the world and became extremely popular. The achievements made with this camera, which introduced a new era for photography, were amazing. Autofocus was no longer a fantasy. The Konica C35AF was followed by SLR cameras with built-in AF systems that combined AF lenses equipped with large power sources and motors with cameras equipped with AF detection functions. Around this time, Nikon equipped its popular F3 with an AF system and released the F3AF in April of 1983. However, the camera's AF system was limited with only two dedicated lenses and one AF teleconverter. I think the camera was positioned as a high-end SLR that was equipped with AF and a focus aid. Finally, a full-fledged SLR AF camera and a new mount that supported a line of AF interchangeable lenses was released. That groundbreaking system consisted of Minolta's α-7000, their new α mount, and dedicated AF lenses. Building a motor and power supply that drives the lens into the camera rather than the lens ensured a great deal of freedom in the design of interchangeable lenses. Minolta succeeded in making the majority of their lenses AF-compatible.
However, I must mention a little-known fact hidden in history. It is that Yashica had produced a prototype of a sleek, compact, and highly refined AF camera with an in-camera motor and power supply several years earlier and proceeded with its development plan. That SLR AF camera was the Contax 137AF. The Contax 137AF that Yashica exhibited as a technical reference at Photokina in 1982 used the same system Minolta used for its α system. The Yashica camera was already equipped with an in-camera function that measured distance, along with an in-camera motor and an AF coupler system, all in a fully developed form. It was an incredible innovation that changed the times. The AF system was exactly the same as that adopted for the α system. Ultimately, Minolta's α-7000 (released in 1985) was the first camera equipped with the aforementioned features to be released to the public. It is highly likely, however, that the concept was first conceived by Yashica, which unveiled its Contax 137AF in 1982. Minolta saw the potential of Yashica's AF system and used it as a model upon which they would gamble the company's future. The entire company worked together to develop their new α system. Nikon then released the Nikon F-501 in April of 1986. I started working at Nikon in April of 1985, right in the middle of this race to develop AF systems. All of Nikon's lens designers were caught up in this race with the objective of developing and releasing new AF lenses. The subject of this Tale, the Ai AF Zoom Nikkor 24-50mm F3.3-4.5S, is a lens born of the times.V. Design performance and evaluation
Now let's take a look at design data. As I've said before, keep in mind that my opinions on, and evaluations of, sample images are provided for reference purposes only. We'll look at aberration correction characteristics at a couple of focal lengths.
Let's start with focus at infinity at the wide-angle 24 mm position. Spherical aberration is fully corrected with the bulge of the spherical aberration curve being relatively small. There is a noticeable amount of distortion at -5.5%. However, as this is basic barrel distortion, it is easily corrected with common image-processing software. There may be some astigmatism at infinity. The meridional (M) image plane is slightly in front of the sagittal (S) image plane. This helps to maintain good imaging performance at the extreme edges of the frame when focus is at infinity. To achieve this, a slight amount of astigmatism is generated, but only at infinity. Close-range fluctuations in astigmatism and curvature of field cannot be ignored, especially with wide-angle lenses. Therefore, it made sense to have a negative image plane to achieve a balance between focus at infinity and focus at close distances. However, the primary reason is the NIKKOR design philosophy of not having a positive image plane all the way to the extreme edges of the frame at infinity. This philosophy was developed in response to Kariya's statement that a wide-angle lens is a lens that captures the entire frame to the extreme edges. In the end we achieved a balance that minimized astigmatism at an intermediate shooting distance of about 1 m.
So why is a positive image plane at infinity not good? Because there will be subjects in front of the in-focus position that will be captured, as when focusing on a subject at infinity positioned near the center of the frame. However, there are no subjects behind the focal plane because the focal plane is already at infinity. As there is nothing beyond infinity in nature, a positive image plane means that no subject is in focus. What would rendering along a positive image plane look like? The image would simply be out of focus because there is no subject in focus. The problem with that is that with a positive image plane, stepping down the aperture does not significantly improve the focus. This varies, of course, depending upon the degree to which the aperture is stopped down.
Another benefit of specifically keeping the S image plane negative is that sagittal coma, the nemesis of wide-angle and fast lenses, appears to be reduced. As such, selecting the optimal sagittal image plane correction method is a key consideration in the design of wide-angle objective lenses for infinity focus.
Next let's look at the mid-range 35 mm focal length. Distortion measures no less than -2%, so not noticeable. Spherical aberration is still fully corrected although the bulge of the spherical aberration curve becomes a little larger than at the maximum wide-angle position. Regarding curvature of field, the S image plane shifts slightly in the negative direction, while the M image plane shifts slightly in the positive direction, compared to their positions at the maximum wide-angle setting. It results in curvature of field with little astigmatism, where the M and S image planes are aligned. However, neither image plane reaches a positive position through to the edges of the frame.
Finally, let's look at performance at the maximum telephoto position of 50 mm. Distortion measures approximately -1%. Distortion is negative throughout the entire zoom range, and spherical aberration is no longer fully corrected. I remember this level of aberration correction being the result of taking background bokeh into consideration, though only a little.
VI. Actual performance
Next let's look at results achieved with some actual images of distant scenes. For this lens, I used a Nikon Z 7 mirrorless camera with the FTZ mount adapter to capture sample images.
I will explain performance at each aperture setting. Evaluations are subjective and based on individual preferences. Please keep in mind that my opinions on, and evaluations of, sample images are provided for reference purposes only.
At 24 mm (maximum wide-angle position)
f/3.3 (maximum aperture)
My initial impression is that while resolution and contrast aren't that great, image quality is consistent all the way to the extreme edges of the frame, and there is no significant flare that might be problematic. Any color bleed in the peripheries is barely noticeable. A very small amount of barrel distortion and vignetting can be seen.
f/5.6
Stopping down the aperture one stop reduces flare and increases contrast and resolution. I really like that the image does not look over-resolved, and vignetting is reduced to the point that it's not an issue.
f/8
The small amount of flare has completely disappeared, image quality is consistent, and the entire frame exhibits excellent contrast and resolution. Again, however, the image isn't over-resolved.
f/11
Resolution seems to be even better than it was at f/8. Consistently good image quality is maintained throughout the frame. This is the aperture setting that achieves the best image quality.
f/16
While image quality changes little from f/11, there is some blurring in high-resolution portions, giving the impression that resolution is slightly lower. The effects of diffraction are beginning to show.
f/22
There is a clear drop in resolution that is likely the result of diffraction. It is probably better not to stop down the aperture this much with normal shooting.
At 35 mm (a mid-range focal length)
f/3.8 (maximum aperture)
Resolution is relatively good from the center of the frame to the edges. It is also almost completely uniform from the center of the frame to the edges. There is, however, a small amount of flare affecting the entire frame. Resolution is good overall, and the faint flare throughout the frame could be useful, depending on how it is utilized. There is some color bleed.
f/5.6
Flare is reduced greatly. The image also seems sharper, and the increase in contrast is especially noticeable. The image remains soft overall, and the majority of color bleed is eliminated.
f/8
Image quality is even better. Flare is greatly reduced, and contrast is outstanding. This aperture setting probably provides the best image quality.
f/11
Consistently good image quality is maintained throughout the frame. For practical reasons, I recommend shooting at f/11 when sharpness is important.
f/16
There is very little change from f/11. However, the effects of diffraction are beginning to show.
f/22 to f/32
There is a clear drop in resolution that is likely the result of diffraction. It is probably better not to stop down the aperture this much with normal shooting.
At 50 mm (maximum telephoto position)
f/4.5 (maximum aperture)
Resolution is fairly consistent from the center of the frame to the extreme edges, but there is also a slight veil of flare. Very pleasing image quality can likely be achieved with proper use. I think this aperture setting would be well suited to portraiture. There is some color bleed.
f/5.6
There is slightly less flare and performance has increased somewhat, but overall, there are no major changes from f/4.5. Except that color bleed is eliminated.
f/8
There is no more flare, and improvements to image quality are consistent throughout the frame. Overall, the best image quality is achieved at this aperture setting. However, the image remains soft.
f/11
Image quality is good and consistent throughout the frame, and images are even sharper than they are at f/8. For practical reasons, I would recommend using f/8 or f/11 to capture landscapes.
f/16
Resolution drops slightly with some roughness. The effects of diffraction are beginning to show.
f/22 to f/32
There is a clear drop in resolution that is likely the result of diffraction. It is probably better not to stop down the aperture this much with normal shooting.
VII. Sample images
Now let's confirm these rendering characteristics with some sample photos. This time as well, I captured all samples at each focal length at maximum aperture.
As always, Picture Control settings that apply less sharpening, such as "Portrait" and "Neutral", are generally used so that readers may best judge the characteristics of the lens. In addition, no special compensation or excess adjustment of characteristics such as sharpness is performed. Subjects were selected based on how I assume the lens would be used by general users.

Z 7 + FTZ w/ Ai AF Zoom Nikkor 24-50mm F3.3-4.5S (at 50-mm equivalent)
Aperture: f/4.5 (maximum aperture)
Shutter speed: 1/4000 s
Exposure compensation: ±0 EV
Sensitivity: ISO 640
Image quality: RAW
White balance: Auto
D-Lighting: Auto
Picture Control: Portrait
Date of capture: March 2024
Sample 1
Sample 1 was captured at the maximum telephoto position of 50 mm at the minimum focus distance. Of course, the image was captured at the maximum aperture of f/4.5. The sharpness of portions along the focal plane and bokeh are clearly visible. At this distance, there is no double-line bokeh, so image quality is barely acceptable for practical use. I have no complaints about sharpness on the focal plane.
Z 7 + FTZ w/ Ai AF Zoom Nikkor 24-50mm F3.3-4.5S (at 24-mm equivalent)
Aperture: f/3.3 (maximum aperture)
Shutter speed: 1/4000 s
Exposure compensation: ±0 EV
Sensitivity: ISO 640
Image quality: RAW
White balance: Auto
D-Lighting: Auto
Picture Control: Portrait
Date of capture: March 2024
Sample 2
Sample 2 is a distant scene captured at the maximum wide-angle position of 24 mm. Of course, this image was also captured at f/3.3. Since focus was at a point behind the subject, the foreground is beyond the depth of field. However, even in this photo you can see that resolution is sufficient to the peripheries. Unfortunately, the peripheral illumination falloff is undeniable. I shot this backlit scene on purpose and, as you can see, ghost and flare are well suppressed and the image exhibits none of the drawbacks usually associated with backlighting, except the purple fringe.

Z 7 + FTZ w/ Ai AF Zoom Nikkor 24-50mm F3.3-4.5S (close-up at 24-mm equivalent)
Aperture: f/4
Shutter speed: 1/200 s
Exposure compensation: -2/3 EV
Sensitivity: ISO 640
Image quality: RAW
White balance: Auto
D-Lighting: High
Picture Control: Neutral
Date of capture: March 2024
Sample 3
Sample image 3 is a close-up that was captured at the maximum wide-angle position of 24 mm and f/4. Focus was on the reflection in the window. Rendering of the scene reflected in the glass and the interior of the car is realistic. I consider it impeccable in terms of contrast, resolution, and textures. I remembered that several photojournalists had told me that "The true value of this lens lies in documentary-style photography," and so I decided to give it a go with this sample. What do you think?

Z 7 + FTZ w/ Ai AF Zoom Nikkor 24-50mm F3.3-4.5S (at 38-mm equivalent)
Aperture: f/4 (maximum aperture)
Shutter speed: 1/8000 s
Exposure compensation: -1/3 EV
Sensitivity: ISO 180
Image quality: RAW
White balance: Auto
D-Lighting: High
Picture Control: Landscape
Date of capture: March 2024
Sample 4
Sample 4 is an example of a snapshot captured at a mid-range focal length of around 38 mm and a maximum aperture of approximately f/4. I focused on the trees on the island. Not only is the resolution excellent, but image quality is also straightforward and free of irregularities from the center of the frame to the extreme edges. The tones are not harsh and the textures are wonderful for a natural-looking image.
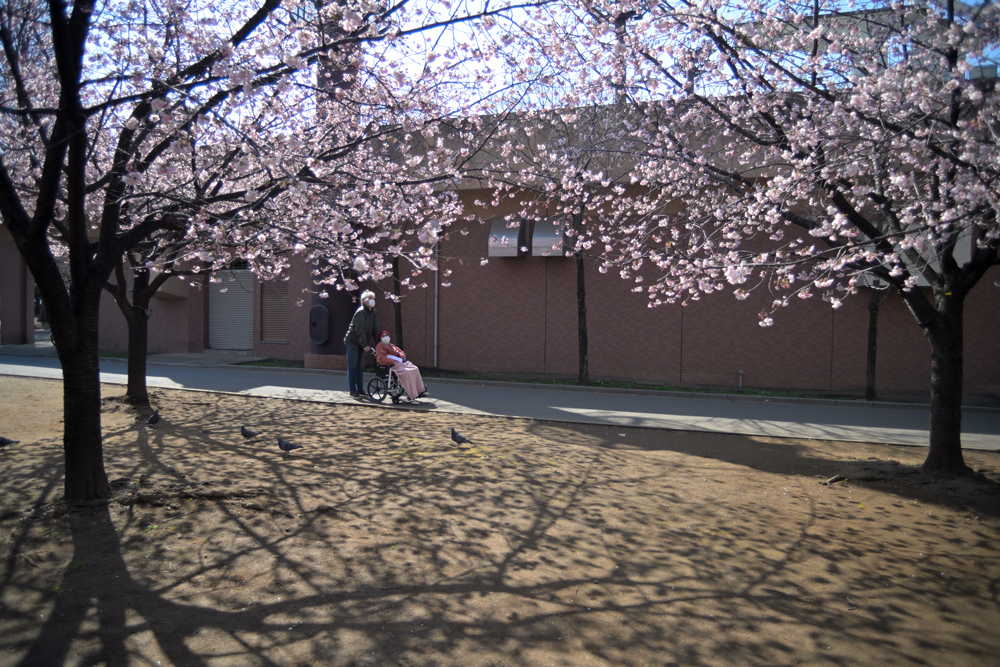
Z 7 + FTZ w/ Ai AF Zoom Nikkor 24-50mm F3.3-4.5S (at 50-mm equivalent)
Aperture: f/4.5 (maximum aperture)
Shutter speed: 1/400 s
Exposure compensation: -1 EV
Sensitivity: ISO 640
Image quality: RAW
White balance: Auto
D-Lighting: High
Picture Control: Neutral
Date of capture: March 2024
Sample 5
Sample 5 was captured at the maximum telephoto position of 50 mm. I have no complaints regarding sharpness at the focal point. Take a look at shadow reproduction. This is a quality that is difficult to judge based solely on MTF characteristics. Shadows are not crushed. I think rendering performance is such that you can clearly make out the objects in the photo. The clarity achieved here may be a good example of the effects of applying multi-layer coating to all surfaces. I think this is a very valuable rendering characteristic for a photographic lens.
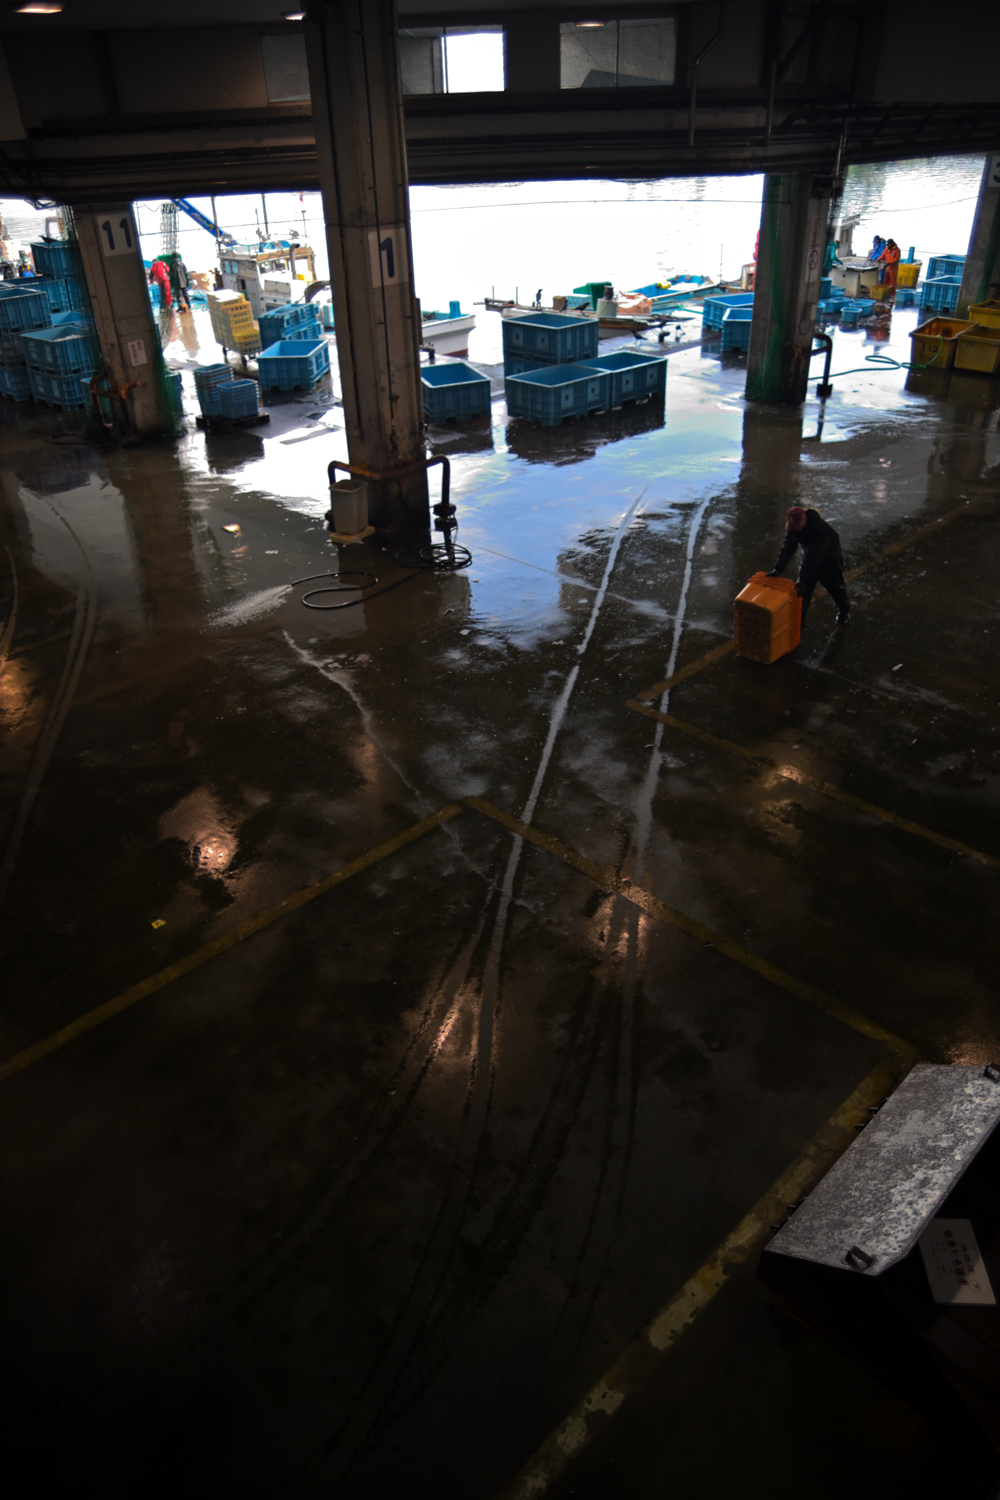
Z 7 + FTZ w/ Ai AF Zoom Nikkor 24-50mm F3.3-4.5S (at 24-mm equivalent)
Aperture: f/3.3 (maximum aperture)
Shutter speed: 1/2000 s
Exposure compensation: -1.0 EV
Sensitivity: ISO 100
Image quality: RAW
White balance: Auto
D-Lighting: Auto
Picture Control: Portrait
Date of capture: March 2024
Sample 6
Sample 6 was captured at the maximum wide-angle position of 24 mm with focus near infinity. I have no complaints regarding sharpness at the focal point, and I like the tones in shadow portions. This photo is a good example of how peripheral illumination falloff unexpectedly contributes to emphasizing the unsettling scene.
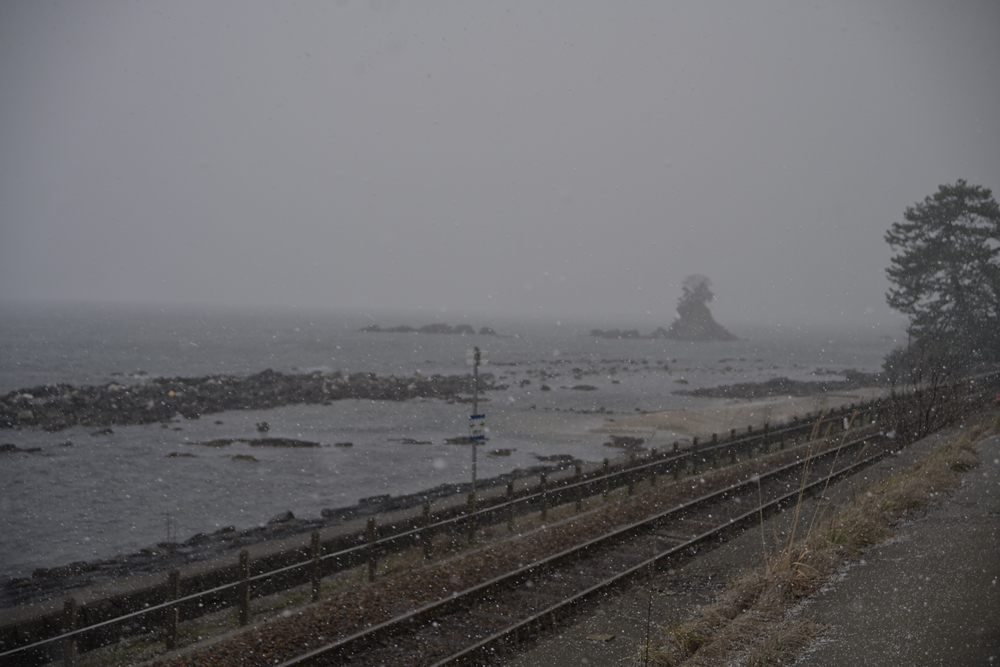
Z 7 + FTZ w/ Ai AF Zoom Nikkor 24-50mm F3.3-4.5S (at 50-mm equivalent)
Aperture: f/4.5 (maximum aperture)
Shutter speed: 1/1250 s
Exposure compensation: -1/3 EV
Sensitivity: ISO 640
Image quality: RAW
White balance: Auto
D-Lighting: Auto
Picture Control: Portrait
Date of capture: March 2024
Sample 7
Sample 7 was captured at the maximum telephoto position of 50 mm with focus near infinity. Of course, I shot it at the maximum aperture of f/4.5 as well. This is an example of a photo taken under difficult conditions with rain, snow, and dim lighting. I focused on the railroad tracks, but you can see that resolution and contrast are good throughout the frame. Objects in the distance are a little blurred, but I intentionally shot from a distance that would achieve this. I really like the rendering and ambiance of this image.
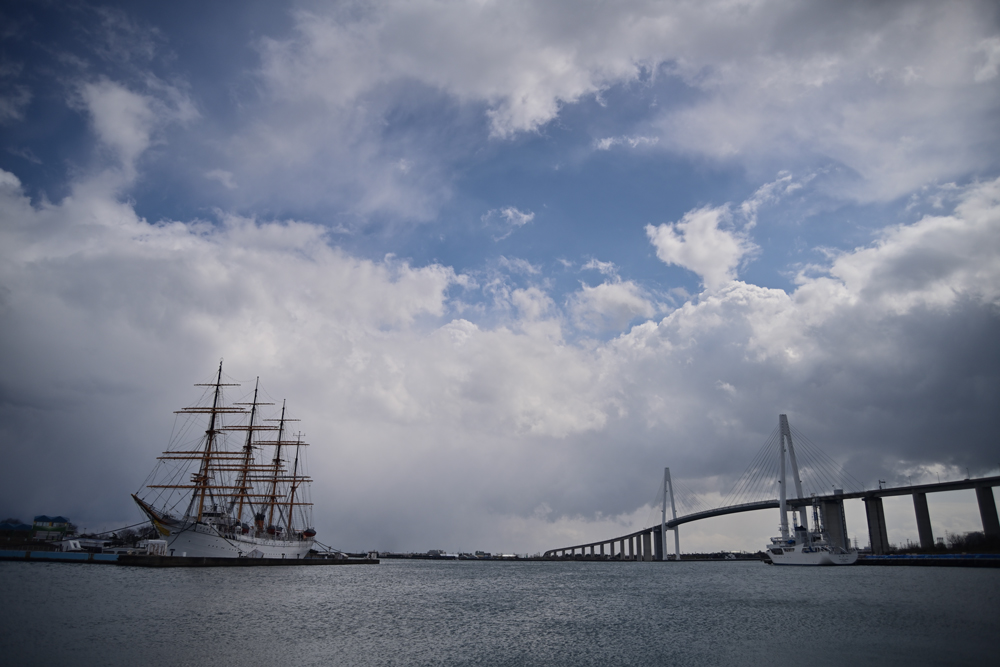
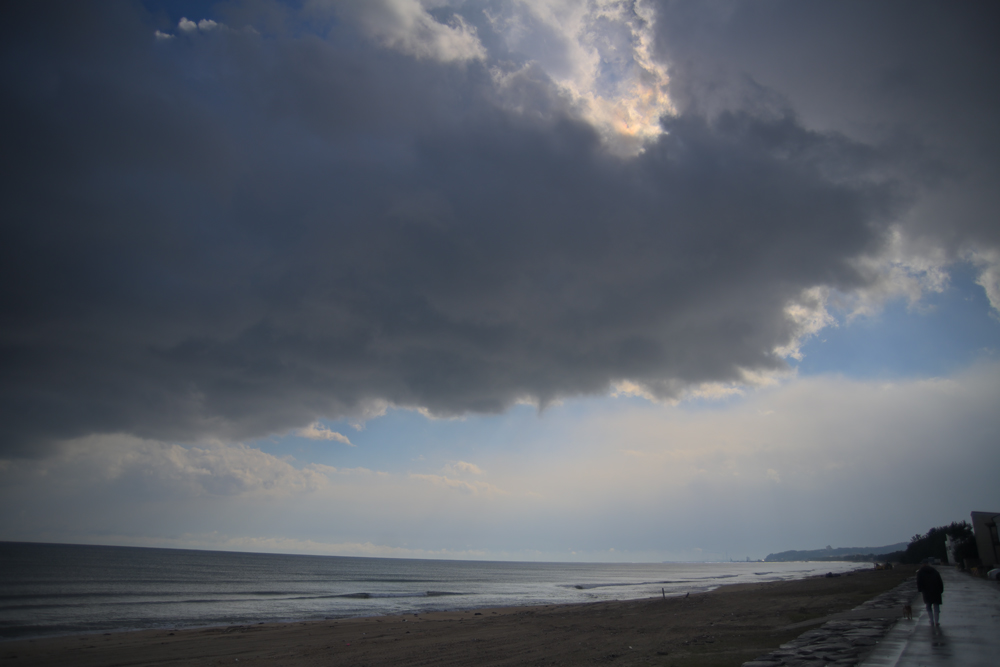
Z 7 + FTZ w/ Ai AF Zoom Nikkor 24-50mm F3.3-4.5S (at 24-mm equivalent)
Aperture: f/3.3 (maximum aperture)
Shutter speed: 1/8000 s
Exposure compensation: -0.3 EV
Sensitivity: ISO 160
Image quality: RAW
White balance: Auto
D-Lighting: Auto
Picture Control: Portrait
Date of capture: March 2024
Sample 8
Sample 8 is a distant scene captured at the wide-angle 24 mm and f/3.3. The subject is partially backlit, but the image is very clear with no ghost or flare. Rendering along the focal plane is sharp, even with the backlighting.
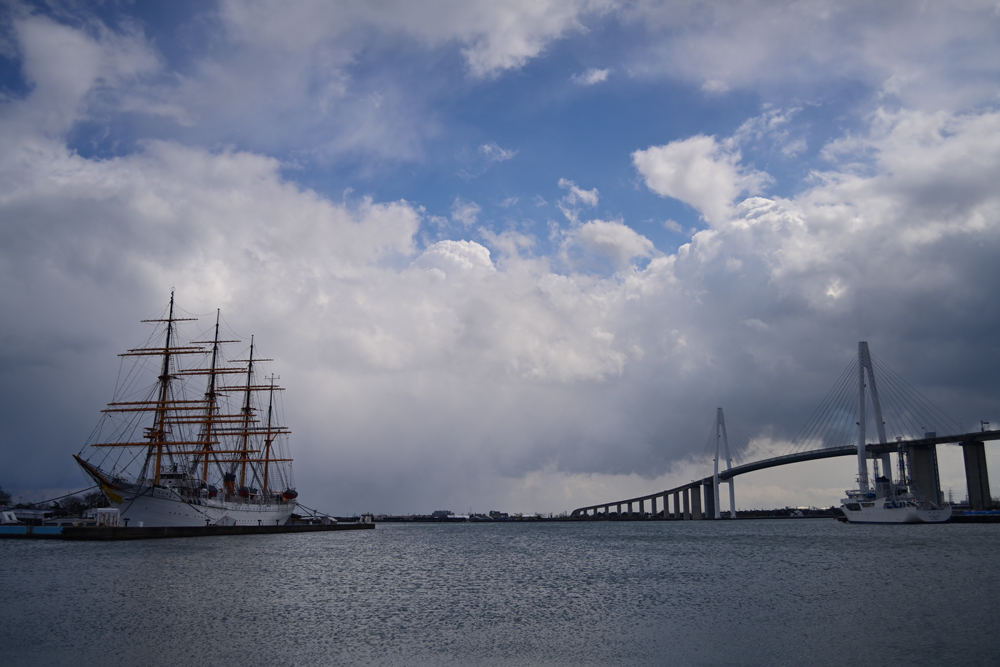
Z 7 + FTZ w/ Ai AF Zoom Nikkor 24-50mm F3.3-4.5S (at 31-mm equivalent)
Aperture: f/3.7 (maximum aperture)
Shutter speed: 1/8000 s
Exposure compensation: -0.3 EV
Sensitivity: ISO 200
Image quality: Raw
White balance: Auto
D-Lighting: Auto
Picture Control: Portrait
Date of Capture: March 2024
Sample 9
Sample 9 is a backlit shot captured at a mid-range focal length of around 31 mm and a maximum aperture of f/3.7. I included this shot for comparison with the photo captured at 24 mm. The subject is still clearly rendered with no ghost or flare. Rendering along the focal plane is sharp, even with the backlighting, and there is no sense of flare in the darker portions.
VIII. The best wide-angle zoom lens for "social issues photography"?
I learned photography from many photographers, especially during my twenties. I tried to imitate everything, from the shooting techniques of masters to the equipment they used. I was especially inspired by the photographs of Ihei Kimura and Ken Domon. I gradually became interested in photojournalism, and soon after starting work at Nikon, I was struck by the phrase, "social issues photography". I often wandered through the back alleys and underground passages of Shinjuku and Ikebukuro to take pictures, and in doing so, I also had some frightening experiences. It is a bit embarrassing to say, but there was a time when I had the ambition to create a personal collection of satirical photos of society. It was during this time that I designed the 24-50mm F3.3-4.5 wide-angle zoom lens. For the telephoto end, I aimed to correct aberrations by considering the characteristics of three-dimensional rendering I had researched since university. For the wide-angle end, I wanted to create a lens suited for social issues photography. Yet, as a beginner, I had no clear idea of what such a lens should be or how to define it, so I must have been spinning my wheels, driven solely by my strong determination. As mentioned earlier, the 24-50mm F3.3-4.5S was my first project. No matter how motivated I was, I was still little better than an amateur. I knew from the start there was no way it would turn out the way I hoped. I stumbled here and there with aberration correction... With the support of my superiors and the guidance of my mentor, I somehow managed to create a lens worthy of the Nikkor name. Immediately after its release, I asked several photographers to use the lens, give me their impressions of it, and tell me of any issues they experienced. I received a lot of harsh feedback. To be honest, I was very disappointed and almost lost trust in myself. At that time, a photojournalist said, "For some reason, I could capture striking photos when I stopped down the aperture at wide-angle positions. The lens would be great for social issues photography. I think journalists would use it. I think it would be suited for photojournalism." It seems my determination was embodied in the lens and reflected in the NIKKOR design values. This reaffirmed that what you think, you create. That was my first NIKKOR, and I'll never forget it. With this lens, my journey as a Nikkor lens designer, which I had long admired, began.
NIKKOR - The Thousand and One Nights
The history of Nikon cameras is also that of NIKKOR lenses. This serial story features fascinating tales of lens design and manufacture.

