NIKKOR The Thousand and One Nights No.89

The fast portrait lens photographers longed for
AI Nikkor 85mm f/1.4S
Tale 89 covers the AI Nikkor 85mm f/1.4S. What sort of lens was Nikon's first 85mm f/1.4? In this Tale, we'll unravel the secrets of the AI Nikkor 85mm f/1.4S, a coveted fast (bright) lens that photographers had eagerly awaited.
The lens has a sophisticated and dignified appearance and the most advanced specs of the time. I'm quite sure it incorporates all of the developer's knowledge and skill. What sorts of things did he have to consider in designing the lens? Tale 89 looks back at the beginning of the AI Nikkor era when fast portrait lenses were being planned and developed.
By Haruo Sato
I. The passage of time and faster apertures
What is the best focal length for portrait photography? That question would likely result in a wide variety of answers. However, even if they don't go as far as to say it's the best lens, anyone would naturally settle on a lens they feel has a convenient focal length (or more accurately, angle of view). As I previously mentioned in Tale 59, there are two preferred focal lengths—85 mm and 105 mm. Portrait photography requires a lens with a fast f-number to beautifully hide the background. The first portrait lenses were f/4- and f/3.5-class medium-telephoto lenses. As time progressed, however, apertures gradually became faster: f/2.8 to f/2 to f/1.8 to f/1.4. The evolution of medium-telephoto lenses closely follows the evolution of design technology, computers, and even the evolution of optical software. In addition, lenses with a focal length of 70 mm to 120 mm are actually the easiest to design for the 35mm format. Many will be surprised by that statement. Why are medium-telephoto lenses easier to design than other interchangeable lenses? The answer is that with these lenses, both chromatic aberration and off-axis aberration can be corrected in a well-balanced manner. The occurrence of axial chromatic aberration, especially second-order dispersion, also known as second-order chromatic aberration, increases as the focal length increases. On the other hand, the wider the angle of view, the more difficult it becomes to correct off-axis aberrations. What's more, in the era of SLR cameras, there was a need for smaller cameras that still maintained a certain amount of back focus. For these reasons, the 70 mm to 120 mm range of focal lengths provide sufficient design freedom for the 35mm format. In more general terms, these are the focal lengths that allow for the easiest design. Therefore, the question becomes, "What should the design freedom we have achieved be used for?" One direction taken was toward faster apertures and better performance. The other was toward smaller sizes and lower costs. With these intentions in mind, 85mm lenses developed by all manufacturers became faster and faster. The result at Nikon was the AI Nikkor 85mm f/1.4S. In a sense, the lens was inevitable.
II. Development history and the designer
Though Japan's great lens designers are not generally known, we can trace their work through reports, development histories, and patents. Now let's take a look at the history behind development of the AI Nikkor 85mm f/1.4S. The AI Nikkor 85mm f/1.4S was developed as if there was a division of labor from basic design to final improvements after the prototype was created, which was unusual at the time. The basic design was by Takashi Takiguchi who, at the time, worked in the 1st Optical Section, Optical Designing Department. Takiguchi was in charge of everything from initial design to finalization of the design policy and creation of the initial solution. Takiguchi was then succeeded by Academy Award winner Daijiro Fujie, who made a notable appearance in Tale 23. Fujie designed the mass-production product based on the original design. He was responsible for creating drawings and initiating mass production. Prior to designing this 85mm f/1.4 lens, Takiguchi was primarily responsible for the design and development of industrial lenses like the Ultra Micro-Nikkor and Apo-Nikkor lenses. He also designed the Bronica Nikkor HC 75mm f/2.8DX and Nikkor lenses for the Plaubel Makina cameras. Takiguchi was thoroughly familiar with the basic lens structures, as he was with the structure used for the 85mm lens, and invented and introduced many original lens structures to the world. The optical design of these lenses made it seem as if they were designed with the premise they would be used to photograph three-dimensional objects. As an optical designer, Takiguchi had a wealth of knowledge and design sense. However, he was a man with a wide variety of knowledge and ideas, so he was also sought after by other departments. As a result, he was transferred to the computer department, where he managed large computers, in 1978. He became an excellent software developer. I was very disappointed when I heard this from Fujie as I was writing Tale 89. The three lenses that have what I considered outstanding designs were invented and designed by Takiguchi. Moreover, these three lenses were the only photographic lenses he designed. I wanted to take more pictures with Nikkor lenses designed by Takiguchi. I wonder what sorts of famous lenses he would have created if he had continued in optical design. Unfortunately, there are no "what ifs" in history, but... It really is too bad.
Now let's take a look at the development history. It is unknown when work on the design began, but the optical design report for this lens was submitted in 1979. In addition, the report was submitted after a long delay. We know this because, based on his initial solution, Takiguchi submitted prototype drawings and began trial production in January 1978. Trial production progressed smoothly and responsibility was transferred to Fujie. After various evaluations, including optical testing, minor modifications were made and mass production was approved. Mass production began in September 1979. Production began at the Sagamihara Plant, which originally produced most of the AI Nikkor lenses. Trial production allowed for the creation of a lens with which everyone was satisfied, and a lens design report was written in time for mass production. Therefore, there is no doubt that the actual initial design was completed before December 1977. Mass production progressed smoothly and the AI Nikkor 85mm f/1.4S was released in September 1981. This fast lens had great value as a representative of the new Nikkor lenses because the Nikon F3 had just been released in 1980. Nikon's first 85mm f/1.4 lens was released as a so-called AI-S lens structure from the very beginning. Therefore, there is only one version of Nikon's first 85mm f/1.4 lens, the AI-S version. As time progressed, Nikon developed its Super Integrated Coating (SIC). This anti-reflection coating would also be applied to this lens during mass production. However, just as Nikon was steadily gaining acclaim in the market, a major event occurred that turned the industry upside down. That event was the European Union's Restriction of Hazardous Substances Directive (RoHS). The industry was rapidly heading toward a more ecologically friendly era before this directive went into effect. As a result, glass materials changed completely. All Nikkor lenses mass-produced during this period were affected. Designs and drawings for all mass-produced products had to be revised. Though the change was very small, the design was revised to accurately reproduce the aberration correction achieved with the original design solution. AI Nikkor 85mm f/1.4S design was also revised at this time. However, it seems that production was discontinued just as the change came about, and the effort came to naught.
On the other hand, the transition to a full-fledged AF system dates back to 1986 with the release of the Nikon F-501. Even though the full-fledged AF era had arrived, AI Nikkor lenses were still the mainstream around 1995. In December 1995, however, the AI AF Nikkor 85mm f/1.4D (IF) designed by Oshita was released and inherited the throne. AI Nikkor lenses then gradually disappeared. Even if we assume the AI Nikkor 85mm f/1.4S was an active player until 1996, it would still have been a favorite for around 15 years, and, if we assume that continued to sell until the RoHS Directive was fully implemented, it would have continued to be a favorite for as many as 22 years. This makes it a long-selling Nikkor lens. The basic performance of the AI Nikkor 85mm f/1.4S was such that there was never a need for improvement. This fast lens developed by Takiguchi and Fujie served as a perfect partner for the F3. Then, with the start of the full-fledged AF era, we saw the curtain close on this lens and the F3.
III. Lens construction and characteristics
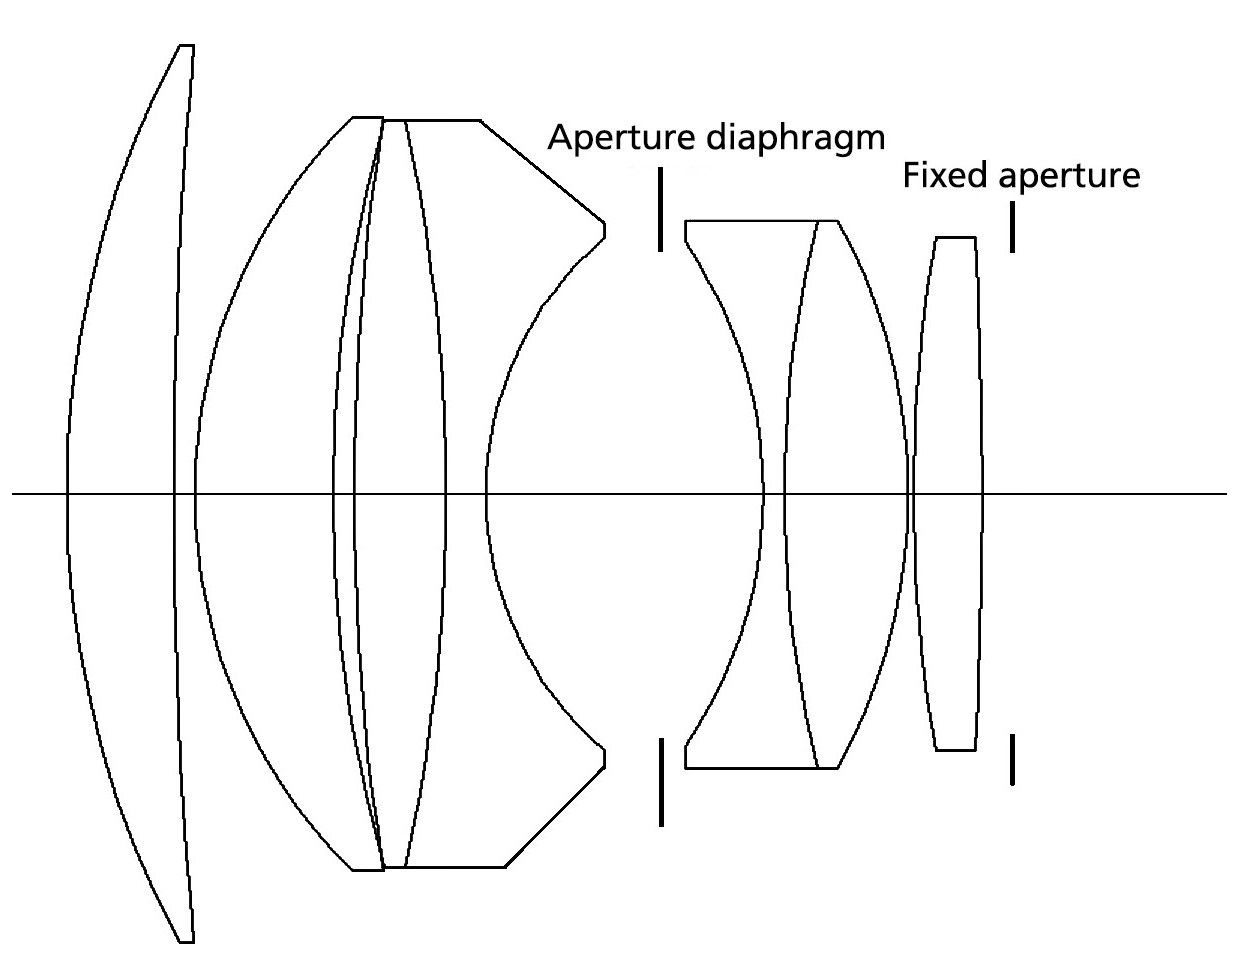
Now, take a look at the cross section of the AI Nikkor 85mm f/1.4S (Fig. 1). This optical system is a new structure created by Takiguchi. If I were to try to classify it, I think it would be best classified as a modified Gauss structure.
The area in front of the aperture (front group) is unique. By adding a pinch of Sonnar to the convex-convex-concave Gauss-structured front group, he created a sort of hybrid Gauss-Sonnar lens. In addition, the lens was equipped with a convex meniscus-shaped air lens in the middle. This is truly a great Takiguchi invention. If you recall, a debate arose as to whether the Gauss or Sonnar structure was better after WWII. During that period, a number of modified lens structures that had both features of Gauss and Sonnar within them were created. With the advent of the modified lens structures that were intended to combine the best features of both, the competition for larger apertures intensified and a variety of fast lenses were produced. I don't know if Takiguchi was aware of the existence of those previous hybrid structures. However, if he didn't know about this historical dispute regarding lens structures and suddenly invented this new hybrid structure, then a tremendous amount of creativity on his part was required. In any case, the lens created with this air lens deserved to be called a genuine hybrid Gauss-Sonnar lens and was ideal for increasing lens speed. The glass material was selected not only to correct first-order chromatic aberrations, but also to reduce second-order dispersion. This too can be considered proof of the craftsman's skill. The group behind the aperture has the same configuration as a common Gauss lens. However, Takiguchi had another idea. Instead of extending the final convex lens as is when focusing at close range, he had it move by a different amount than the six lens elements in front of it. This is known as the short-range correction method (floating mechanism). This structure suppresses the variations in aberration that tend to occur with shooting at close distances with fast lenses
.
IV. Design performance and evaluation
First let's look at design data. As I have always stated, evaluations are both subjective and relative. Please use my own evaluations merely as reference.
An innovative lens structure was adopted for this lens, making it one for the textbooks. The front convex-convex-convex-concave group uses achromatism and higher-order aberrations to skillfully correct spherical aberration, axial chromatic aberration, and coma. Astigmatism is also well corrected, and the meridional and sagittal image planes nearly overlap with no noticeable variations in aberration that tend to occur with shooting at close distances. This is partly due to the use of a close-range correction mechanism, but I'm sure Takiguchi was very aware of what was important for this lens. Distortion and lateral chromatic aberration are very well corrected, taking full advantage of the symmetrical lens structure. Sagittal coma, which is a major drawback of fast Gauss lenses, was dramatically reduced by incorporating aspects of the Sonnar structure. It was at a level that was rarely noticeable with standard shooting.
Let's take a closer look at the aberration correction characteristics at various reproduction ratios. We'll start with aberration characteristics with imaging of an object point at infinity. First, we will look at the maximum aperture of f/1.4, where 1.4 originally represents the square root of 2, so f/1.4141... is the median value. However, this maximum aperture of AI Nikkor 85mm f/1.4S was calculated at f/1.39. You can see that it was expected to be faster than the original f/1.4 value. Next, we'll look at aberration characteristics. Axial chromatic aberration tends to be slightly different than that of other relatively slow Nikkor lenses. Along the axis the g line is a little more negative than the so-called d-g correction, and it is located exactly between the F and d lines. This is a correction method that actually makes second-order dispersion of axial chromatic aberration appear to be greater. So why did he choose this axial chromatic aberration correction balance? The answer lies with chromatic spherical aberration. This lens provides almost full correction of d-line spherical aberration. However, g-line spherical aberration is slightly over-corrected. In short, the spherical aberration correction form differs for each color. This is often referred to as chromatic spherical aberration, and while the degree varies with lens used, it is a frequent issue with common photographic lenses. However, Gauss lenses should have a way to suppress this chromatic spherical aberration on their own. In short, the Gauss structure makes it easier to control this chromatic spherical aberration than do other structures. The Sonnar portion of the structure may have backfired on this point. The Sonnar structure is generally an asymmetric optical system, which makes chromatic spherical aberration relatively common. I think Takiguchi achieved this achromatic effect by selecting glass materials that minimized the occurrence of second-order dispersion as a countermeasure against chromatic spherical aberration.
Next let's look at aberration performance for an object positioned at a finite distance. At a magnification of -1/30x, approximately 2.7 m is the most common shooting distance used for portrait photography. There is very little variation in aberration when shooting at close distances. The only visible changes are in lower coma and lateral chromatic aberration. Downward rays of light are slightly displaced in the positive direction, and lateral aberrations are optimally balanced. Lateral chromatic aberration also shifts slightly in the negative direction, further reducing residual aberration.
What happens to aberration characteristics when shooting at a close distance of 0.85 meters? First the ring-shaped zone of spherical aberration shifts more in the negative direction than it does at infinity. This results in a more bulging shape. In addition, curvature of field does not increase astigmatism, and it is only slightly displaced in the negative direction in accordance with spherical aberration. The biggest change is that downward rays of light are slightly displaced in the positive direction, resulting in outer coma. In a sense, this is unavoidable as it is not caused by the design, but the MTF values remain at a level that does not cause a significant drop. Further, lateral chromatic aberration gradually shifts the g-line in the negative direction, but changes in lateral aberration makes it less noticeable in actual images.
Now let's look at a spot diagram. First, from infinity to a magnification of around -1/30x, a point image is well condensed at the center of the frame with a clear core surrounded by a small amount of flare. However, as the image height increases, flare gradually begins to occur in the sagittal direction. Luckily, the concentration of energy is so small that it doesn't seem to be a concern with standard photography. How does the MTF chart look at close distances? There is a slight increase in flare near the center of the frame, but no significant difference from that produced with shooting at longer shooting distances. However, as the image height increases, outer coma tends to appear around the edges of the frame. On the other hand, the amount of peripheral illumination is maintained at least 40%. I think this is outstanding for an f/1.4 fast lens.
Now let's look at MTF characteristics. The first thing I can say from observing values at 10-30 lines/mm at infinity is that the values and shapes of the meridional and sagittal MTF peaks match perfectly all the way to the edges of the frame. This suggests that the centers of point objects are nicely rounded. It also indicates good three-dimensional rendering characteristics. Contrast at 30 lines/mm measures less than 50% at the center of the frame. Contrast gradually decreases toward the edges of the frame, but remains at around 30%. At 10 lines/mm, however, a higher value of 85% is maintained at the center of the frame. As the AI Nikkor 85mm f/1.4S is a fast lens, though, contrast gradually decreases to approximately 50% at the edges of the frame. Due to these MTF characteristics, users can expect softer tones that appear well resolved, but with slight flare. In the portraiture range, where the shooting magnification is -1/30x, the center becomes slightly softer, but the overall trend remains the same as when shooting at infinity. How does the MTF chart look at close distances? At a shooting distance of 0.85 m (shooting magnification of -1/7.9x), contrast measuring around 30% is reproduced at the center of the frame at 30 lines/mm, but gradually declines due to outer coma as the distance from the center increases, finally dropping to approximately 20% at the extreme edges. Contrast at 10 lines/mm is also low, but considering the reproduction ratio, we can assume that satisfactory images will still be captured. As I mentioned before, depth of field becomes shallower as the shooting magnification increases at close distances. However, this shouldn't be an issue except when photographing a flat subject like a newspaper page in detail. When photographing a three-dimensional object, the MTF value for the focus position at each image height is what's important. I don't think we should place special emphasis on the flatness of the entire plane. In fact, the three-dimensional rendering characteristics of this lens may be good. Now let's see what the lens can actually produce.
V. Actual performance
Next let's look at results achieved with some actual images of distant scenes. For this lens, I used a Nikon Z 7 mirrorless camera with the FTZ mount adapter to capture sample images.
I will explain performance at each aperture setting. Evaluations are subjective and based on individual preferences. Please keep in mind that my opinions on sample images and evaluations are for reference purposes only.
f/1.4 (maximum aperture)
As expected, resolution is very good. Very detailed subjects are clearly rendered from the center of the frame to the extreme edges. Contrast, however, is somewhat compressed by symmetrical flare. This results in so-called thin-line rendering. There is no noticeable chromatic aberration. The overall image is pleasing with extremely soft reproduction characteristics.
f/2
Rendering characteristics change completely by stopping down the aperture by just one stop. The surrounding flare is almost eliminated, and contrast increases greatly. These changes, however, do not result in a sharp, high-contrast image. The image is clean with pleasant rendering characteristics.
f/2.8
The image becomes even clearer. It also seems sharper, and both resolution and contrast seem to have increased. The image quality is fantastic.
f/4 to f/5.6
The best image quality is consistently maintained throughout the entire frame at aperture settings in this range. Image quality at the extreme edges of the frame is increased. Flare is completely eliminated all the way to the outermost edges. Image quality is perfect!
f/8 to f/11
The best image quality is consistently maintained throughout the entire frame at aperture settings between f/8 and f/11. The average image quality across the entire frame increases. Image quality is perfect! Overall, the best image quality is achieved at this aperture setting.
f/16
Resolution drops slightly with some roughness. This seems to be due to the effects of diffraction. It is probably better not to stop down the aperture this much with normal shooting.
VI. Sample images
Now let's confirm these rendering characteristics with some sample photos. This time I captured all samples with the aperture set to the maximum aperture of f/1.4.
As always, Picture Control settings that apply less sharpening are generally used so that readers may best judge the characteristics of the lens. Further, no special compensation or adjustment of characteristics such as sharpness is performed. Subjects were selected based on how I assume the lens would be used by general users. I tried to cover the full range of shooting distances with these samples.

Z 7 + FTZ w/ Ai Nikkor 85mm f/1.4
Aperture: f/1.4 (maximum aperture)
Shutter speed: 1/6400 s
Exposure compensation: +0.1 EV
Sensitivity: ISO 640
Image quality: RAW
White balance: Auto
D-Lighting: Auto
Picture Control: Portrait
Date of capture: March 2023
Sample 1
Sample 1 was captured at a short shooting distance.
I deliberately chose a composition that placed the subject in the foreground and the background. Of course, the image was captured at the maximum aperture of f/1.4. I have no complaints regarding sharpness at the focus point, and I think the foreground and background bokeh is good with little tendency toward double-line blur. I like the image.

Z 7 + FTZ w/ Ai Nikkor 85mm f/1.4
Aperture: f/1.4 (maximum aperture)
Shutter speed: 1/8000 s
Exposure compensation: +0.15 EV
Sensitivity: ISO 450
Image quality: RAW
White balance: Auto
D-Lighting: Auto
Picture Control: Portrait
Date of capture: March 2023
Sample 2
Sample 2 was captured at a slightly greater distance. This image was also captured at the maximum aperture of f/1.4. I chose a subject that would allow me to observe the continuity of background bokeh starting from the focal plane. It goes without saying that the image is very sharp along the focal plane, but the most distinguishable characteristic is the straightforward background bokeh. As you can see, there is little tendency toward double-line blur and rendering is straightforward.

Z 7 + FTZ w/ Ai Nikkor 85mm f/1.4
Aperture: f/1.4 (maximum aperture)
Shutter speed: 1/8000 s
Exposure compensation: +0.1 EV
Sensitivity: ISO 500
Image quality: RAW
White balance: Auto
D-Lighting: Auto
Picture Control: Portrait
Date of capture: March 2023
Sample 3
Sample 3 was captured at nearly the minimum focus distance. Of course, the image was captured at the maximum aperture of f/1.4. Flowers, the tips of the stamens, and flower petals are beautifully rendered and exhibit excellent detail. See how the defocus range is rendered. Bokeh is elegant, beautiful, and natural.

Z 7 + FTZ w/ Ai Nikkor 85mm f/1.4
Aperture: f/1.4 (maximum aperture)
Shutter speed: 1/1250 s
Exposure compensation: ±0 EV
Sensitivity: ISO 640
Image quality: RAW
White balance: Auto
D-Lighting: Auto
Picture Control: Auto
Date of capture: March 2023
Sample 4
Sample 4 was captured at a distance of approximately two meters. This image was also captured at the maximum aperture of f/1.4. You can see the sharpness along the focal plane and the rendering of front and rear defocus areas. Superior resolving power is exhibited along the entire focal plane. You can see some color fringing caused by axial chromatic aberration along the dripping water, as well as on rock surfaces that are a bit beyond the depth of field. However, at this range it may not be noticeable if not closely observed. I think this was a lens that clearly exhibited chromatic aberration that was well-corrected for the times.
The following examples show lens characteristics with portraiture. Unfortunately, my daughter, who served as a model for NIKKOR the Thousand and One Nights on a voluntary basis, has graduated from modeling since entering the workforce. I asked the daughter of my music teacher to model for me for this Tale. Let's look at some examples.

Z 7 + FTZ w/ Ai Nikkor 85mm f/1.4
Aperture: f/1.4 (maximum aperture)
Shutter speed: 1/1250 s
Exposure compensation: ±0 EV
Sensitivity: ISO 640
Image quality: RAW
White balance: Auto
D-Lighting: Auto
Picture Control: Portrait
Date of capture: August 2023
Sample 5
Sample 5 was captured at a shooting distance of approximately 1.5 meters, which is the distance most commonly used for portraits. It is impossible to evaluate the AI Nikkor 85mm f/1.4S without photographing people. Of course, the image was captured at the maximum aperture of f/1.4. First of all, I have no complaints regarding sharpness along the focal plane. Enlarge the image and see for yourself. The resolution of the eyelashes and reality of the shadows reflected in the eyes are truly amazing. In addition, the background exhibits little tendency toward double-line blur for very smooth and gentle bokeh.
Z 7 + FTZ w/ Ai Nikkor 85mm f/1.4
Aperture: f/1.4 (maximum aperture)
Shutter speed: 1/1250 s
Exposure compensation: ±0 EV
Sensitivity: ISO 640
Image quality: RAW
White balance: Auto
D-Lighting: Auto
Picture Control: Portrait
Date of capture: August 2023
Sample 6
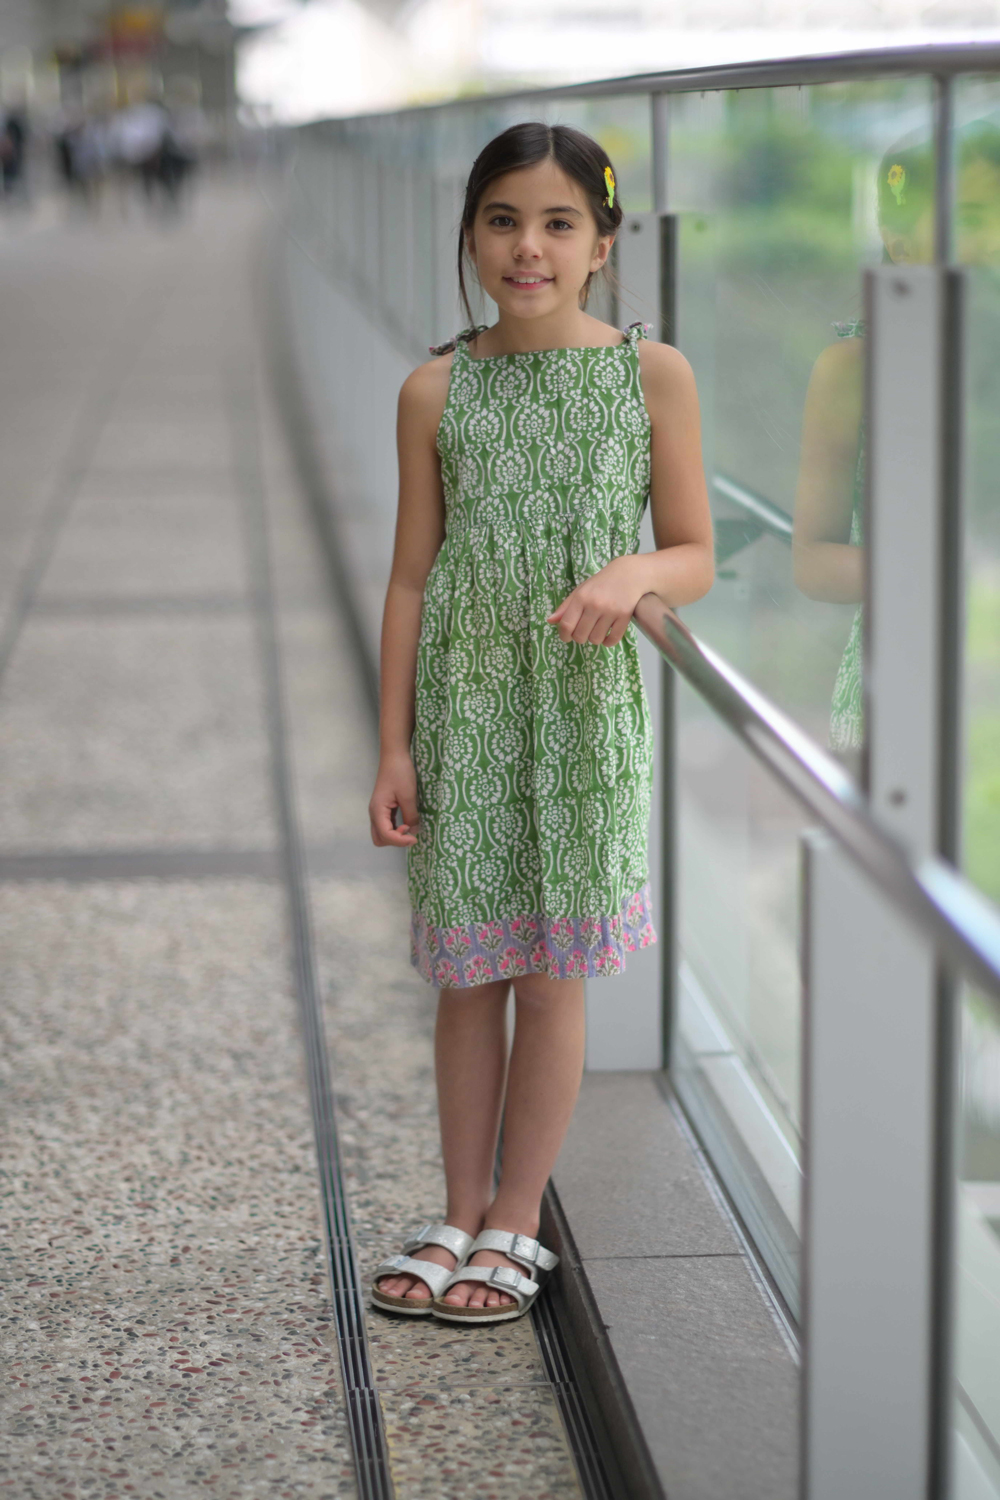
Sample 6 is a full-body portrait captured in vertical orientation. The shooting distance was approximately 2.5 m, so slightly longer than that used for Sample 5. Of course, the image was captured at the maximum aperture of f/1.4. I have no complaints regarding sharpness at the focal position. The reality of the shadows reflected in the eyes is incredible.
The level of sharpness exhibited by the lens is obvious even in the patterns in the dress. In addition, I chose a scene that included a detailed regular pattern to make judging foreground and background bokeh easier. Foreground bokeh is good, but background bokeh leans toward double-line blur. However, only slightly.
Z 7 + FTZ w/ Ai Nikkor 85mm f/1.4
Aperture: f/1.4 (maximum aperture)
Shutter speed: 1/1600 s
Exposure compensation: ±0 EV
Sensitivity: ISO 640
Image quality: RAW
White balance: Auto
D-Lighting: Auto
Picture Control: Portrait
Date of capture: August 2023
Sample 7
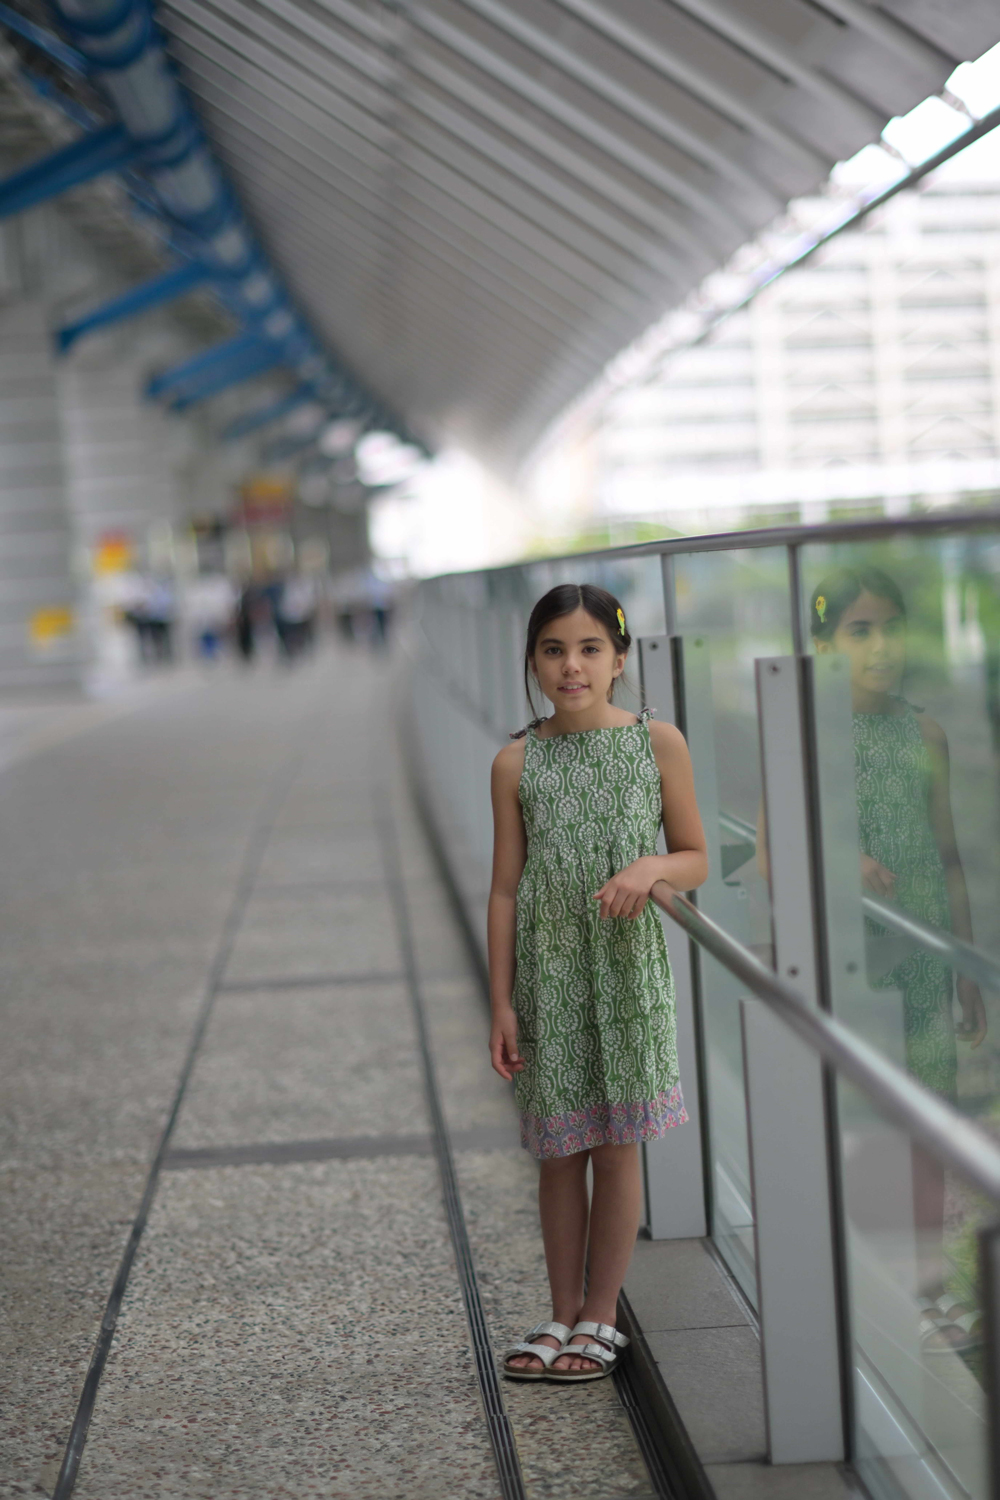
Sample 7 was captured at a slightly greater distance at the maximum aperture of f/1.4. Sharpness at the focal position is good. The focal position is slightly in front of the subject and the real focal plane is on the pattern on the girl's dress. Even in this example, we can judge the continuity of foreground to background bokeh. You can determine the tendency toward double-line blur from the transition from fine to medium bokeh, and the effects of vignetting in medium to large bokeh. There is a tendency toward double-line blur in areas close to relatively large blur in the background bokeh. Again, only a slight one.

Z 7 + FTZ w/ Ai Nikkor 85mm f/1.4
Aperture: f/1.4 (maximum aperture)
Shutter speed: 1/2500 s
Exposure compensation: ±0 EV
Sensitivity: ISO 640
Image quality: RAW
White balance: Auto
D-Lighting: Auto
Picture Control: Portrait
Date of capture: August 2023
Sample 8
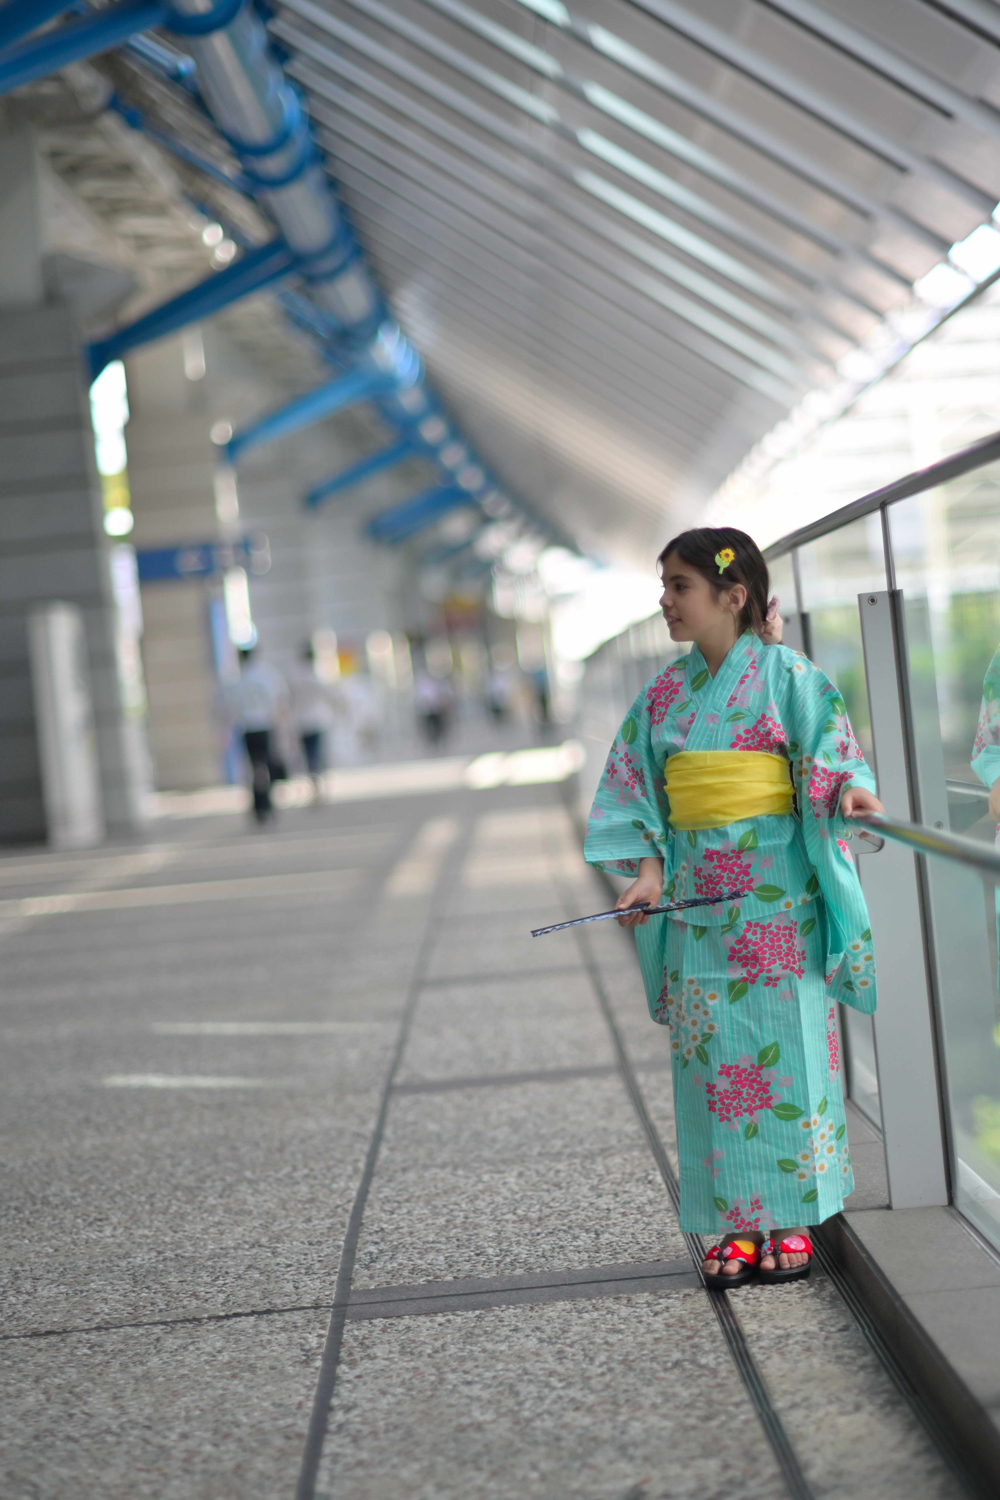
Sample 8 includes reflected light in the background. It was captured at a distance of approximately 1.5 m at the maximum aperture of f/1.4. Even with the backlighting, the focal plane is sharp. In addition, background bokeh isn't bad. There is no double-line blur, and rendering is pleasing.
Z 7 + FTZ w/ Ai Nikkor 85mm f/1.4
Aperture: f/1.4 (maximum aperture)
Shutter speed: 1/2500 s
Exposure compensation: ±0 EV
Sensitivity: ISO 640
Image quality: RAW
White balance: Auto
D-Lighting: Auto
Picture Control: Portrait
Date of capture: August 2023
Sample 9
Sample 9 is fully backlit. It is an example of an image with strong light reflected in the background just as the sunlight was getting brighter. It was captured at a distance of approximately three meters at the maximum aperture of f/1.4. Even with the backlighting, the focal plane is sharp. And while there is some double-line blur in the background bokeh, it seems very slight. Now let's look at the face. There is some color fringing along her profile. You may notice a small amount of red color bleed. Although it is barely noticeable at a display size of 100%, it can be said to be the result of residual axial chromatic aberration.

Z 7 + FTZ w/ Ai Nikkor 85mm f/1.4
Aperture: f/1.4 (maximum aperture)
Shutter speed: 1/100 s
Exposure compensation: ±0 EV
Sensitivity: ISO 640
Image quality: RAW
White balance: Auto
D-Lighting: Auto
Picture Control: Portrait
Date of capture: August 2023
Sample 10
Sample 10 was captured at the minimum focus distance of 0.85 m at the maximum aperture of f/1.4. Focus was acquired on the eyelashes. I have no complaints as they are sharply rendered. Background bokeh is also very clear with no tendency toward double-line blur in either foreground or background bokeh.
What do you think of this lens' straightforward rendering and delicate and precise imaging? I was very satisfied with every shot captured using this lens. Takiguchi successfully developed a fast portrait lens that is truly Nikkor-like in its sincerity and impressiveness. In the era of zoom lenses, it can be said that the rendering exhibited by this fast lens is due to the fact that it is a prime lens.
VII. The fusion of the Gauss and Sonnar structures
The Sonnar structure was invented by Dr. Ludwig Bertele, who you all are sure to know. It surpassed the f/2 barrier that was thought to be the limit at the time, and achieved the world's fastest speed of f/1.5 for its time. His highly unique and original lens configuration amazed not only photographers and hobbyists, but also optical designers around the world. It is said that it is possible to analyze and evaluate an invention after the fact with just one one-hundredth of the inventor's knowledge. Doing so would be easy for a scholar or engineer in the same field. I believe that we should give far more credit to pioneers. Using the original Sonnar as a model, designers around the world have researched and developed various Sonnar structures. The optical structure that best represents the Sonnar structure is described as follows.
i. The power arrangement is a telephoto structure
The advantage is that the overall length and aperture diameter can be reduced. The disadvantages are that there is more variation in aberrations with shooting at close distances than there is with symmetrical lenses, and there is an inherent tendency for positive (pincushion) distortion to remain
ii. It is comprised of three elements
The advantage is that there are only six surfaces coming in contact with air. It is resistant to ghost and flare, making it capable of clear rendering. The disadvantage is that the frequent use of cemented triplets limits the degree of freedom in designing lens surfaces. Simply put, there are only four curvature radii for the three lens surfaces joined together. However, three lens elements that are separated has six lens surfaces. Therefore, separate lens elements clearly offer a higher degree of design freedom.
iii. Highly corrective nature of the rear cemented triplet
The advantage is the presence of a stopper surface. By providing a lens surface that is concentric with the aperture diaphragm and has a small curvature radius, it is possible to reduce spherical aberration by utilizing high-order aberrations with respect to the pupil, and achieve an even larger aperture. However, there are also drawbacks. The effect of this stopper surface decreases as the angle of view increases, eventually eliminating all corrective effects. This makes it difficult to increase the angle of view. It is also very difficult to manufacture.
Bertele's great invention would be passed along to optical designers around the world with a thorough understanding of these advantages and disadvantages. On the other hand, the Gauss (or more precisely, the double Gauss) structure also has its advantages and disadvantages. However, its characteristics are contradictory to the Sonnar structure. What would you do? Yes. Many optical designers around the world have considered a compromise between Sonnar and Gauss. This technological development is a natural progression. As a result, many optical systems are created based on the idea that the front group has a Sonnar structure and the rear group a Gauss structure. Among these, the Zunow 5cm f/1.1 and Fujinon 5cm f/1.2 were lenses with even more advanced rear group configurations. However, the cemented triplet of the front group remained untouched for a long time. Of course, we're talking 40 to 50 years ago, so there was a world of difference in glass materials and computer speeds. I believe, though, that designers' creativity and inspiration is timeless. I believe that this AI Nikkor 85mm f/1.4S represented the completion of a thoroughly improved version of the front lens group that had remained untouched for forty years.
The design method adopted for the AI Nikkor 85mm f/1.4S can be described as taking a scalpel to the cemented triplet of the front Sonnar group, which had remained the same until that point. First, let's consider the effectiveness of aberration correction by the cemented triplet of the front Sonnar group. A standard convex-concave-convex or concave-convex-concave cemented triplet allows the optical correction by each cemented surface to be fully demonstrated. However, the triplet of the front Sonnar group has a convex-convex-concave structure. The problem is optical correction performed by the convex lens in the middle. The original Sonnar structure uses glass material with a significantly lower refractive index and less dispersion for the second convex element than for the first. I wouldn't go so far as to say the second convex element isn't necessary, but the two convex cemented surfaces do not actively correct aberrations. Bertele filled the gap with glass with the lowest refractive index instead of filling it with air. The Sonnar structure was developed on the eve of the development of coating technology. He just wanted to reduce the surfaces that come into contact with air. With this in mind, Bertele developed a means of filling the space between the first convex and concave portions with glass. Therefore, once the use of coatings becomes common, this cemented triplet would be replaced by two separate convex and concave elements. So, does this convex-convex doublet have no meaning at all? No. It is thought that the convex-convex doublet creates a convex lens with a refractive index and dispersion characteristics exactly between those of the first and second convex elements. Doing so may have been particularly effective although a little costly at a time when glass materials were hard to come by. Takiguchi developed the convex-convex-concave cemented triplet into a structure that offered the maximum optical correction. He separated the first convex element from the convex-convex-concave cemented triplet and filled the gap between it and the second convex element with a convex meniscus-shaped air lens (with negative refractive power). As a result, the convex-convex-concave triplet evolved into a revolutionary new convex element + air lens + convex-concave doublet structure. This effectively eliminated contradictions and clarified the role of each element in the optical design. The structure's tremendous aberration correction also gave rise to a wide variety of ways to use glass materials and freedom in selecting curvature radii. Indeed, Takiguchi perfected the compromise between the Sonnar and Gauss structures, and put an end to the long-standing, complicated designs that used high-order aberrations to eliminate other aberrations.
NIKKOR - The Thousand and One Nights
The history of Nikon cameras is also that of NIKKOR lenses. This serial story features fascinating tales of lens design and manufacture.

