NIKKOR The Thousand and One Nights No.87
Challenging limits
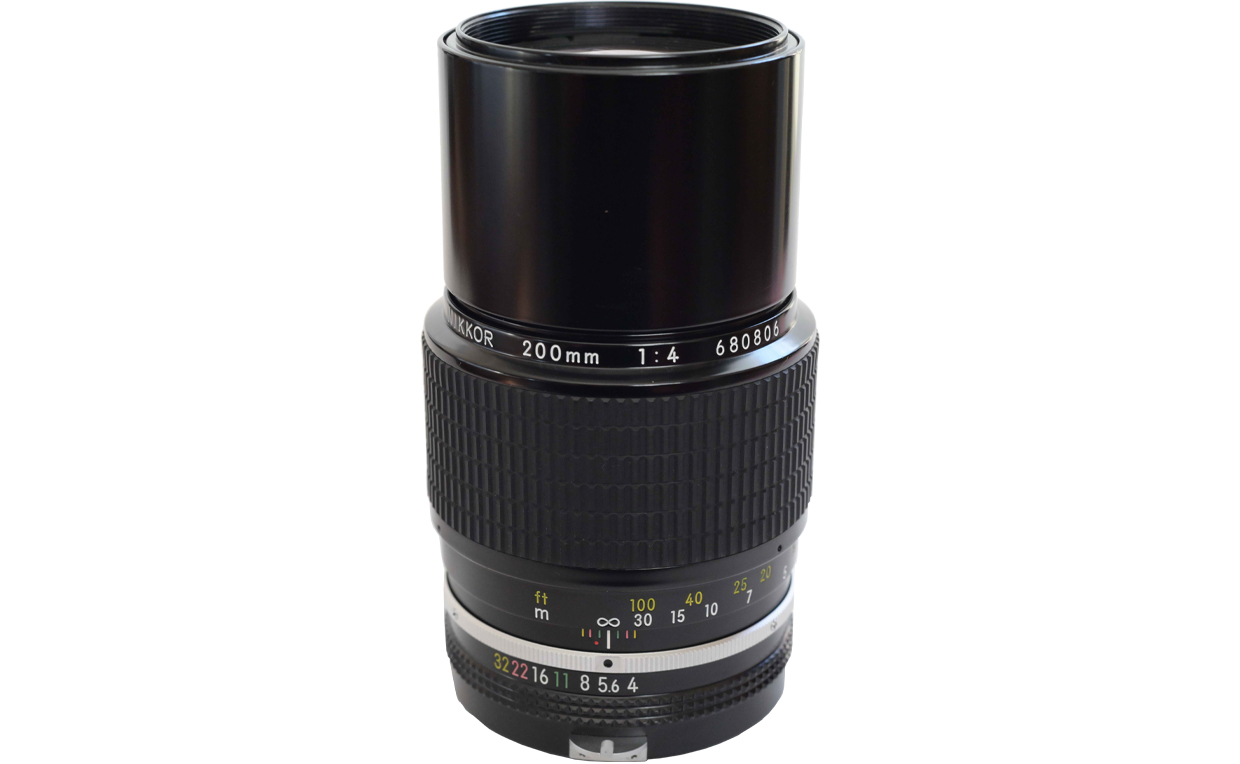
New Nikkor 200mm f/4
In Tale 87, we'll look at the new Nikkor 200mm f/4. This telephoto lens was an updated version of a popular Auto Nikkor, and for which a completely different structure was adopted. In this Tale, let's unravel the secrets of the new Nikkor 200mm f/4.
At first glance, the specifications for this telephoto lens look rather basic. However, the more basic specifications appear, the more designing skill and wisdom are required. The new Nikkor 200mm f/4 is this sort of lens. In this Tale, we will look at the era in which this small telephoto lens, which was planned and developed at the dawn of the new Nikkor age, originated.
By Haruo Sato
I. Telephoto lenses and telephoto ratios
There are a few important aspects to keep in mind when considering the optical characteristics of a telephoto lens. First, I'll explain the characteristic telephoto type of lens made of a basic lens structure. Take a look at Figure 1. Most current telephoto lenses are constructed with a telephoto structure like that seen in Figure 1. What, exactly, makes a lens a telephoto lens? The structure of the new Nikkor 200mm f/4 is a good example.
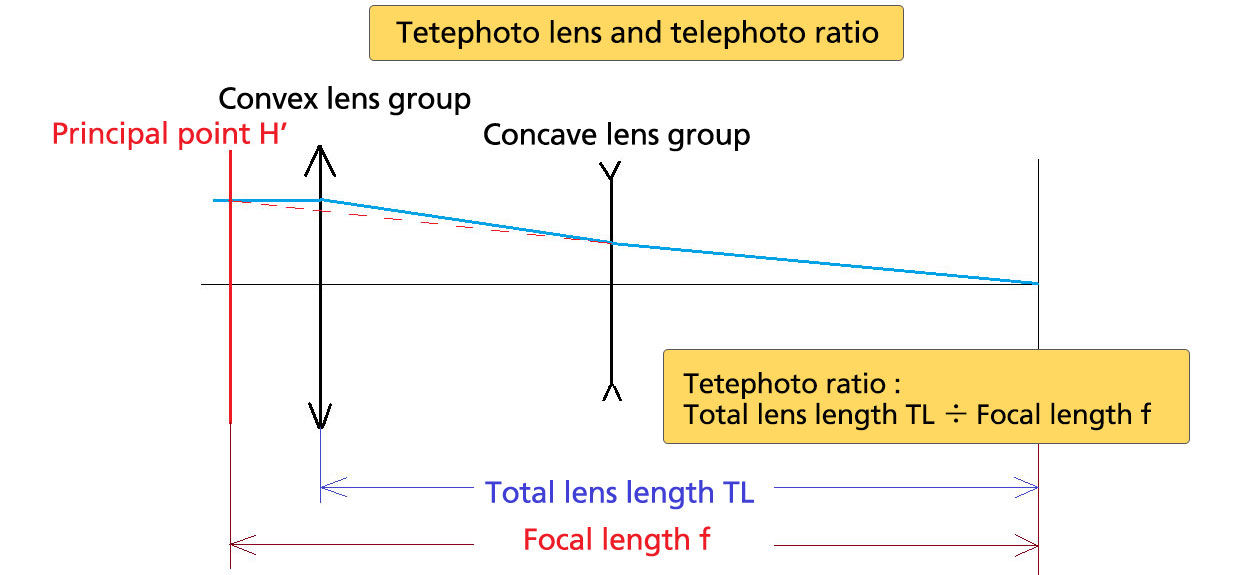
The structure begins from the far end (subject side) with a convex lens group. We can think of this convex group as the master lens. The rear group is a concave lens group. With this sort of arrangement, the focal length of the convex group is extended by the concave group, thus increasing the lens focal length (achieving the telephoto effect). When this happens, the principal point for the entire lens group is projected forward as shown in Figure 1, enabling a telephoto lens with a short total length. I wonder if you've noticed anything here. That's right, this is the same as attaching a teleconverter to a prime (e.g., standard prime) lens. The telephoto ratio was defined to indicate the nature and characteristics of this sort of telephoto lens, and can be expressed with a simple formula:
Telephoto ratio: Total lens length TL ÷ Focal length f
The telephoto ratio is the value obtained by dividing total lens length (TL) by the focal length (f). Therefore, a standard telephoto lens has a telephoto ratio lower than 1. By the way, there was once a time when a lens with a telephoto ratio greater than 1 was called a long focus lens rather than a telephoto lens. It is easy to roughly calculate the telephoto ratio of a lens. There's just one thing to be aware of. The total lens length (TL) is the distance from the vertex of the first surface of the first lens element to the surface of the image sensor. This makes it impossible to accurately measure the total lens length (TL) from outside the lens. It can, however, be approximated to within a few millimeters. Why don't you get a ruler or calipers, and try calculating the telephoto ratio of your own lens?
As you can see, the lower the telephoto ratio, the more compact and easier to use the telephoto lens. For example, a 1000 mm telephoto lens with a telephoto ratio of 1 has a total length of 1 meter, which makes it extremely difficult to use. If the telephoto ratio is 0.5, a 1000 mm lens with a total length of 50 cm can be produced. Unfortunately, things aren't as straightforward in the real world. A low telephoto ratio means using a high-power convex-concave group structure. Therefore, the lower the telephoto ratio, the more difficult it becomes to correct aberrations. In short, qualitatively speaking, the size of the telephoto ratio is inversely proportional to the amount of aberration that occurs. A power arrangement that achieves an extremely low telephoto ratio would make it dramatically more difficult to correct aberrations, which cause problems with sharpness. What is particularly noticeable is the degradation caused by axial chromatic aberration (more precisely, second-order chromatic dispersion). This is represented by the chromatic aberration that is inversely proportional to the telephoto ratio. Sufficiently correcting chromatic aberration is one of the things that makes it difficult to design compact, lightweight, high-performance telephoto and super-telephoto lenses. If design begins by forcibly specifying a low telephoto ratio, the number of lens elements tends to increase in order to achieve the necessary aberration correction, essentially losing all that was gained. Those new to lens design always end up making lenses larger and heavier by increasing the number of lens elements. A telephoto lens with a telephoto ratio of 0.6 is far more difficult to design than is a lens with a telephoto ratio of 0.8. This is what makes making telephoto and super-telephoto lenses smaller extremely difficult.
II. Development history and the designer
Though Japan's great lens designers are not generally known, we can trace their work through reports, development histories, and patents. Now let's take a look at the history of new Nikkor 200mm f/4 development. Teruyoshi Tsunashima, 1st Optical Section, Optical Designing Department, as it was known at the time, designed the optics for the lens. He, along with Ikuo Mori, first introduced in Tale 9, and Yoshiyuki Shimizu, first introduced in Tale 5, was one of the designers who established the golden age of old Nikkor lenses.
I was surprised when I began investigating this lens. Tsunashima, known as a fast worker, put a lot of time and effort into designing it. Surprisingly, four complete design proposals were presented before the lens proceeded to mass production. The first was in March of 1971, and the fourth and final draft in February of 1974. That's three years between them! One could say he was persistent, but at the time, three years was more than sufficient. What drove him to be so persistent? I discovered the answer in Tsunashima's report on the first design proposal. He wrote that he would try to make the lens smaller than the conventional 200mm f/4 without using the FK52 glass. He was determined to achieve a high-performance telephoto lens with the lowest telephoto ratio ever that was so compact that no rival could match it using only inexpensive glass materials (i.e., no ED glass). He was surely determined to challenge design limits. The notes scribbled in pencil told me all I needed to know about his enthusiasm.
Final prototype drawings for mass production were submitted in April of 1974, and trial production progressed to mass production in September. The long-awaited, ultra-compact, high-performance new Nikkor 200mm f/4 telephoto lens was finally released in February of 1976. In March, 1977, the Ai Nikkor 200mm f/4 was released, and December of 1981 saw the birth of the so-called Ai-S Nikkor 200mm f/4. Nikon actively sold the lens until the release of the Ai AF Nikkor 180mm f/2.8 ED. Of course, the optics remained the same until the lens was discontinued. As the Ai AF Nikkor 180mm f/2.8 ED was released in 1986, the new Nikkor 200mm f/4 sold for over 10 years. It can certainly be considered a long-selling Nikkor with basic performance second to none.
III. Lens construction and characteristics
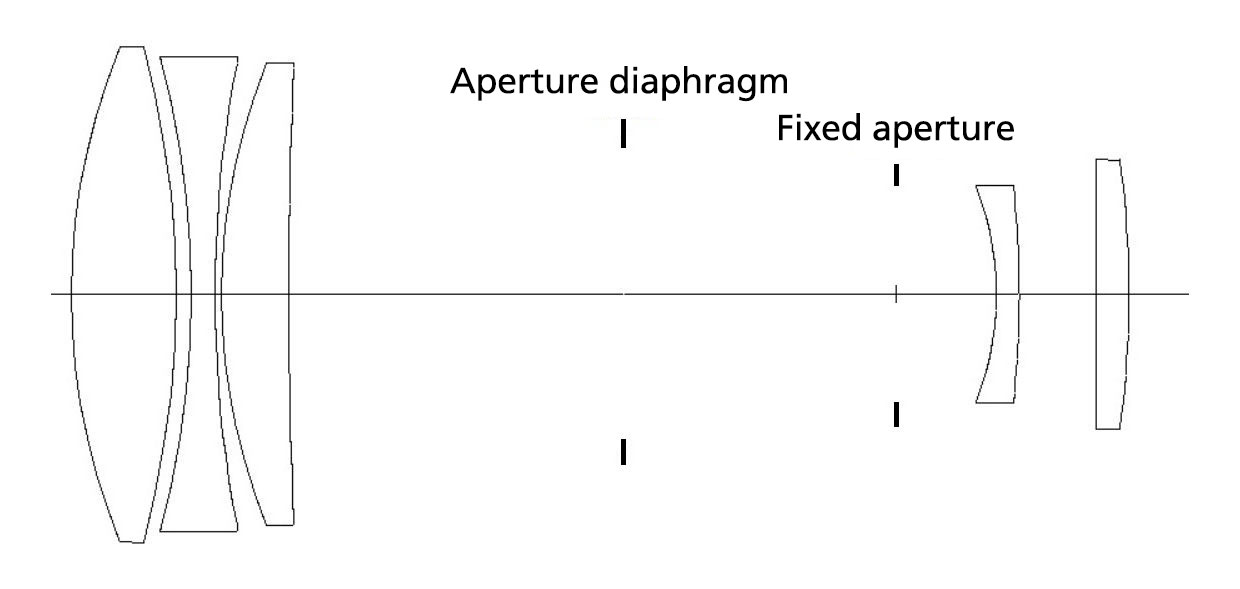
Now, take a look at the cross section of the new Nikkor 200mm f/4 (Figure 2). The optics shown here are representative of a typical telephoto lens.
The part in front of the aperture diaphragm (front group) is a convex objective lens derived from a so-called telescope objective. With a telephoto structure, this group should be considered the master lens, which must sufficiently correct axial chromatic aberration. Therefore, it has a typical convex-concave-convex three-element configuration that is often used for apochromatic objectives. It represents a truly beautiful structure and bending from which there is a lot to learn. What's more, no special glass materials were used, but the elements are superior in terms of durability and chemical properties. The group behind the aperture diaphragm (rear group) is an overall negative-power concave group. It is easiest to understand if you think of this group as a teleconverter. It could be said that the existence of this concave group itself forms a telephoto structure. In short, the rear concave group is designed to provide a telephoto ratio. Therefore, both chromatic and spherical aberration increases in accord with the amount power this concave group exhibits. Furthermore, if we focus on chromatic aberration, considering the rear group functions as a teleconverter, it can be said that the rear teleconverter group increases axial chromatic aberration by the square of its magnification. Think about this, it's squared. The point is that increasing the telephoto ratio by even a little results in a rapid increase in chromatic aberration. What's more, faster (brighter) apertures increase the degree of difficulty in correcting spherical aberration. This makes correcting chromatic aberration, and then spherical aberration and coma, the most difficult part of telephoto lens design. A photographic lens is an optical system with variable magnification, meaning that variations in the amount of aberration caused by changes in shooting distance must be controlled. An extremely small telephoto ratio will result in a smaller lens but it also reduces symmetry, thus increasing variations in close-range aberration. Astronomy telescopes embody optical systems for observing objects at infinity, so they cannot be described as being highly resistant to variable magnification, even with a large aperture and superior achromatic objective lens group. On the other hand, a photographic telephoto lens must be resistant to variations in close-range aberration as well. I think this is another aspect that makes photographic lenses more difficult to design than other objective lenses.
IV. Design performance and evaluation
First let's look at design data. As I have always stated, evaluations are both subjective and relative. Please use my own evaluations merely as reference.
This lens can be described as having a truly ideal basic telephoto lens structure. As I wrote earlier, the front group, which consists of three convex and concave lenses, is similar in structure to the apochromatic objective often used in astronomy telescopes. This three-element configuration can be considered the most basic form for achieving good coma correction, even as spherical and chromatic aberrations are corrected. To suppress chromatic aberration, especially second-order dispersion, as a super apochromat would, a special partial-dispersion glass such as ED glass may be used for one of the two convex elements, or Kurzflint (KzF) glass for the concave element in the middle. Note, however, that these special partial-dispersion glasses have relatively low refractive indices. While they are definitely advantageous for correcting chromatic aberration, they make it somewhat difficult to correct monochromatic aberrations such as spherical aberration and coma. Tsunashima avoided these glasses, which were both expensive and difficult to handle physically and chemically. I think he must have made the best decision after weighing the advantages and disadvantages of aberration correction. Next is the concave rear group with a concave-convex configuration based on theory. This concave-convex structure increases the rear diameter of the lens, but also increases the degree of freedom available in correcting upper coma, astigmatism, and curvature of field. This basic five-element structure is the same used for the Ai Nikkor 180mm f/2.8 ED. You can see that the structure is also similar to that of the old Nikkor-H 300mm f/2.8. Perhaps Tsunashima used these Nikkor lenses as models for the new Nikkor 200mm f/4.
Let's take a closer look at the aberration correction characteristics at various reproduction ratios. We'll start with aberration characteristics with imaging of an object point at infinity. Just as with other Nikkor lenses, the axial chromatic-aberration correction takes the form of d-g (d: yellow line, g: bluish purple line) correction in which the F-C (F: blue line, C: red line) line width appears directly as second-order dispersion. If we turn our attention to spherical aberration, aberrations related to the reference line are fully corrected with minimum ring-shaped zone width. However, g-line spherical aberration is slightly over-corrected. In short, the spherical aberration correction form differs for each color. This is often referred to as chromatic spherical aberration, and while the degree varies with lens used, it is a frequent issue with common photographic lenses. Depending upon the design concept, some designs adopt a correction method that makes second-order dispersion less apparent by intentionally moving the g line even further in the positive direction. While this means of correcting chromatic aberration seems to improve the MTF, it comes at the cost of the troublesome issue of constantly generating a bluish-purple (g line color) fringe. Considering the concept behind Nikkor lens design, this bluish-purple fringe was not desirable. Instead of actively adopting this method, elimination of d-g line color was employed for correcting chromatic aberration.
There was, however, another major reason for that. It was an issue with the spectral sensitivity of film. In the early days of new Nikkor lens development, black-and-white film was still at its peak. In fact, as the intrinsic sensitivity of silver halide, the main component in black-and-white film, tends to have short wavelengths, sensitivity near the g line was sufficiently high. Therefore, designing a lens with correction that only moved the g line significantly in the positive direction resulted in a drop in sharpness in black-and-white photos due to flare caused by light with short wavelengths. In addition, when color film was used, reds, blues, and yellows were pleasing, but the means used to correct chromatic aberration that I described earlier caused the overall image to appear to be covered with a faint bluish-purple veil. This resulted in a pure white dress appearing slightly bluish-purple. It was also the true cause of the purple fringing that occurs when shooting sunlight filtered through foliage. Therefore, I think Tsunashima settled on the d-g correction method after thorough consideration of the issues described above. The d-g correction method had already been discovered in the days of old Nikkor lenses, and by the time Tsunashima was designing the new Nikkor 200mm f/4, this chromatic aberration correction method was fully optimized for Nikkor lenses.
Now back to the main subject. Overall, there is very little residual aberration, but another feature that should be noted is the fact that astigmatism is very well corrected. I was also impressed with the good symmetry of coma and the little variations in the angle of view. This lens not only offers sharpness along the focal plane, but users can also expect superior three-dimensional rendering capability. Distortion measures less than 1%, and while I would like to say there are no shortcomings, the telephoto ratio causes some color coma to occur in the most peripheral part of the frame . The point is that as compared with the d, C, and F lines, correction leaves only the g line in the negative direction. However, while the degree varies with each lens, this is a qualitative tendency of almost all telephoto lenses. To my surprise, this lens exhibits very little residual aberration, considering the extremely low telephoto ratio it has.
Next let's look at aberration performance for an object positioned at a finite distance. At a magnification of -1/30x (shooting distance of approx. 6.5 m), spherical aberration and curvature of field shift to negative values, but aberration fluctuations are negligible. In addition, downward rays of light are slightly displaced in the positive direction. It can be said, however, that there is virtually no variations in close-range aberration. There is also very little variation in chromatic aberration, which is at a level where it would not be visible in actual photos. What happens to aberration characteristics when shooting at a close distance of 2 meters? Close-range aberration fluctuations are so small that they don't seem to apply to a 200 mm telephoto lens. First, at a magnification of -1/30x, spherical aberration and curvature of field shift in the negative direction, and downward rays of light are slightly displaced in the positive direction, resulting in outer coma. In addition, two-color correction of chromatic aberration relative to the reference line remains amazingly unchanged. However, second-order dispersion increases as the magnification increases. In a way, this is unavoidable because it is not the result of the design. Lateral chromatic aberration gradually shifts the g line to the negative end, but since the reference line shifts to the positive end, it is less noticeable in actual photos.
Now let's look at a spot diagram. First, a point image positioned at infinity is well condensed at the center of the frame with a clear core surrounded by a small amount of flare. This small amount of flare is more reddish in color, so depending on the situation, there may be a slightly reddish fringing on the focal plane. Point-image reproduction characteristics at the edges of the frame tend to be similar to those at the center of the frame, but point images are smaller in the meridional direction at the extreme edges due in part to vignetting. How about variations at close distances? Roughly speaking, close-range aberration fluctuations result in insufficient correction of spherical aberration and some outer coma. This effect is very pleasing, especially with magnifications of -1/10 to -1/30x for distances common with portrait photography, as it makes for beautiful background bokeh. At full infinity, foreground bokeh is more pleasing, and at a finite distance, background bokeh is more pleasing. It is still unclear whether this was the aberration fluctuation chosen by the designer, but isn't it exquisite?
Now we'll take a quick look at MTF characteristics. I'll give you my observations on 30 lines/mm under the white light of sunlight. At infinity, contrast of 65% or more is reproduced throughout the large majority of the frame. Even at the extreme edges, a minimum of 57% is maintained. Not only does this trend continue throughout the portrait range, where the shooting magnification is -1/30x, but it increases to 59% at the extreme corners of the frame.
How does the MTF chart look at close distances? At a shooting distance of 2 m (shooting magnification of -1/7.4x), contrast of 62% is reproduced at the center of the frame, but gradually declines as the distance from the center increases, finally dropping to approximately 22% at the extreme edges. However, contrast at 10 lines/mm is sufficiently high, holding at around 65% even at the extreme edges. Considering the shooting magnification, we can assume that images will be sufficiently sharp.
As I mentioned before, depth of field becomes shallower as the shooting magnification increases at close distances. Therefore, if there is an object that is on the same plane, it would probably be something like a newspaper. Everyone will understand that copying a newspaper with a 200 mm telephoto lens has no meaning. When photographing a three-dimensional object, the MTF value for the focus position at each image height is what's important. I don't think we should place special emphasis on the flatness of the entire plane. I found Tsunashima's design to be outstanding in that respect as well.
V. Actual performance
Next let's look at results achieved with some actual images of distant scenes. For this lens, I used a Nikon Z 7 mirrorless camera with the FTZ mount adapter to capture sample images.
I will explain performance at each aperture setting. Evaluations are subjective, and based on individual preferences. Please keep in mind that my opinions on, and evaluations of, sample images are provided for reference purposes only.
f/4 maximum aperture
First of all, it should be noted that resolution is very good. Very detailed subjects are clearly rendered from the center of the frame to the extreme edges. Contrast is also good, and there is no problematic flare. However, the lens is still a telephoto lens. As expected, a small amount of magenta fringing is visible. This fringing was observed with the image enlarged to 100% and would not normally be visible. My overall impression is that the lens performs extremely well for a telephoto lens.
f/5.6
Stopping down the aperture just one stop nearly eliminates the faint flare surrounding objects and color fringing. The image also seems sharper, and the increase in contrast is especially noticeable. The image quality is fantastic.
f/8
At f/8, the best image quality is consistently maintained throughout the entire frame. Image quality increases even more. In particular, flare is completely eliminated all the way to the outermost edges. Image quality is perfect! Overall, the best image quality is achieved at this aperture setting.
f/11
There is very little change from f/8, with consistently good image quality maintained throughout the frame. It seems that sharpness decreases ever so slightly, but it may still be safe to say that image quality is almost the same as it is at f/8. For practical reasons, I would recommend using f/8 or f/11 to capture landscapes.
f/16
Resolution drops slightly with some roughness. The effects of diffraction are beginning to show.
f/22 to f/32
There is a clear drop in resolution that is likely the result of diffraction. It is probably better not to stop down the aperture this much with normal shooting.
VI. Sample images
Now let's confirm these rendering characteristics with some sample photos. This time I captured all samples with aperture set to the maximum aperture of f/4.
As always, Picture Control settings that apply less sharpening are generally used in order the readers to best judge the characteristics of the lens. Further, no special compensation or adjustment of characteristics such as sharpness is performed. Subjects were selected based on how I assume the lens would be used by general users. I tried to cover the full range of shooting distances with these samples.

Z 7 + FTZ w/ New Nikkor 200mm f/4
Aperture: f/4 (maximum aperture)
Shutter speed: 1/8000 s
Exposure compensation: ±0 EV
Sensitivity: ISO 800
Image quality: RAW
White balance: Auto
D-Lighting: Auto
Picture Control: Auto
Date of capture: March 2023
Sample 1
Sample 1 is an example of a shot captured from quite some distance at the maximum aperture of f/4. Sharpness at the focus position is excellent, and foreground and background bokeh is smooth and natural with little tendency toward double-line blur.

Z 7 + FTZ w/ New Nikkor 200mm f/4
Aperture: f/4 (maximum aperture)
Shutter speed: 1/4000 s
Exposure compensation: ±0 EV
Sensitivity: ISO 800
Image quality: RAW
White balance: Auto
D-Lighting: Auto
Picture Control: Auto
Date of capture: March 2023
Sample 2
Sample 2 is an example of a shot captured from a slightly closer distance at the maximum aperture of f/4. Depth becomes more shallow and the focal plane clearer. Sharpness is good and bokeh is pleasing. The rounded bokeh shows just how straightforward the lens' blur characteristics are.

Z 7 + FTZ w/ New Nikkor 200mm f/4
Aperture: f/4 (maximum aperture)
Shutter speed: 1/8000 s
Exposure compensation: ±0 EV
Sensitivity: ISO 800
Image quality: RAW
White balance: Auto
D-Lighting: Auto
Picture Control: Auto
Date of capture: March 2023
Sample 3
Sample 3 was captured at an even closer distance, and is an example of a close-up shot captured at the maximum aperture of f/4. Flowers, the tips of the stamens, and flower petals are beautifully rendered and exhibit excellent detail. See how the defocus range is rendered? Bokeh is elegant, beautiful, and natural.

Z 7 + FTZ w/ New Nikkor 200mm f/4
Aperture: f/4 (maximum aperture)
Shutter speed: 1/4000 s
Exposure compensation: ±0 EV
Sensitivity: ISO 800
Image quality: RAW
White balance: Auto
D-Lighting: Auto
Picture Control: Auto
Date of capture: March 2023
Sample 4
Sample 4 was captured at a distance between 5 and 8 meters at the maximum aperture of f/4. Sharpness and clarity along the focal plane is good and the rounded blur in defocus portions is beautifully rendered. Superior resolving power is exhibited along the entire focal plane, even at the edges of the frame. Rounded bokeh at the edges of the frame is distorted into a rugby ball shape due to optical vignetting, but I think it can still be considered okay as it is not unsightly. In fact, you can directly predict the quality of aberration correction from the shape light distribution for this rounded bokeh takes. Thus, the uniform rounded bokeh that exhibits consistent brightness make it clear that this lens has good, straightforward aberration correction.

Z 7 + FTZ w/ New Nikkor 200mm f/4
Aperture: f/4 (maximum aperture)
Shutter speed: 1/5000 s
Exposure compensation: ±0 EV
Sensitivity: ISO 800
Image quality: RAW
White balance: Auto
D-Lighting: Auto
Picture Control: Auto
Date of capture: March 2023
Sample 5
Sample 5 is an example of a more distant view captured at the maximum aperture of f/4. Sharpness at the focus position is excellent, and there is little tendency toward double-line blur in the background, which makes it easy to see what the shot includes. This is a very important characteristic for a photographic lens because it means that the lens supports good three-dimensional rendering performance.

Z 7 + FTZ w/ New Nikkor 200mm f/4
Aperture: f/4 (maximum aperture)
Shutter speed: 1/40 s
Exposure compensation: ±0 EV
Sensitivity: ISO 1100
Image quality: RAW
White balance: Auto
D-Lighting: Auto
Picture Control: Auto
Date of capture: March 2023
Sample 6
Sample 6 is a series of pinpoint lights captured at night. What do you notice? The focal plane is at infinity in this distant landscape captured at the maximum aperture of f/4. Sharpness at the focal position is excellent, and you can see how the foreground bokeh changes gradually. You can determine the tendency toward double-line blur with the transition from fine to medium bokeh, and the effects of vignetting in medium to large bokeh.

Z 7 + FTZ w/ New Nikkor 200mm f/4
Aperture: f/4 (maximum aperture)
Shutter speed: 1/1000 s
Exposure compensation: ±0 EV
Sensitivity: ISO 640
Image quality: RAW
White balance: Auto
D-Lighting: Auto
Picture Control: Auto
Date of capture: March 2023
Sample 7
Sample 7 is an example of a shot for which the focal plane was adjusted as much as possible for a flat surface and captured at the maximum aperture of f/4. Looking at this image, you can see that it exhibits consistently high resolution from the center of the frame to the edges. In addition, there is almost none of the color fringing that tends to occur with telephoto lenses, and peripheral illumination falloff is hardly noticeable.

Z 7 + FTZ w/ New Nikkor 200mm f/4
Aperture: f/4 (maximum aperture)
Shutter speed: 1/640 s
Exposure compensation: ±0 EV
Sensitivity: ISO 640
Image quality: RAW
White balance: Auto
D-Lighting: Auto
Picture Control: Auto
Date of capture: March 2023
Sample 8
Sample 8 is photo of a light source captured at nearly the minimum focus distance and at the maximum aperture of f/4. The subject is clearly rendered with no ghost or flare, and the focal plane is sharp, even with the backlighting. In addition, bokeh is natural and beautifully rendered.
What do you think of this lens' straightforward rendering and delicate and precise imaging? I was very satisfied with every shot captured using this lens. Tsunashima successfully developed a telephoto lens that is truly Nikkor-like in its sincerity and impressiveness. It is not an amazing lens in terms of specifications. However, lenses with mediocre specs that ordinary users can easily pick up are the ones where the design concept and the skills of the designer shine. At a time when zoom lenses are at their peak and inexpensive zoom lenses are gaining popularity, this compact telephoto lens that is simple but made with all the attention to detail as a higher-end lens would be, is now available at a very low price. I hope you'll try it should the opportunity present itself. Tsunashima's ideas should be passed along.
VII. Comparison by telephoto ratio
Let's actually calculate the telephoto ratio that I explained earlier, and then compare it with that of other lenses. The new Nikkor 200mm f/4 has a telephoto ratio of exactly 0.8. So what is the telephoto ratio of the previous Nikkor Auto 200mm f/4? Actually, it is approximately 1 (0.99). In short, it had virtually no telephoto ratio. However, when the Nikkor Auto was first released, it was popular as a compact, groundbreakingly sharp telephoto lens (see Tale 48). Even considering the times though, in fact, it was bulky. I think Tsunashima wanted to make that lens as small as possible. By the way, I also examined some lenses released by other manufacturers in the same generation. The first was the Topcor 20cm (200mm) f/5.6 released in 1965 based on the concept of a compact telephoto lens. When I performed rough measurement and calculation, the telephoto ratio was about 0.83x. In a sense, it is amazing they were able to make the lens as small as they did in the 1960s, but it did have a maximum aperture of just f/5.6. This makes it one stop slower (darker) than the new Nikkor 200mm f/4. It is impossible to compare these two lenses because their maximum aperture is different and they were released at very different times. There was another lens. If I remember correctly, the Zuiko 200mm f/5 was released in 1974, around the same time as our lens, and was billed as "the world's smallest 200mm lens". I calculated the telephoto ratio for this lens from documented data. It is approximately 0.76x. I don't know if it was really the world's smallest at 200 mm focal length, but it was definitely small. However, it had a maximum aperture of f/5, which makes it more than half a stop slower (darker) than f/4, so it is no exaggeration to say that such a low telephoto ratio was achieved in exchange for the freedom with aberration correction. The difference in maximum aperture has a significant effect on the ability to correct aberration as the focal length increases. Therefore, I think a direct comparison with this lens is also difficult.
Even considering the telephoto ratio of various lenses, it is clear just how compact and high performing Tsunashima made the 200mm f/4. Once again, Tsunashima had outdone himself with the new Nikkor 200mm f/4. I think it is one of the smallest lenses in the telephoto 200 mm f/4 class. It is truly worthy of being called a "little giant". Wouldn't you agree?

NIKKOR - The Thousand and One Nights
The history of Nikon cameras is also that of NIKKOR lenses. This serial story features fascinating tales of lens design and manufacture.