NIKKOR - The Thousand and One Nights No.86

A new-generation close-range correction system
AI Nikkor 24mm f/2.8
In tonight's tale, we'll look at the AI Nikkor 24mm f/2.8. This lens was released in 1977 as a successor to the Nikkor-N Auto 24mm f/2.8 introduced in Tale 14. In just what ways was it better than its predecessor?
by Kouichi Ohshita
The AI Nikkor 24mm f/2.8
Since the release of the Nikkor-N Auto 24mm f/2.8, the world's first lens equipped with a close-range correction system, in 1967, development of wide-angle lenses for Nikon F-series cameras progressed steadily. In the following year, the Nikkor-UD Auto 20mm f/3.5 (introduced in Tale 20) was released, followed by the Nikkor Auto 15mm f/5.6 in 1973 and the New Nikkor 20mm f/4 (also introduced in Tale 20) in 1974, nearly completing the wide-angle lens lineup by the mid '70s. After that time, the lineup was expanded and, at the same time, improvements in the design of existing lenses were also made. Ten years after the release of the Nikkor-N Auto 24mm f/2.8, the AI Nikkor 24mm f/2.8 was released as the first AI Nikkor lens. Ikuo Mori, whose name often appears in these tales, designed the optics. Mori, specialized in the design of wide-angle lenses, designed most wide-angle lenses at that time, including the 15mm f/5.6 and 20mm f/4 mentioned above, as well as the New Nikkor 13mm f/5.6 (introduced in Tale 9), which offered the widest angle of view available for SLR cameras for many years.
There were two major improvements to be made to the Nikkor-N Auto 24mm f/2.8. The first was the slight vignetting, caused by peripheral illumination falloff that occurred when a filter was used, and second was performance around the edges of the frame. I wasn't troubled by either of these issues when I shot the sample images used in Tale 14, but they resulted in a significant amount of coma flare at the edges of the frame, and a lower resolution at frame mid ranges and at the extreme edges due to noticeable curvature of field. Work to overcome these issues began around 1974 as the design of the New Nikkor 13mm f/5.6 was mostly completed. I think Mori must have been thinking of a retrofocus lens with a convex-lead structure at that time. If a 52 mm attachment size was used for an ultra-wide-angle 20 mm lens, as I noted in Tale 20, design of a 24mm f/2.8 lens should also be possible based on that method. The first prototype he designed performed well, but was rejected due to the amount of ghost. Mori did not give up. With his next prototype completed the following year, he modified the structure of the rear group to prevent ghost, and this prototype was approved for mass production. The AI Nikkor 24mm f/2.8 was then released in 1977, at about the same time the switch to AI was made.
Lens construction
Figure 1 is a cross section of the AI Nikkor 24mm f/2.8 lens.
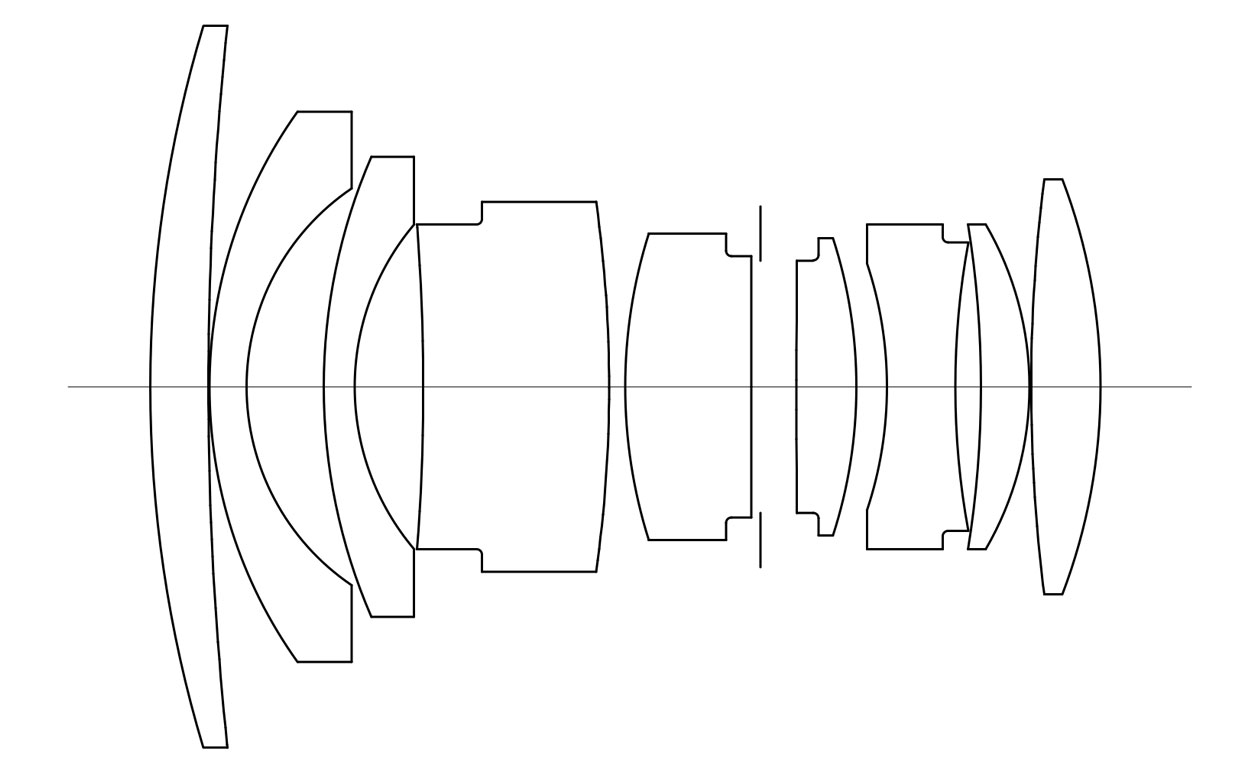
The AI Nikkor 24mm f/2.8 has a retrofocus structure with a convex lens element positioned at the front, making it quite different from the structure adopted for the Nikkor-N Auto introduced in Tale 14. While the front lens in this convex-lead structure is larger in diameter than it would be for a concave-lead structure, because the curvature of the front element is less pronounced and a filter can be located closer, the convex-lead structure is more suited to achieve a smaller attachment size. This must be what drew Mori to the convex-lead design. The thick lenses used for the fourth and fifth elements also contributed to the reduction in size.
If we compare this cross section with that of the New Nikkor 20mm f/4 introduced in Tale 20, you can see that they are quite similar. We could almost imagine that this lens was used as the design model. However, that caused a problem. The structure of the New Nikkor 20mm f/4 was so tightly packed that there was no gap for a close-range correction system. Then, Mori came up with the idea of separating the thick lens element into two and using that space for close-range correction. In addition, if the aperture is positioned between the separated elements, the distance between the sixth and the seventh elements (the aperture was originally positioned here) could be reduced to suppress the high-order flare that tended to occur on the imaging surface of the sixth element and the object surface of the seventh element, both exhibiting large curvature . This idea resulted in a successful development of a 24 mm lens with which curvature of field, coma, and other aberrations were significantly reduced.
This new close-range correction system further reduced variations in aberration that occur at different distances, and also improved performance with shooting at short distances. It is also worth noting that the lanthanum glass, which was new and expensive at the time, was not used at all. This made it the perfect lens in terms of size, performance, and price.
Lens rendering
As always, let's take a look at the rendering characteristics of this lens with actual images. The sample images for this tale were captured using the Z 6 full-frame mirrorless camera and FTZ mount adapter. When a manual-focus AI lens is used with the FTZ, shooting is performed with actual aperture metering. However, as lens information is not transmitted to the camera, focal length and maximum aperture information must be registered with the camera. Registering this information enables recording of focal length information in image Exif data as well as proper operation of the camera's on-board vibration reduction function. However, information is not transmitted to the camera when the aperture ring is rotated, so users must be aware that aperture information in Exif data will not change.

Z 6 + FTZ w/ AI Nikkor 24mm f/2.8 Aperture: f/2.8 (maximum aperture) Shutter speed: 1/1600 s Sensitivity: ISO 100 Processed using NX Studio

Z 6 + FTZ w/ AI Nikkor 24mm f/2.8 Aperture: f/8 Shutter speed: 1/320 s Sensitivity: ISO 100 Processed using NX Studio
The two Sample 1 images are distant landscape shots, one captured at maximum aperture and the other at f/8, shown side by side for comparison purposes. The center of the frame in the image on the left, captured at maximum aperture, is sharp, but contrast is reduced and flare occurs beginning at roughly 70% image height/width through to frame peripheries . However, resolution is good all the way to the edges. As these sample images were captured in RAW format with lateral chromatic aberration correction disabled, a slight amount of lateral chromatic aberration is visible around the edges of objects in frame peripheries. In most cases, this sort of aberration can be significantly reduced using in-camera or NX Studio lateral chromatic aberration correction function. If you look at the gradation in the sky, you will note the illumination falloff occurring at each of the four corners of the frame. This peripheral illumination falloff is almost completely eliminated by stopping the aperture down to f/5.6.
Now look at the image at right that was captured at f/8. You can see that the flare and illumination falloff that occurred at maximum aperture are eliminated, and rendering is nearly uniform to the four corners of the frame.

Z 6 + FTZ w/ AI Nikkor 24mm f/2.8 Aperture: f/2.8 (maximum aperture) Shutter speed: 1/1.3 s Sensitivity: ISO 100 Processed using NX Studio

Z 6 + FTZ w/ AI Nikkor 24mm f/2.8 Aperture: f/5.6 Shutter speed: 2 s Sensitivity: ISO 100 Processed using NX Studio
The two Sample 2 images are night landscapes, one captured at maximum aperture and the other at f/5.6. In the image at left captured at maximum aperture, light sources at the edges of the frame exhibit sagittal coma that resembles a bird with its wings spread. You can see that this was the cause of the flare visible at the edges of the frame in Sample 1. Stopping down the aperture for the image at right eliminated sagittal coma throughout most of the frame, but if you look closely, you'll see that light sources in the corners are distorted to a triangular shape. To resolve all of these issues, the aperture needs to be stopped down to f/8.

Z 6 + FTZ w/ AI Nikkor 24mm f/2.8 Aperture: f/2.8 (maximum aperture) Shutter speed: 1/400 s Sensitivity: ISO 100 Processed using NX Studio

Z 6 + FTZ w/ AI Nikkor 24mm f/2.8 Aperture: f/5.6 Shutter speed: 1/125 s Sensitivity: ISO 100 Processed using NX Studio
The two Sample 3 images are photos of hydrangeas captured at maximum aperture and f/5.6 at a distance of about one meter. The flowers in focus in the image at left, captured at maximum aperture, are rendered with good contrast due to close-range correction. But look at bokeh in the background, especially in the upper right corner of the frame. You can see that bokeh takes the shape of a C or V and appears to radiate outward. This is an adverse effect of the close-range correction mechanism explained in Tale 84. Close-range correction causes astigmatism for out-of-focus objects in the background, making them to appear to flow. In addition, the edge of the V is the result of the sagittal coma indicated with Sample 2. To prevent this from happening with close-up shooting, stopping down the aperture will reduce the tendency toward double-line blur. The aperture was stopped down to f/5.6 for the image at right. While the bokeh still radiates outward at the corners of the frame, the double-line blur is eliminated to exhibit pleasing, softer bokeh.

Z 6 + FTZ w/ AI Nikkor 24mm f/2.8 Aperture: f/11 Shutter speed: 1/200 s Sensitivity: ISO 100 Processed using NX Studio

Z 6 + FTZ w/ AI Nikkor 24mm f/2.8 Aperture: f/5.6 Shutter speed: 1/1000 s Sensitivity: ISO 100 Processed using NX Studio
Sample 4 shows construction of Nikon's new building in Nishi-Ohi. It was captured at f/11. Stopping down the aperture to f/11 realizes clear rendering of everything from the subject in the foreground to the steel frame and cables on the crane. As lateral chromatic aberration is visible along edges, users of this lens would want to apply lateral chromatic aberration correction with image processing.
Sample 5 is an image of Kashiwaba hydrangeas captured at a relatively short distance and an aperture setting of f/5.6. Using a wide-angle lens to photograph flowers captures not only close-ups of the flowers, but also the surrounding area. It is especially effective for photos of flowers that bloom in clusters like hydrangeas. As mentioned above, I stopped down the aperture to f/5.6 to make the bokeh appear more natural, but it might have been better to stop it down even further to make the background flowers sharper.

Z 6 + FTZ w/ AI Nikkor 24mm f/2.8 Aperture: f/2.8 (maximum aperture) Shutter speed: 1/500 s Sensitivity: ISO 100 Processed using NX Studio

Z 6 + FTZ w/ AI Nikkor 24mm f/2.8 Aperture: f/5.6 Shutter speed: 1/200 s Sensitivity: ISO 100 Processed using NX Studio
Sample 6 is a photo of Lysimachia fortunei captured at maximum aperture. The flowers are arranged in a charming inflorescence structure that resembles the tail of an animal. As this photo was captured on a cloudy day, I shot it at maximum aperture to compensate for low-contrast backgrounds, but this may have caused the double-line blur in the background be a little annoying.
Sample 7 is a close-up of plum blossoms captured at f/5.6 and the minimum focus distance. Ghost is something you'll want to watch for when shooting images like this that are partially backlit. A multilayer coating was used on AI Nikkor lenses, so there isn't as much ghost as there could be. The blue ghost that appears inside the light source positioned inside the frame in a long-side corner (or just outside the frame in a short-side corner) is diffused at maximum aperture so it is not very noticeable. At smaller apertures such as f/8 and f/11, however, the size of the ghost is reduced and its intensity increased, possibly making it a problem if it overlaps the main subject. If the light source is positioned outside of the frame, keep it well beyond the frame to prevent halation, and if it is inside the frame, try adjusting the angle to avoid this.

Z 6 + FTZ w/ AI Nikkor 24mm f/2.8, and BR-2A Macro Adapter Ring Aperture: f/2.8 (maximum aperture) Shutter speed: 1/13 s Sensitivity: ISO 800 Processed using NX Studio

Z 6 + FTZ w/ AI Nikkor 24mm f/2.8, BR-2A Macro Adapter Ring, and K1/K4/K5 close-up extension rings Aperture: f/8 Shutter speed: 1/5 s Sensitivity: ISO 100 Processed using NX Studio
I wonder how many readers are aware of an accessory known as the BR-2A Macro Adapter Ring. I also introduced it in Tale 4 about the Zoom-Nikkor Auto 43-86mm f/3.5. The BR-2A is a thin ring with an F mount on the lens side and a 52 mm male screw on the other. It allows for the mounting of a lens with a 52 mm attachment size backwards onto the camera. Attaching a retrofocus wide-angle lens this way enables shooting at a reproduction ratio of 1:1 (life size) or higher, and attaching a micro lens in this way increases image quality at 1:1 or higher. Sample 8 is a magnified shot of a poinsettia flower captured with a BR-2A. Attaching the lens to an F mount camera via the BR-2A magnifies the scene by 2.5x allowing a subject measuring around just 1 cm to completely fill the frame. I captured this image at maximum aperture for a surreal look and feel, but the center of the frame is quite well rendered. By the way, when the BR-2A is used, focusing cannot be performed by rotating the focus ring. Therefore, the user must adjust the distance between the subject and the lens. In addition, it is best to keep the focus ring at the minimum focus distance position of 0.3 m as this makes close-range correction more effective to reduce peripheral astigmatism.
Sample 9 is an image of an agate plate captured with a BR-2A and three close-up extension rings, the K1, K4, and K5, that increased the distance between the camera and lens by 40 mm. The reproduction ratio is approximately 4x. This agate plate is the same used for Sample 5 in Tale 74. You can see the difference in magnification. Increasing the distance between the camera and lens in this way makes the effective f-number slower (darker) and results in a drop in sharpness due to the effects of diffraction, but the aberration balance improves for better resolution performance especially at the edges of the frame. This means that if the distance between the front end of the lens and the camera's focal plane is increased to approximately 20 cm, the distance from the subject to the focal plane (shooting distance) increases to 30 cm, reversing the subject and focal plane at the minimum focus distance with this lens. Because the lens imaging performance is the same even if the subject and focal plane are reversed, good performance can be achieved even in such situations if the lens offers good close-range correction. However, it is worth noting that the slow (dark) effective f-number causes a significant drop in resolution due to diffraction and lateral chromatic aberration is magnified, so users should not expect the same resolution they get with normal shooting. Users really can't hope to increase depth of field by stopping down the aperture with this sort of magnified shooting, but should do so anyway to reduce aberrations. Stopping down the aperture too far, however, leads to diffraction that tends to reduce resolution. In my personal opinion, the best results are achieved between f/5.6 and f/8. I stopped the aperture down to f/8 for Sample 9. With 4x magnification, this made the effective aperture value f/40.
The evolution of the close-range correction system
Originally released in 1977, this lens was re-released as the AI Nikkor 24mm f/2.8S in 1981. It was then born again as the AI AF Nikkor 24mm f/2.8S autofocus lens in 1986, and the AI AF Nikkor 24mm f/2.8D in 1993. Throughout its evolution, the lens was manufactured with the same optics until quite recently, and has proven to be a very popular lens with a long sales life. The concept behind the design of the AI Nikkor 24mm f/2.8 has been handed down from generation to generation with even high-performance wide-angle lenses like the AI Nikkor 28mm f/2.8S (released in 1981) introduced in Tale 57 and the AI Nikkor 20mm f/2.8S (released in 1984) having been developed using the close-range correction system built into this lens as a model. In that sense, the AI Nikkor 24mm f/2.8 can be considered the first of a new generation of close-range correction lenses.
Both before and after developing this lens, Mori actively researched a retrofocus type of close-range correction system, going so far as to apply for multiple patents. One application was for a rear-focusing retrofocus lens with which only the last convex lens moved. The design was never commercialized, but in 1994, Haruo Sato developed the AI AF Nikkor 18mm f/2.8D based on this idea. It can be said that Mori's research was the inspiration for AF lenses that focus with small lens movements.
24 mm lenses are not used as frequently these days because that focal length is included in standard zoom lenses, but I used to always have one with me when I went out shooting. Using one again for the first time in a long time reminded me of the power of this lens with its compact size, light weight, and nearly distortion-free rendering, all characteristics unique to f/2.8 prime lenses. Why not see for yourself how the feel of a small prime lens differs from that of a zoom lens?

NIKKOR - The Thousand and One Nights
The history of Nikon cameras is also that of NIKKOR lenses. This serial story features fascinating tales of lens design and manufacture.