NIKKOR The Thousand and One Nights No.85
The Truth About Micro NIKKOR
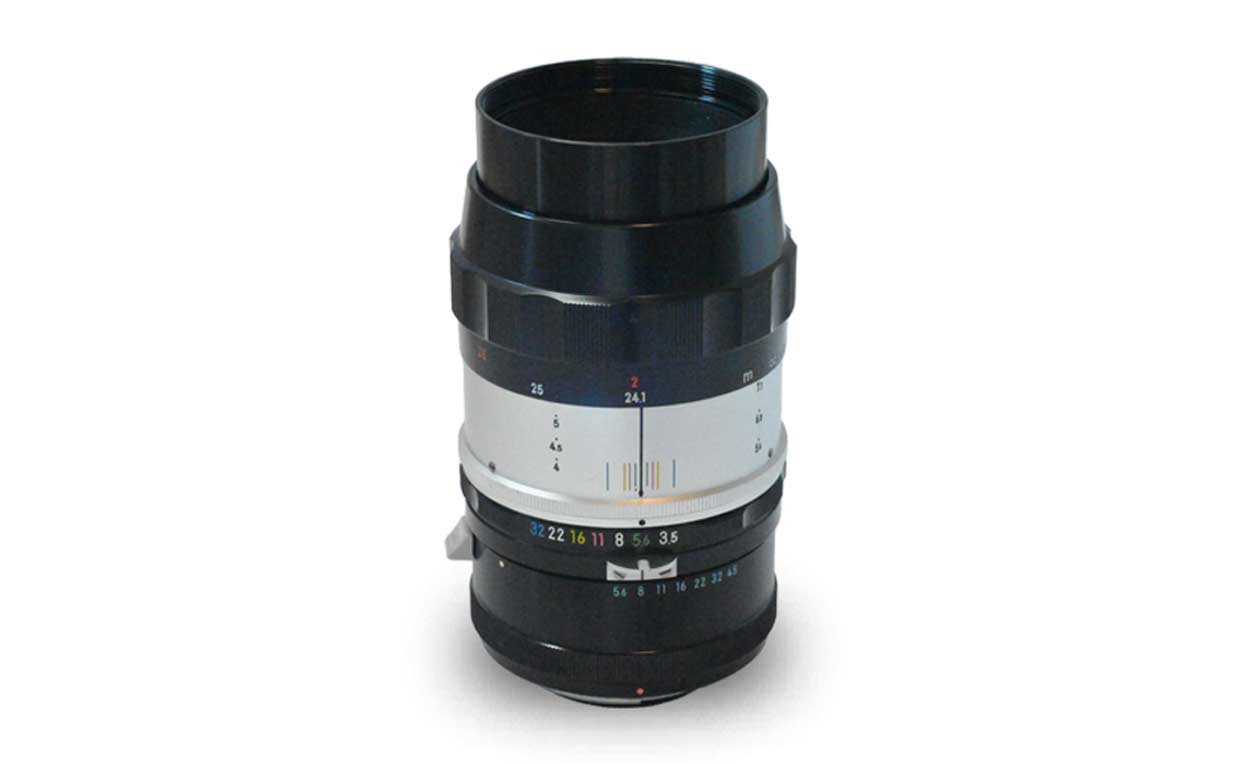
Micro-Nikkor Auto 55mm f/3.5
In Tale 85, we will look at the Micro-Nikkor Auto 55mm f/3.5. This is the lens that firmly established the Micro Nikkor name. It was also the signature lens of one of the great Nikkor designers, Zenji Wakimoto. In this Tale, we will uncover the secrets of the Micro-Nikkor 55mm f/3.5 lenses.
What concerns did Wakimoto have and how did he resolve them? As always, let's delve into the lens' history to find out.
By Haruo Sato
I. Professor Koana and Wakimoto
As I mentioned in Tales 25 and 26, the first Micro Nikkor lens was developed in the days of the Nikon S camera in response to a request from Zyun Koana, who was a professor at the University of Tokyo at that time. Upon receipt of this request, Hideo Azuma and Wakimoto began developing a Micro Nikkor that would satisfy Koana's requirements. Azuma was a classmate of Koana's and a mentor to Wakimoto. The Micro-Nikkor 5cm f/3.5 for Nikon S cameras was released in 1956. This lens had a unique Xenotar structure. Wakimoto told me about the difficulties they faced in developing the lens. Initially, he thought a structure with symmetrical optics that made it resistant to aberration fluctuations at close distances was vital in designing a micro lens. This was only natural. The system had to support focusing on objects at any distance from the lens, from infinity to close-up at life size. The optics had to exhibit little residual aberration, be structured to resist aberration fluctuations at short distances, and maintain speed (brightness). If that is the case, anyone would immediately consider a Gauss structure to be best. Wakimoto began designing the lens with the same assumption, and came up with several solutions. However, none of them provided the target resolving power. Even after many attempts, Koana remained unsatisfied. As a last resort, Wakimoto proposed a design that used a Xenotar structure. The trial lens he developed with the Xenotar structure finally achieved satisfactory results in terms of resolution. A question came to Wakimoto's mind. The lens initially had a six-element Gauss structure. He thought it would be superior to a five-element Xenotar structure. The Gauss structure clearly outperforms in terms of its ability to correct spherical aberration, coma, and chromatic aberration. Wakimoto wondered why, then, did the Xenotar structure achieve higher resolution? He compared residual aberration in detail, but could find no clear reason. He didn't understand until he forcibly reproduced spot diagrams and point images, which were extremely complicated at the time.
I have had the same experience myself. The reason was the method by which chromatic aberration was corrected and the mechanism behind point-image formation. For example, a Gauss structure is very flexible in terms of chromatic aberration (chromatic aberration of the first order) correction for a standard lens with a relatively large aperture, seeming to provide good correction both on and off axis. On the other hand, the Xenotar structure is unable to correct chromatic coma (the degree of coma correction differs for each color), and this inability increases in proportion to the angle of view. The tendency toward chromatic coma also occurs on-axis so that the residual spherical aberration for each color cannot be removed completely (it is also possible that chromatic coma reflects residual errors in the shape of spherical aberration compensation for each color). When the necessary conditions are met, however, the Gauss structure supports spherochromatic correction (a correction method with which the shape spherical aberration correction takes for each color is fairly uniform). Experience, however, has shown that this is difficult for the Xenotar structure. In fact, achieving the proper balance for chromatic aberration compensation was the answer. Details will be explained and illustrated at the end of this Tale.
II. Development history and the designer
Let's take a look at the development history. Micro-Nikkor Auto 55mm f/3.5 optics were, of course, designed by Wakimoto. We can trace its history through the breadcrumbs left by drawings and reports. First of all, no optical design report was ever submitted. It's now hard to figure out the situation that made this possible. Micro Nikkor lenses for various camera formats were being developed at that time. I researched notes and prototype records from the past and gained some certainty about what happened. Wakimoto must have prioritized development of the Micro Nikkor lenses, proceeding to create one prototype after another that went on to mass production. His busy schedule must have prevented him from writing even a single report.
Nikon progressed from the S to the F era. Wakimoto modified the design of the popular Micro-Nikkor 5cm f/3.5 for the Nikon S to extend the focal length by 5 mm because the 5 cm lens for the Nikon S could not be used with the Nikon F mount without doing so. The primary reason for this was an insufficient flange focal distance. Then, the lens design was modified with correction of the aberrations that increase in proportion to the increase in focal length. This resulted in the birth of the Micro-Nikkor 55mm f/3.5, the lens that firmly established the Micro Nikkor name. Drawings for the Micro-Nikkor 55mm f/3.5 prototype was submitted in October of 1960, and trial production progressed to mass production in January of the following year. The lens was finally released in August of 1961. The automatic aperture indexing that was a major feature of the Nikon F-mount system was not adopted for this first version of the Micro-Nikkor 55mm f/3.5. The reason for this was the lens' specialized barrel structure. With this initial model, the focus ring required two full turns to adjust focus from infinity to a 1:1 reproduction ratio (life size). Its design, however, turned out to be a disadvantage. This lens was unable to couple with the auto-aperture indexing, which was the most important innovation of the Nikon F-mount system and introduced to great fanfare, for exposure metering. Therefore, the lens was simplified and improved with a priority on user friendliness, and the Micro-Nikkor Auto 55mm f/3.5 for was released in 1963. Micro Nikkor lenses with couplers that support auto-aperture indexing are much smaller and have been greatly simplified by eliminating a life-size reproduction ratio and limiting the shooting domain to infinity to a magnification of -1/2x. To make up for this shortcoming, the lens was equipped with a special middle ring that enabled shooting from a magnification of -1/2x to life size making life-size photography possible. It was at this time the development team at the time proposed a new type of Micro lenses. When photographing most subjects, a shooting range of infinity to a magnification of -1/2x is usually sufficient. Wakimoto determined there is very little need for a magnification of -1/2x to life size photography, so there should be two types of macro lenses and ease of use should be the priority for both. His proposal was accepted and applauded. Proof of this is the fact that, until recently, camera/lens manufacturers around the world used the same system. This lens had another notable mechanism. As everyone knows, the actual aperture value slows (becomes darker) as the subject gets closer. To distinguish this from the nominal aperture value (aperture value at infinity), the actual aperture value is referred to as the effective aperture value (effective f-number). This is not a problem with TTL exposure metering, but when using an external exposure meter, or using a Speedlight or other flash with close-up photography, the so-called exposure multiple had to be calculated and exposure compensated. This exposure multiple is the mechanism that considers the effective aperture value (f-number). However, this lens was equipped with a revolutionary feature that saved users from this troublesome operation. It was an aperture mechanism that opened the aperture blades so that the effective aperture value does not change in accordance with the shooting distance. In short, this epic mechanism prevented the aperture value at infinity from changing as the shooting distance decreased. Of course, this mechanism does not perform perfectly at or near maximum aperture. Its full effect is achieved as the aperture is stopped down to around f/8 or more. This is why the new Micro-Nikkor Auto 55mm f/3.5 was so popular amongst its users. I have heard that the standard 55 mm focal length led many people to purchase the lens as a set with a camera. It remained a hit and manufactured and sold for many years. Seven years later in April of 1970, the Micro-Nikkor Auto 55mm f/3.5 was replaced by the Micro-Nikkor P Auto 55mm f/3.5, which had undergone some cosmetic changes and for which the revolutionary auto aperture indexing mechanism was eliminated. This was because the role played by the feature was by then obsolete due to the fact that TTL exposure meters had become commonplace and flash units had become automated. In August of 1973, multilayer lens coating was adopted for the next adaptation of the lens, which was released as the Micro-Nikkor P•C Auto 55mm f/3.5. In May of 1975, the new Micro-Nikkor 55mm f/3.5 was released as part of a complete overhaul of the exterior design of all NIKKOR lenses. With the shift to Ai, the Ai Micro-Nikkor 55mm f/3.5 was released in 1977. The Ai Micro-Nikkor 55mm f/2.8 was released in February 1980, leaving behind the famous lenses that established the Micro Nikkor name after approximately 19 years in production. Considering that stock remained on the market until around 1980, the same optics and basic design survived for nearly 20 years. The optics were so good that they required no improvement or modification for those 20 years. Perhaps Wakimoto could see twenty years into the future of optics and the world.
III. Lens construction and characteristics
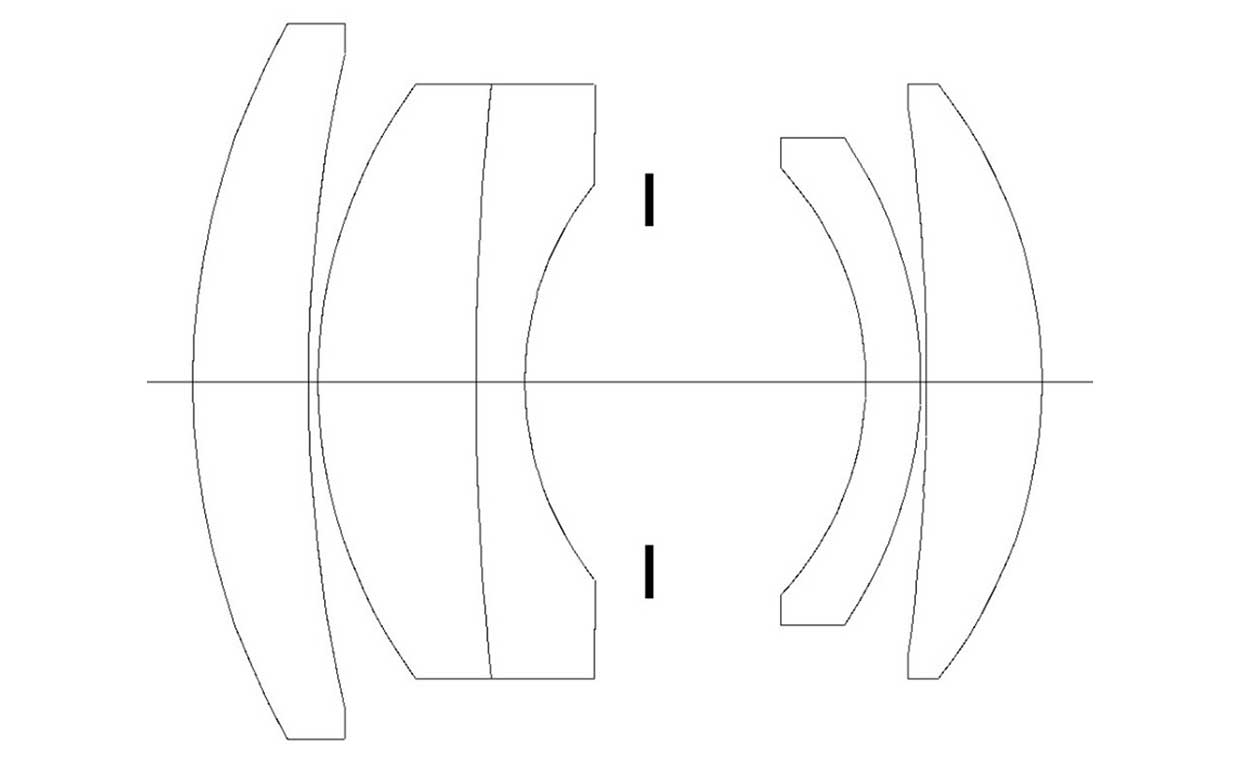
Now let's take a look at a cross-section of the Micro-Nikkor 55mm f/3.5 (Figure 1). Please forgive me if the following is quite technical. The optics shown here are representative of a typical Xenotar structure. Just as with the front group in a Gauss structure, elements in front of the aperture consist of a convex element and a convex-concave doublet. The concave element that is part of the doublet has a higher refractive index than does its partner, the convex element. It not only corrects chromatic aberration, but also spherical aberration. The rear group behind the aperture consists of two separate elements, one concave and one convex. Just as with the front group, the concave element has a higher refractive index than does the convex element. This use of glass is considered the "old" way of correcting chromatic aberration that is also effective at correcting spherical aberration and coma. However, as the Petzval sum tends to increase, it does have the disadvantage of making curvature-of-field correction difficult. In addition, the optical glass used is considered "old" glass (made of materials historically used in the making of glass). The rear group in a Gauss structure is comprised of three elements, (concave-convex) convex, which offers greater flexibility in correcting chromatic and spherical aberrations than does a Xenotar structure. Therefore, a convex element that has a higher refractive index than does its concave partner can be used for either of the doublets in the front and rear groups to achieve a "new" way of correcting chromatic aberration. This "new" way of correcting chromatic aberration through the use of a doublet maintains a lower Petzval sum that allows for greater flexibility in correcting curvature of field and helps to increase performance. Many modern large-diameter Gauss lenses are designed to effectively utilize these "new" doublets to correct chromatic aberration. It is clear that this design method has increased the angle of view and speed (brightness) of recent Gauss lenses. On the other hand, the rear group in a Xenotar structure is reduced to just two elements—one concave and the other convex—leaving little flexibility for aberration correction. As a result, it was thought that this sort of aberration correction could be achieved with a narrower angle view and slower (darker) speed than would be the case with a Gauss structure. Micro lenses in particular must offer good image quality at any shooting distance, from infinity to life size. The Gauss structure should be better suited in this respect as well. Wakimoto must have known this, so why did he choose to go with a Xenotar structure? Wakimoto and Azuma came up with two solutions, one Xenotar and one Gauss, which they compared to make their final decision. The answer was found in chromatic coma (varying degrees of coma depending upon the color/wavelength), which initially seems to be a drawback of the Xenotar structure.
IV. Design performance and evaluation
First let's look at design data. As I have always stated, evaluations are both subjective and relative. Please use my own evaluations merely as reference.
This lens is a typical Xenotar photographic objective lens. The configuration of the rear group distinguishes it from a Gauss structure. As you may know, one of the theories is that the rear group is derived from the Topogon structure. However, a Topogon's rear group is generally characterized by strongly curved, high-power lens elements. This is where I was not fully convinced. The original German lenses aside, if you investigate the Xenotar lenses developed in Japan, you will find that most are positioned as inexpensive lenses. Basically, the concept behind them is 'optics with which one element is removed for a lower cost/price than is possible with a six-element Gauss structure'. The doublet in the rear group of a Gauss structure is replaced with a single concave element. Therefore, the Xenotar structure can be considered potentially weak in terms of speed (brightness) and angle of view, which decreases its level of flexibility and makes correcting chromatic aberration difficult. Utilizing the characteristics of the Topogon structure should be advantageous in terms of angle of view, if not speed (brightness). In any case, the general idea was that the Xenotar structure did not offer the level of aberration-compensation capability that the Gauss structure does. It goes without saying, however, that the Xenotar structure can provide the same level of aberration compensation as the Gauss structure if speed and angle of view are slightly reduced.
Now let's take a look at Micro-Nikkor 55mm f/3.5 aberration-compensation characteristics at various reproduction ratios.
We'll begin with infinity. I thought the spherical aberration should be characterized by the so-called Wakimoto balance. However, in reality the shape correction takes provides almost complete correction, despite a very small tendency toward overcorrection. Further, while it may partly be due to the f/3.5 maximum aperture, the amount of residual spherical aberration is very small. Coma aberration for off-axis point sources tends toward inner coma. This aberration balance can be considered very representative of the theory behind symmetrical lenses. With a symmetrical lens, common aberration fluctuations at shorter distances include a tendency for spherical-aberration correction to become less and less effective, curvature of field and distortion to shift to the negative direction (distortion presents as barrel distortion), and coma to shift toward outer coma as the shooting distance decreases from infinity to close-up. Japanese optical designers have long concentrated on suppressing these short-distance aberration fluctuations and balancing performance at the minimum focus distance with that at infinity. They were convinced that the best design would be one that captures images as consistently as possible at all shooting distances. Therefore, when shooting at infinity with many old lenses, both spherical aberration and curvature of field tend to be positive (slightly over-corrected), and coma presents as inner coma. Now back to the Micro-Nikkor Auto 55mm f/3.5. Chromatic-aberration correction is outstanding. Strictly speaking, however, it is clear that chromatic coma is not completely corrected. The levels of astigmatism and curvature-of-field correction are ideal and did not shift to the positive direction even at the extreme edges of the frame. There is virtually no astigmatic difference through to the maximum angle of view where distortion measures -0.16%, which is just what one'd expect from a Micro Nikkor. Axial chromatic-aberration correction takes the form of d-g correction (d—yellow—and g—bluish purple—lines), and any lateral chromatic aberration is virtually invisible. We can expect excellent shape of point images and MFT with the abundance of peripheral light and sagittal coma that is suppressed more than one might assume.
Next we'll look at aberration performance at finite distances. It is clear that there is almost no aberration fluctuation even when the magnification exceeds -1/30x. This is just what one'd expect from a Micro Nikkor. The Micro-Nikkor Auto 55mm f/3.5 exhibits very little aberration fluctuation at shorter distances. They become more noticeable little by little as the magnification exceeds -1/10x. Spherical aberration and curvature of field begin to shift to the negative direction, and the ring caused by spherical aberration swells slightly. Inner coma is eliminated to the point that it can be considered fully corrected. Of all shooting distances, this achieves the best correction balance for coma. At a magnification of -1/2x, both spherical aberration and curvature of field shift to the negative direction and off-axis, inner coma changes to outer coma. Second-order dispersion of colors also increases for slightly softer image quality. Further, when the middle ring is used to extend the reproduction ratio to life size, variations in spherical aberration are not so pronounced, but curvature of field and astigmatism measure significant negative values, and the tendency toward off-axis outer coma is even more conspicuous. However, first-order chromatic aberrations remain good. The problem here is imaging performance when photographing flat objects. Optimal imaging positions for each imaging height do not align on a flat plane, but because depth of field is very shallow at a reproduction ratio of 1:1, there is no consistent image plane when photographing three-dimensional objects like there is for flat objects. Therefore, this shouldn't be an issue except for possibly the photography of newspapers.
Now let's look at a spot diagram. The first thing we notice is the lack of flare and clarity of point images at the center of the frame at a distance of infinity. This is further proof that spherical aberration is almost fully corrected. However, while the blurring of point images in the foreground is pleasing, slight double-line blur is visible in the background. Of course, this tends to occur only at maximum aperture. These characteristics change as the aperture is stopped down. Next let's see how objects closer to the edges of the frame are imaged. We see that the core of point images is sharp and clear, but the tendency toward inner coma leaves some flare in the vertical direction (shaped like an upside-down "V"). This tendency becomes more pronounced as image height increases. The tendency toward double-line blur in the background decreases as the angle of view increases until it is nearly indistinguishable at the maximum angle of view. What about point images with shooting at short distances? Again, we'll use a spot diagram to evaluate performance. Point image formation tendencies at infinity gradually change from around -1/10x magnification. The center of the frame becomes under-corrected and background bokeh becomes very pleasing. Unfortunately, double-line blur now tends to become noticeable in the foreground and sharpness at the exact focus position suffers slightly. Inner coma is eliminated, improving point-image flare so that it is symmetrical rather than shaped like an upside-down "V". Wakimoto seems to have properly considered 3D rendering, which is the essence of a micro lens, for the capture of still objects, flowers, and small animals at short distances. Moreover, coma changes to outer coma at the edges of the frame from a magnification of -1/2x. As a result, rendering toward the background gradually becomes softer.
Now we'll take a quick look at MTF characteristics. I'll cover the results seen at 30 lines/mm. First, reaching 87%, MTF value is very high at the center of the frame at a distance of infinity, but gradually drops toward the edges. Contrast still measures approximately 55% at a height of 50% the total image height, and remains approximately 33% at the extreme edges. On the MTF chart, the image-plane average value is highest at a magnification of -1/30x suited for shooting portraits. However, the variation from those at infinity is very small. There is no deterioration in MTF characteristics from near infinity to a magnification of around -1/10x, which makes the Micro-Nikkor Auto 55mm f/3.5 an excellent all-purpose lens for standard focal lengths. The peripheral MTF peak begins to move in the negative direction in accordance with changes in the curvature of field as we move closer to achieve a magnification of -1/10x or greater. As a result, MTF characteristics of the same plane appear to deteriorate. However, as I mentioned earlier, depth of field is extremely shallow with close-up photography. As such, the only flat subject that would lie on the same plane is a newspaper. When photographing a three-dimensional object, the MTF value for the focus position at each image height is what's important. Therefore, a perfectly flat image plane is not really necessary. I found Wakimoto's design to be outstanding in that respect as well.
V. Actual performance
Next let's look at results achieved with some actual images of distant scenes. For this lens, I used a Nikon Z 7 mirrorless camera with the FTZ mount adapter to capture sample images.
I will explain performance at each aperture setting. Evaluations are subjective, and based on individual preferences. Please keep in mind that my opinions on, and evaluations of, sample images are provided for reference purposes only.
f/3.5 maximum aperture
There is no noticeable flare from the center of the frame to the edges, and contrast is good. Images are sharp and clear for good image quality, especially at the center of the frame. There is some flare at the extreme edges and corners of the frame, but details are sharply rendered. There is some flare, but I like the lack of noticeable image blurring or color fringing.
f/5.6
Sharpness seems to increase dramatically by stopping down the aperture just one stop. In particular, contrast is increased and flare is virtually eliminated throughout the frame with the exception of the corners.
Resolution from the center of the frame through the mid ranges was relatively high from maximum aperture, but it has increased even more. Stopping down the aperture increases contrast for excellent image quality.
f/8
Image quality throughout the frame increases even more. Flare is nearly completely eliminated, even in the corners of the frame. Image quality is perfect! Resolution is further increased throughout the entire frame.
f/11
Consistently good image quality is maintained throughout the frame. Image quality appears to be even better, with greater resolving power especially at the edges and extreme corners of the frame.
This is the aperture value that produces the best image quality. I would recommend this aperture setting for everyday use.
While image quality increases at f/5.6, f/8, and f/11, aperture settings of f/8 to f/11 are recommended to achieve a depth of field suited to practical use.
f/16
Image quality throughout the frame is more consistent, and there is no hint of flare. Resolution drops slightly with some roughness. The effects of diffraction are beginning to show.
f/22 to f/32
There is a clear drop in resolution that is likely the result of diffraction. Stopping down the aperture is absolutely necessary under certain conditions, such as with macro photography, but under normal conditions, it is better to use a larger aperture.
VI. Sample images
Now let's confirm these rendering characteristics with some sample photos. This time I captured all samples with aperture set to the maximum aperture of f/3.5.
As always, [Portrait] and other Picture Controls that apply less sharpening are generally used in order the readers to best judge the characteristics of the lens. Further, no special compensation or adjustment of characteristics such as sharpness is performed. Subjects were selected based on how I assume the lens would be used by general users. I tried to cover the full range of shooting distances with these samples.

Z 7 + FTZ w/ Micro-Nikkor Auto 55mm f/3.5
Reproduction ratio: Around -1/2x
Aperture: f/3.5 (maximum aperture)
Shutter speed: 1/400 s
Exposure compensation: ±0 EV
Sensitivity: ISO 800
Image quality: RAW
White balance: Auto
D-Lighting: Normal
Picture Control: Portrait
Date of capture: April 2022
Sample 1 was captured at a magnification of around -1/2x and, of course, at the maximum aperture of f/3.5. Sharpness at the focus position is perfect, and flower buds and petals in portions of the background that are just a little out of focus are beautifully rendered. The shift in three-dimensional rendering from the focus position is smooth and natural. I've heard that at the peak of its popularity, some described this lens as producing "hard-edged" bokeh typical of Nikkor lenses. Some even said it had the worst bokeh characteristics. Based on this sample image, however, there seems to be no trace of that at all. Please make your own decision about that.

Z 7 + FTZ w/ Micro-Nikkor Auto 55mm f/3.5
Reproduction ratio: -1/10x to −1/5x
Aperture: f/3.5 (maximum aperture)
Shutter speed: 1/320 s
Exposure compensation: -0.7 EV
Sensitivity: ISO 800
Image quality: RAW
White balance: Auto
D-Lighting: Auto
Picture Control: Vivid
Date of capture: May 2022

Z 7 + FTZ w/ Micro-Nikkor Auto 55mm f/3.5
Reproduction ratio: -1/10x
Aperture: f/3.5 (maximum aperture)
Shutter speed: 1/400 s
Exposure compensation: -0.7 EV
Sensitivity: ISO 800
Image quality: RAW
White balance: Auto
D-Lighting: Auto
Picture Control: Vivid
Date of capture: May 2022
Sample 2 was captured at a slightly greater distance. I think the magnification was around -1/10x. The somewhat broader depth of field makes it easier to evaluate resolution on the focus plane. This sample was also captured at the maximum aperture of f/3.5. Not only the flowers, but veins in the leaves are well defined and three-dimensional in appearance. Background bokeh is also very straightforward and perfectly natural in its expression of depth.
Example 3 was captured at an even greater shooting distance than Example 2. This sample was also captured at the maximum aperture of f/3.5. Flowers, the tips of the stamens, and the water droplets are beautifully rendered and exhibit excellent detail. See how the defocus range in the background is rendered? The scene is reproduced in such a way that shows how the various parts relate to one another in terms of depth. It is so natural that I can find nothing to complain about.

Z 7 + FTZ w/ Micro-Nikkor Auto 55mm f/3.5
Aperture: f/3.5 (maximum aperture)
Shutter speed: 1/3200 s
Exposure compensation: ±0 EV
Sensitivity: ISO 800
Image quality: RAW
White balance: Auto
D-Lighting: Auto
Picture Control: Auto
Date of capture: June 2022

Z 7 + FTZ w/ Micro-Nikkor Auto 55mm f/3.5
Aperture: f/3.5 (maximum aperture)
Shutter speed: 1/3200 s
Exposure compensation: ±0 EV
Sensitivity: ISO 800
Image quality: RAW
White balance: Auto
D-Lighting: Auto
Picture Control: Auto
Date of capture: June 2022
Sample 4 was captured at a distance between 5 and 8 meters. Again, this sample was captured at the maximum aperture of f/3.5. In this photo of a building utilizing traditional sand walls, the fine details on the focus plane are sharply rendered, and the transition to defocus portions is smooth and natural. The focal plane is flat and resolution is excellent through to the extreme edges of the frame.
Sample 5 was captured at a distance of nearly infinity at the maximum aperture of f/3.5. This image exhibits very neat and flawless rendering. Shadow portions are clearly reproduced, and tonal gradations are smooth and natural. There is almost no vignetting.

Z 7 + FTZ w/ Micro-Nikkor Auto 55mm f/3.5
Aperture: f/3.5 (maximum aperture)
Shutter speed: 1/1600 s
Exposure compensation: ±0 EV
Sensitivity: ISO 800
Image quality: RAW
White balance: Auto
D-Lighting: Auto
Picture Control: Vivid
Date of capture: June 2022
Sample 6 was captured at a distance of between 1 and 3 meters, also at the maximum aperture of f/3.5. Focus was acquired on the komainu (lion dog) in front. As you can clearly see, objects on the focus plane are incredibly sharp, but the komainu in the background is proof of the lens' beautiful bokeh and three-dimensional rendering.

Z 7 + FTZ w/ Micro-Nikkor Auto 55mm f/3.5
Aperture: f/3.5 (maximum aperture)
Shutter speed: 1/400 s
Exposure compensation: -0.3 EV
Sensitivity: ISO 1600
Image quality: RAW
White balance: Auto
D-Lighting: Auto
Picture Control: Portrait
Date of capture: July 2022

Z 7 + FTZ w/ Micro-Nikkor Auto 55mm f/3.5
Aperture: f/3.5 (maximum aperture)
Shutter speed: 1/400 s
Exposure compensation: ±0 EV
Sensitivity: ISO 4500
Image quality: RAW
White balance: Auto
D-Lighting: Auto
Picture Control: Portrait
Date of capture: July 2022
Sample 7 was captured at a distance of approximately ten meters, a distance just short of the distant landscape range. It is an example of use similar to that of a telephoto lens, and was captured at the maximum aperture of f/3.5. The foreground is blurred. Needless to say, objects on the focal plane are in good focus, but foreground bokeh is also smooth and pleasing.
Sample 8 was captured at a distance of between 2 and 3 meters at the maximum aperture of f/3.5. The shift in three-dimensional rendering from the focus position is smooth and natural. The transition to defocus portions is gentle in the foreground, and bokeh characteristics in the background is very pleasing. Especially noteworthy here is not only an incredibly sharp focal plane, but also the three-dimensional rendering performance. I hope you now understand that this lens is capable of beautiful photos with natural rendering that are pleasing to look at.
As this Tale covers a Micro Nikkor with a broad range, I created sample images that covered distances from infinity to a magnification of -1/2x. What did you think of them? I think I was able to prove that Wakimoto's masterpiece did not produce "hard-edged" bokeh. It's really too bad the lens faced such baseless criticisms, and that its vindication finally comes after so many years. I hope that, with this new evaluation of the Micro-Nikkor Auto 55mm f/3.5, Wakimoto and all fans of Micro Nikkor lenses will excuse this delay.
VII. The mysterious Xenotar
Why was the Xenotar structure able to achieve higher resolution than the Gauss structure? I'll do my best to explain based upon my own observations. The explanation is a little complicated, but I will explain carefully and include illustrations. I hope I don't lose you.
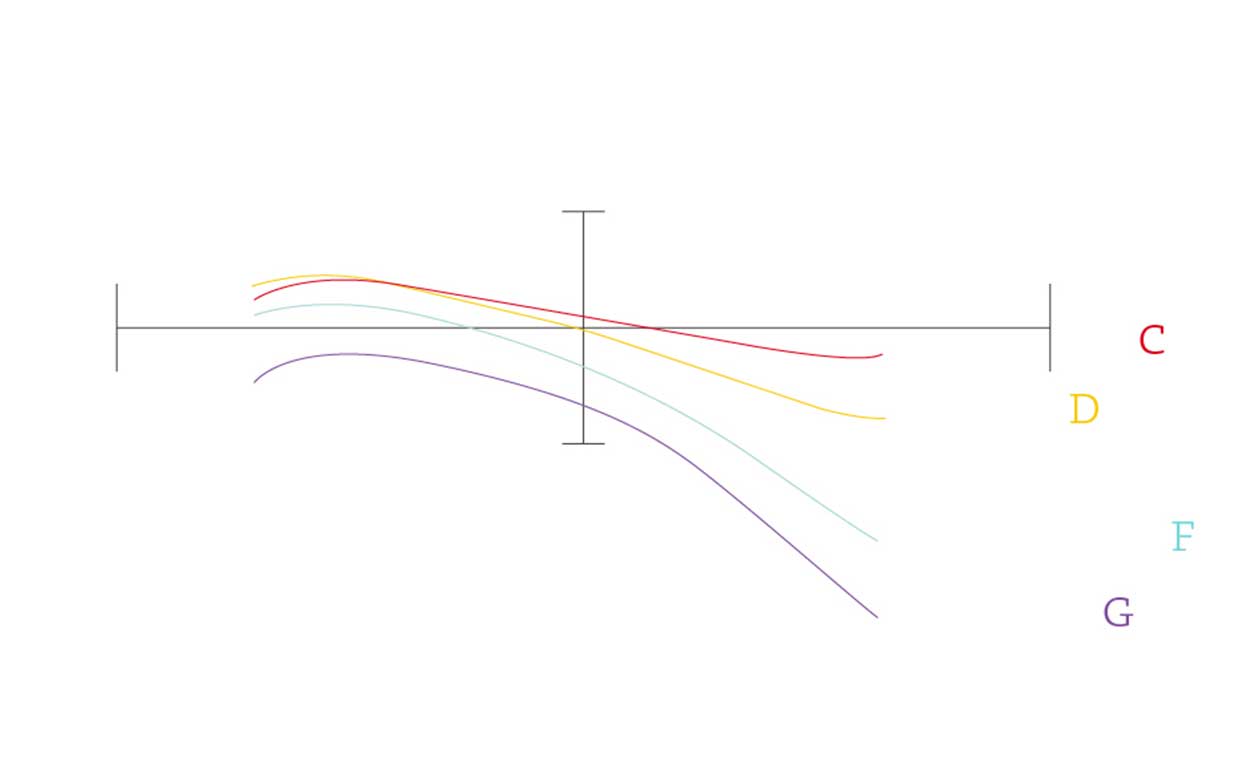
Let's begin with chromatic aberration. In fact, the issue is closely related to the means with which chromatic aberration is corrected. As I said earlier, the Gauss structure is very effective at correcting first-order chromatic aberrations. In addition, off-axis chromatic aberration can be effectively corrected with the use of two doublets. The Xenotar structure, with the configuration of the rear group, does also correct on-axis chromatic aberration for the most part, but it has a special way of correcting off-axis chromatic aberration. It is based on the fact that structurally speaking, differences in the degree of chromatic coma and aberration correction depending upon the incident height at various angles of view tend to remain. This could be considered a drawback in terms of the degree of correction flexibility. Take a look at Chart 1. Chart 1 is a lateral aberration chart for a typical Gauss structure. The scale was intentionally enlarged to better express residual aberration. Think of this chart as representing variations (aberrations) in imaging positions at the edges of the frame. The various colors indicate the amount of lateral aberration for each wavelength. D, G, C, and F correspond to the d (yellow), g (bluish purple), c (red), and f (blue) lines respectively. In Chart 1, the colored lines indicating lateral aberrations run nearly parallel to one another. Please note that the actual amount of aberration (residual errors) is extremely small but enlarged in this chart for better understanding.
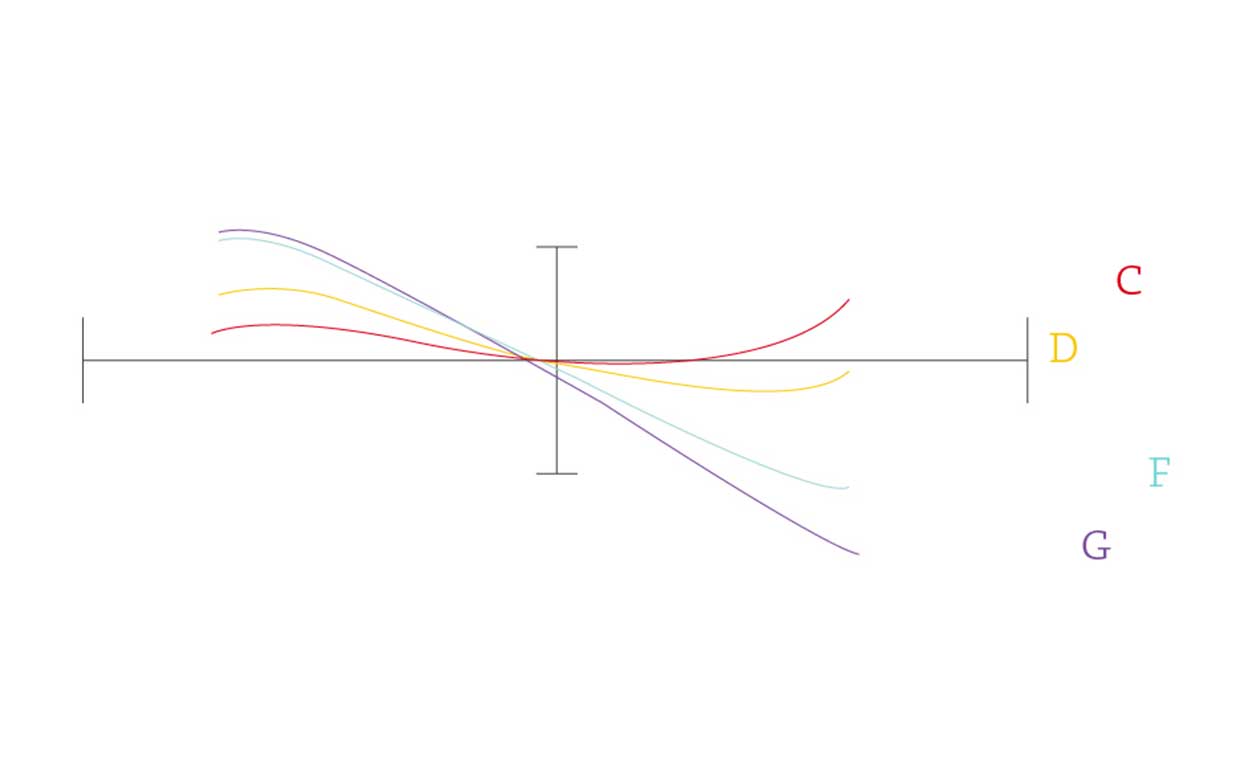
Now look at Chart 2. Chart 2 is a lateral aberration chart for a typical Xenotar structure. Both ends of the lateral aberration look like flowers that have bloomed. This shows a somewhat larger amount of aberration than is shown in Chart 1. These lines represent what is commonly known as chromatic coma. This residual chromatic coma often occurs with the Xenotar structure.
First, let's compare d-line lateral aberration (the yellow line in the two charts). D lines for both the Gauss and Xenotar structures indicate little aberration. The amount of lateral aberration is basically the same. Now let's look at each of the other lines. With the Gauss structure (Chart 1), light rays for other lines are very similar to those of the d line. Lateral aberration is such that rays of light run parallel to one another. This chart shows us that each color forms its own sharp image. What about the Xenotar structure? Chart 2 shows that there is more aberration for lines other than the d line. The difference in the form of aberration between the two structures consists in that the imaging position for each wavelength (color) is shifted in the direction of image height or depth of field. When considering these aberration values on a flat plane, numerical values appear to show that the Gauss structure is superior. That, however, was the pitfall.
Take a look at Charts 3 and 4. Point spread function for each color is shown. Think of the charts as indicators of point-image formation where all colors within the area indicated by the red line are converted into white (sunlight) with rough integration.
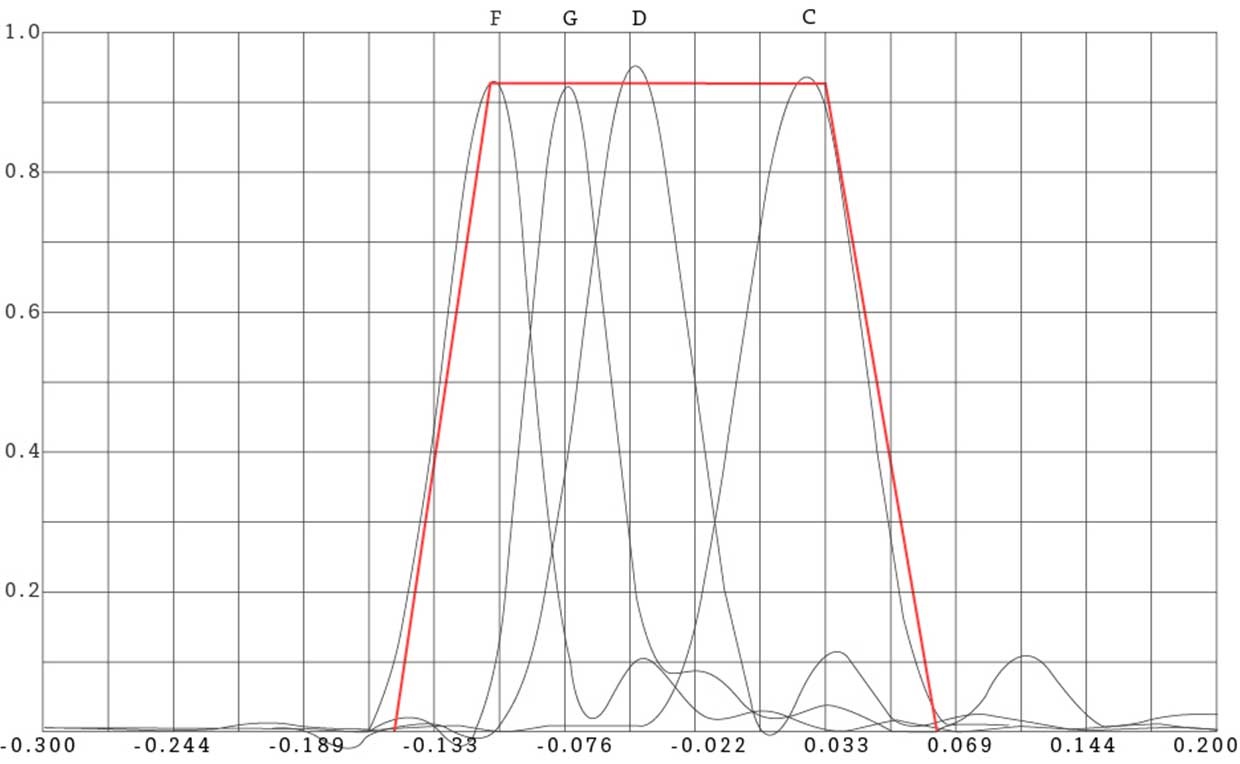

Chart 3 shows that point images for each color are uniform, and that contrast and resolution are very high. Just as with Chart 1, Chart 3 shows point spread function typical of a Gauss structure. When white is used, peaks for each color are consistently spaced, indicating excellent contrast and sharpness. As shown by the red line, the contrast is extremely high, but we can see that resolving capabilities (resolution) are limited. This means that the small amount of residual aberration for each color was a real drawback in high resolution regions, or resolving capabilities.
Now look at Chart 4. Remember aberration conditions from Chart 2? Residual aberration for each color tended to increase as the difference in the wavelength from the d line increased. Chart 4 shows that point spread function peaks for colors other than those indicated by the d line are low and spread out horizontally. What is important here is the fact that those peaks are close to each other. The red line in Chart 4 is lower and more sloped on the slides than that in Chart 3. This means the lens' ability to reproduce contrast is low especially in low-frequency ranges. In other words, color flare causes contrast to drop. However, we can see that the white point spread function has a narrow image core. This shows the lens' ability to reproduce high frequencies or, in other words, its superior resolving power. Therefore, a lens with point spread function like that shown in Chart 4 would be described as capable of superior resolution, but exhibiting slightly low contrast due to a significant amount of flare. A lens with point spread function like that shown in Chart 3, on the other hand, would likely be described as exhibiting superior clear contrast, but a clear drop in resolving power in high resolution regions. Of course, this is all based on results when colors are converted into white.
Isn't there anything that comes into your mind when you hear users describe lenses? Rumors such as, "images are sharp and color reproduction is good, but resolution is poor," or "there is a lot of flare, but resolving power, even with fine lines, is excellent" are not so far from the truth. Indeed, some user comments describe lens optical performance and aberration characteristics with an amazing accuracy.
How did you like the story? Were you able to follow the somewhat complicated explanation? Even Wakimoto, outstanding optics designer that he was, was distracted by numerical values and initially thought the Gauss structure superior. Micro Nikkor lenses were born of these daily realizations and deep insight. It is the history of optical design itself. I have high hopes for a future where the learning never ends and lenses evolve with endless possibility.

NIKKOR - The Thousand and One Nights
The history of Nikon cameras is also that of NIKKOR lenses. This serial story features fascinating tales of lens design and manufacture.