NIKKOR - The Thousand and One Nights No.81

The least expensive high-performance pancake lens perfect for flash photography
GN Auto NIKKOR 45mm f/2.8
Tale 81 covers an SLR lens; the first in some time. Upon its initial release, this NIKKOR lens was incredibly inexpensive despite the fact that the craftsmanship of the lens barrel alone made it a high-end product. It was a superior lens developed with the brilliant concept of offering a good rounded aperture, pancake specifications, and a GN mechanism.
This tale will clarify just how this pancake lens became popular for reasons other than those originally intended. What sort of lens was the GN Auto NIKKOR 45mm f/2.8? What secrets were hidden behind its development, and who designed it?
Let's delve into these questions.
by Haruo Sato
I. What is GN?
To what exactly does the "GN" in "GN mechanism" refer? Younger people may be unfamiliar with the acronym. "Guide number" (GN) is an indicator for measuring flash performance. These days, mainstream flash systems are fully automatic systems that emit the appropriate amount of light for the shooting distance and scene. Naturally, modern Nikon Speedlights are also equipped with technologies that enable fully automatic flash operation. With products and systems like this, the guide number (GN) changes automatically in accordance with the shooting distance. Things were different, however, in the early days of flash development. The invention of Xenon tubes capable of continuous light emission was itself a tremendous innovation. Flash technology has evolved from single-use flash bulbs to flash units capable of repeated firing. In those days, flash units had a fixed power (guide number). Proper exposures were achieved by adjusting the aperture and shutter speed settings according to the shooting distance. That made the guide number an important basic value from which exposure adjustment began.
Guide number is defined as the aperture value that provides proper exposure at a shooting distance of 1 m at ISO 100. Put simply, the guide number is a numerical value indicating flash power (volume of light emitted). This value is often noted as the "GN", and is commonly calculated as follows.
GN = f-number x shooting distance
This may be easier to understand if you think of flash power as shooting distance (the maximum distance at which a subject can be illuminated). This changes the formula to
Shooting distance = GN ÷ f-number
On the other hand, when shooting from a fixed distance with a constant flash volume, optimal exposure can be achieved by adjusting the aperture setting according to the following formula.
f-number = GN ÷ shooting distance
This means that the aperture value needed to achieve optimal exposure can always be determined automatically by attaching a GN mechanism that works with the aperture ring and the distance extension mechanism on the lens.
II. The GN mechanism
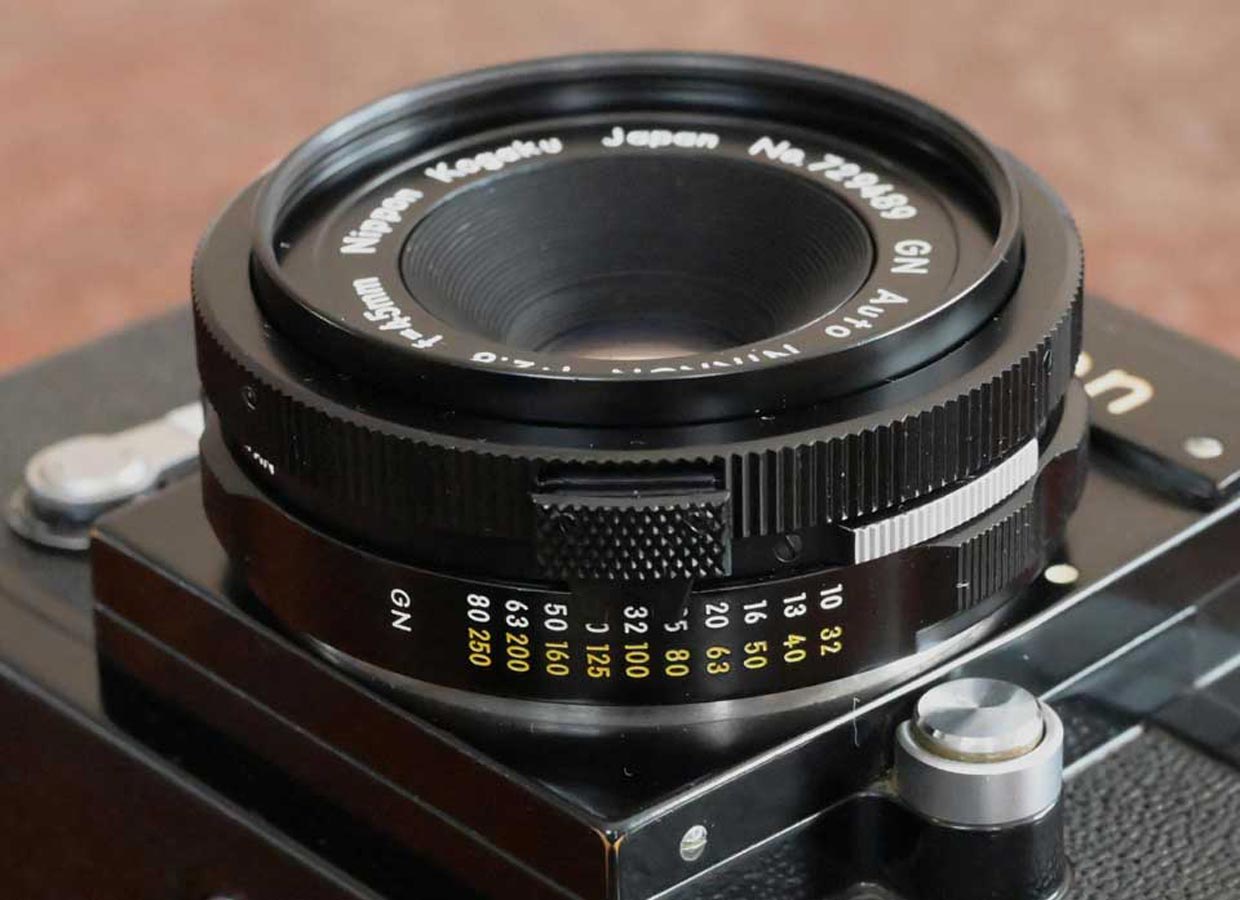
As mentioned above, the aperture value needed to achieve optimal exposure can be determined automatically by attaching a GN mechanism that works with the distance extension mechanism on the lens. Take another look at the third formula noted above. The f-number will be larger (slower) in inverse proportion to the shooting distance. That is, at short distances, optimal exposure can be maintained by stopping down the aperture greatly as the subject gets closer. However, the focus ring on standard NIKKOR lenses is graduated in the opposite direction. In addition, the amount of extension needed to focus is determined by the lens focal length and reproduction ratio. Therefore, a non-linear cam needed to be used instead of a linear helicoid to match the amount of extension with the change in the number of aperture stops. To satisfy these two issues, the lens barrel for this GN NIKKOR lens was designed with a focus ring cam that rotates in the opposite direction as those on standard NIKKOR lenses. It is actually very elaborate (see Photo 1). It seems that Nikon was the first to equip interchangeable lenses for cameras with this GN mechanism. Nikon began researching it long ago. In fact, a GN 35mm prototype (exhibited in the Nikon Museum special exhibition "Prototype Lenses" in October 2018) had already been made by the time the Nikon F was released. The first GN lens to be released, however, was the GN 45mm f/2.8. The focal length may have been extended to 45mm because the designers thought the GN mechanism should be adopted especially for a semi-standard lens. They probably also had plans to use the mechanism on a pancake lens. The actual facts of the matter are unclear.
So, what happened to this groundbreaking mechanism after the GN Auto NIKKOR 45mm f/2.8? In 1973 it was adopted for Tokyo Kogaku's Topcor, but it seems that it never became common. It may be that flash units evolved faster than expected, and auto flash functions that measure and fire automatically became the mainstream. Thus, the end of the GN mechanism.
III. Development history and the designer
Now let's take a look at the history of GN Auto NIKKOR 45mm f/2.8 development. The best Japanese designers don't like attention and their names are not commonly known, but they have left their mark on numerous reports and patents. Submission of the optical design report for this lens was recorded in May of 1967, prototype drawings were issued on April 22, 1967, and mass-production drawings were issued on October 27, 1967. That means that mass production began sometime in 1967. I have heard that it was common at the time to write reports after things had calmed down rather than immediately after designs were completed. With this lens as well, it is highly possible that prototype drawings were submitted first, and the report submitted after things had calmed down. Unfortunately, we do not know when work on lens design began. The GN Auto NIKKOR 45mm f/2.8 was released in March of 1969. The lens was renewed in 1974 with a multi-layer coating and slightly modified outer diameter for the first lens element. Production of the lens was discontinued in 1977. While a small amount of stock likely remained on the market, the discontinuation of sales in 1977 means this lens had a sales life of approximately nine years.
Now let's take a look at the designer. The optics were designed by Yoshiyuki Shimizu, the creator of the Auto NIKKOR. Shimizu worked on a number of lenses while he was designing the GN Auto NIKKOR 45mm f/2.8. The objective was to design a compact, high-performance lens. It seems that he intended to use as few lens elements as possible and make the total length short. Shimizu chose a Tessar design for the lens. Unfortunately, angle of view is not one of the Tessar structure's strengths. It is a structure that makes achieving the optimal aperture diameter and angle of view difficult. In spite of these difficulties, Shimizu designed a semi-standard Tessar lens with an angle of view greater than 2ω = 51° in a very short amount of time. In addition, the high-performance lens was quite inexpensive with a price of just ¥16,500 upon initial release. It was an incredibly inexpensive NIKKOR lens. Once again, Shimizu had outdone himself.
IV. Lens construction and characteristics
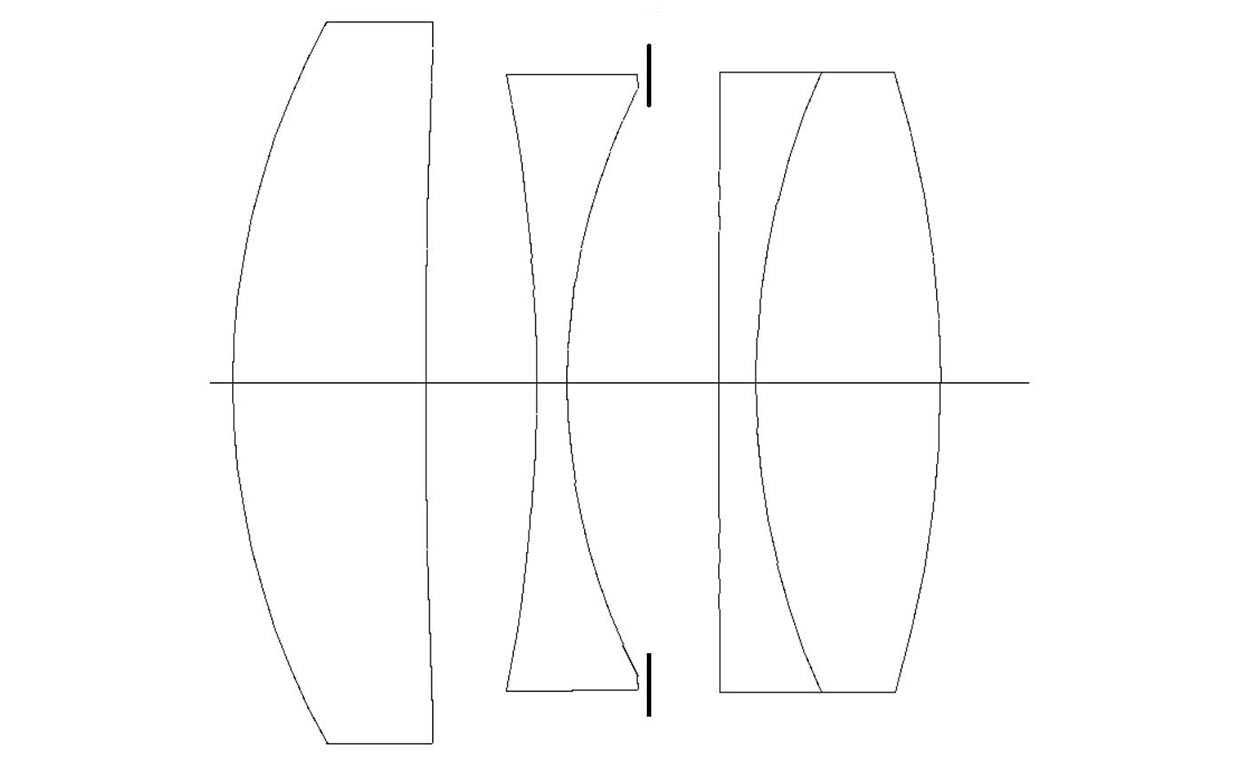
Now let's take a look at a cross-section of the GN Auto NIKKOR 45mm f/2.8 (Fig. 1). Please forgive me if the following is quite technical. This lens is a typical Tessar lens.
Let's consider the structure in the order in which light rays pass through the lens from the left. First is a convex lens element followed by a powerful concave element, the aperture, and then a concave element and a convex element joined together to form a convex doublet. This makes the structure a convex-concave-convex triplet. The lens was designed to use lanthanum (La) glass, a new type of glass at the time. La glass with a refractive index (nd) greater than 1.7 was used for the first and fourth convex elements, and a flint glass was used for the second and third (concave) elements. It is a very basic design. The key to sufficient correction of aberrations related to the reference line lies in how glass with a high refractive index is used in the triplet and/or Tessar structure. In this respect as well, we can say that this lens was designed using the optimum combination of glass materials available at the time. The designer's knowledge and skill shows in the simple four-element Tessar structure. The most difficult part of this design was likely achieving a semi-wide focal length of 45 mm with a Tessar structure. Standard lenses usually have a focal length of 50 mm. The angle of view for such lenses is 2ω = 46°. To achieve a focal length of 45 mm, an angle of view measuring more than 2ω = 51° must be achieved. As it is not easy to increase the angle of view of Tessar lenses in the first place, a great deal of knowledge and technique were needed to design this lens with a Tessar structure. The keys to GN Auto NIKKOR 45mm f/2.8 design were specifying the optimum curvature radius for the first and second lens elements, choosing the right glass materials for the G3 and G4 elements, and minimizing the Petzval sum. When I look at Shimizu's design, I am absolutely amazed that it proved successful with the glass available at the time. The GN Auto NIKKOR 45mm f/2.8 must have been the 1960's best Tessar lens.
V. Design performance and evaluation
First let's look at design data. As I have always stated, evaluations are both subjective and relative. Please use my own evaluations merely as reference.
As I mentioned above, this lens is quite symmetrical. It is a well-known fact that this type of structure exhibits very little distortion and extremely little lateral chromatic aberration. But what about other aberrations? We'll begin with performance at infinity, and start with spherical aberration and coma. Spherical aberration is slightly over-corrected. As such, there are fewer lens zones that cause spherical aberration and good resolution can be expected. On to chromatic aberration. The correction band for chromatic aberration is generally expressed using the names of the spectral lines of atoms and molecules, such as g-line and C-line. The axial chromatic aberration exhibited by this lens is the so-called C-g achromatic effect. Triplets and Tessar structures tend to exhibit g-line flare. This has been prevented with this lens by skillfully adjusting axial chromatic aberration. The lens also exhibits no coma, even at the outermost edges. Only the extreme corners seem to exhibit a slight amount of inner coma. The degree to which sagittal coma is corrected is also wonderful. It is hardly noticeable at all. Even when looking at the entire frame, lateral aberration is such that users can expect the intensity of point images to be consistent throughout the frame. And how about curvature of field and astigmatism? A small amount of negative curvature of field was left in accordance with the lens zones that cause spherical aberration and the Petzval sum. The Petzval sum of 0.0057 is a little high for a 45mm f/2.8 photographic lens with a Tessar structure. Astigmatism is hardly noticeable throughout 90% of the frame. Tessar lenses tend to be inferior in terms of curvature of field and astigmatism, but thanks to Shimizu's knowledge and skill, these drawbacks were overcome. Any optical designer would be fascinated by the beauty of this aberration diagram. What about variations in aberrations at short distances? As a pancake lens, the minimum focus distance is a little longer at 0.8 m. Lens zones that cause spherical aberration increase a little at close distances, but the focus position remains basically the same. A good balance has been achieved. The curvature of field shifts slightly in the negative direction, but the change in astigmatism is minimal because sagittal changes follow meridional changes. Coma tends to decrease following changes in curvature of field. This often reduces variations in aberrations at short distances. The GN Auto NIKKOR 45mm f/2.8 is an outstanding Tessar photographic lens.
Next, let's look at point-image intensity distribution and spot diagrams. Performance at the center of the frame is good, due in part to the maximum aperture of f/2.8, but over-correction causes a slight amount of flare. This flare can be eliminated by stopping down the aperture just 1/3 stop. There is little flare in the mid ranges and core energy is very high. There is no sagittal coma flare. Naturally, there seems to be a drop in resolution at the extreme corners, partially due to astigmatism. Overall, however, it can be said that with the exception of the extreme corners, the lens exhibits little sagittal coma flare in any off-axis portion of the frame for good point-image formation. As a result, excellent resolution can be expected from the center of the frame, through the mid ranges, and to frame peripheries. With little lateral chromatic aberration, the energy concentration of each color is high, and conditions favorable to good resolution are achieved.
Now let's look at the MTF charts. We'll check contrast reproduction at 10 and 30 lines/mm. Contrast at the center of the frame is 50% or more at 30 lines/mm. The slight reduction in contrast is primarily the result of spherical aberration generated with over correction. However, it has the advantage of increasing the apparent depth of field. The peak of the sagittal MTF moves in the negative direction the closer it gets to frame peripheries. With the best focus position at the center of the frame, the image contrast of the sagittal direction decreases in the mid ranges. When this happens, reducing contrast just a little at the center of the frame by focusing on something slightly in front of the intended focal point will raise the peak at the peripheries. Moving the focal plane increases average image quality throughout the frame, and increases peripheral contrast at 30 lines/mm to 30-40%. At 10 lines/mm, contrast is roughly 80% all the way to the extreme edges of the frame.
A similar tendency is seen at short distances, but the focal plane curves very slightly. However, when shooting at short to medium distances, characteristics such as bokeh that contribute to three-dimensional rendering are far more important than is a flat plane, especially for lenses in this focal range. Even with this lens, variations in aberrations at short distances tend to improve background bokeh. Lenses that exhibit slightly harsh bokeh at greater distances but pleasing bokeh at shorter distances are quite common. This is the result of variations in aberrations that can also be seen in images captured with the GN Auto NIKKOR 45mm f/2.8.
VI. Actual performance
Next let's look at results achieved with some actual images of distant scenes. I used the Nikon Z 7 with FTZ mount adapter.
I will explain performance at each aperture setting in detail. Evaluations are subjective, and based on individual preferences. Please use my own evaluations merely as reference when viewing sample images.
f/2.8 (maximum aperture)
The image seems a little soft overall, but when viewed at actual size, it is clear that resolution is sufficient. Resolution is particularly good from the center of the frame through the mid ranges. Coma flare gradually increases closer to the edges of the frame, but there is very little chromatic aberration from the center of the frame to the peripheries. There is no color bleed for an overall good impression. Only the extreme four corners of the image exhibit deterioration.
f/4
By simply stopping down the aperture one stop, flare disappears and contrast increases from the center of the frame to the edges. The center of the frame becomes sharper, and image quality through the mid ranges to the peripheries is increased. While performance at the extreme four corners is better, sharpness is a little soft.
f/5.6
Sharpness increases throughout the frame, and nearly all flare is eliminated. Resolution from the center of the frame through the mid ranges increases from that exhibited with shooting at maximum aperture, but it could be better. Stopping down the aperture increases contrast and clarity for excellent image quality.
f/8
Image quality throughout the frame increases a little more. Image quality is excellent despite some flare remaining at the extreme edges. This aperture setting achieves superior image quality throughout the frame. I would recommend this aperture setting for everyday use.
f/11
Consistently good image quality is achieved to the extreme edges of the frame, for a sense of even more improvement. While image quality increases at f/5.6, f/8, and f/11, aperture settings of f/8 to f/11 are recommended to achieve the depth of field suited to landscapes.
f/16
While there is more consistency throughout the frame, there is a slight drop in resolution. This is the aperture setting at which we begin to see the effects of diffraction.
f/22 to f/32
There is a clear drop in resolution that is likely the result of diffraction. It is probably better not to stop down the aperture this much.
f/8 to f/11 are likely best for landscapes. However, with sufficient image quality even at f/2.8 maximum aperture, the drop in peripheral image quality may not be a concern with snapshots and the like. In addition, sufficient light volume is maintained to the edges of the frame, so peripheral illumination falloff is not a problem even at maximum aperture.
VII. Sample images
Now let's confirm these rendering characteristics with some sample photos.
Portrait and other Picture Controls that apply less sharpening are generally used for sample images captured for use in NIKKOR The Thousand and One Nights tales in order to best judge the characteristics of the lens. However, as many of the samples I've captured for this tale are landscapes, I chose to use Auto Picture Control with some of them. Further, no special compensation including sharpening was applied to enhance image sharpness. I concentrated on capturing the sorts of landscape snapshots I assume general users of this lens would capture.

Nikon Z 7 with F-Z third-party adapter and GN Auto NIKKOR 45mm f/2.8
Aperture: f/2.8 (maximum aperture)
Shutter speed: 1/640 s
Exposure compensation: +1.0 EV
Sensitivity: ISO 400
Image quality: RAW
White balance: Auto
D-Lighting: Auto
Picture Control: Portrait
Date of capture: September 2020
Sample 1
Sample 1 was captured at the maximum aperture of f/2.8. The scene is partially backlit, and the shooting distance was 1.5 to 2 m. The sharpness of in-focus portions is in no way lacking. I chose a background suitable for identifying defocus conditions. There is no breakdown in blur characteristics, and bokeh is soft and quite pleasing for a semi-standard Tessar lens.

Nikon Z 7 with F-Z third-party adapter and GN Auto NIKKOR 45mm f/2.8
Aperture: f/2.8 (maximum aperture)
Shutter speed: 1/400 s
Exposure compensation: +1.0 EV
Sensitivity: ISO 400
Image quality: RAW
White balance: Auto
D-Lighting: Auto
Picture Control: Portrait
Date of capture: September 2020
Sample 2
Sample 2 was also shot at f/2.8 (maximum aperture), and is even more backlit than was Sample 1. At 1 m, the shooting distance was a little shorter. The sharpness of in-focus portions is in no way lacking. I again chose a background suitable for identifying defocus conditions. There is no breakdown in the very slight blurring of the hair or objects on the table, and bokeh is soft and smooth for a semi-standard Tessar lens.

Nikon Z 7 with F-Z third-party adapter and GN Auto NIKKOR 45mm f/2.8
Aperture: f/2.8 (maximum aperture)
Shutter speed: 1/400 s
Exposure compensation: +1.0 EV
Sensitivity: ISO 400
Image quality: RAW
White balance: Auto
D-Lighting: Auto
Picture Control: Portrait
Date of capture: September 2020
Sample 3
Sample 3 was also shot at f/2.8 (maximum aperture). I increased the shooting distance with this image, putting between 2 and 3 m between myself and the subject. Image quality is good with sufficient sharpness and detail, as well as a pleasing degree of contrast, from the center of the frame to the peripheries. This image seems to exhibit no weaknesses that could be attributed to the optics.

Nikon Z 7 with F-Z third-party adapter and GN Auto NIKKOR 45mm f/2.8
Aperture: f/2.8 (maximum aperture)
Shutter speed: 1/4000 s
Exposure compensation: +0.7 EV
Sensitivity: ISO 400
Image quality: RAW
White balance: Direct sunlight
D-Lighting: High
Picture Control: Vivid
Date of capture: September 2020
Sample 4
Again, Sample 4 was captured at f/2.8 (maximum aperture), but this time with intense backlighting. Lens ghost is reflected in the image. Due to the COVID-19 pandemic, I was forced to use a third-party mount adapter I had on hand for all these samples. Lens flare was an issue with which I struggled. I neglected to block the light from entering the lens, so some flare remains, reducing overall contrast. I corrected the contrast and enhanced D-Lighting so that true lens performance can be seen. The image also had a yellow cast that I corrected. I think these corrections and adjustments have resulted in an image that very closely expresses actual lens characteristics. Even under these lighting conditions, sharpness on the focal plane is maintained extremely well. At this distance, bokeh seems a little harsh. Blur characteristics were straightforward at shorter distances, but become somewhat harsh due to the effects of vignetting when the distance is increased a little.

Nikon Z 7 with F-Z third-party adapter and GN Auto NIKKOR 45mm f/2.8
Aperture: f/2.8 (maximum aperture)
Shutter speed: 1/2000 s
Exposure compensation: +0.7 EV
Sensitivity: ISO 400
Image quality: RAW
White balance: Direct sunlight
D-Lighting: High
Picture Control: Vivid
Date of capture: September 2020
Sample 5
Again, Sample 5 was captured at f/2.8 (maximum aperture), but this time with intense backlighting. This sample exhibits the same drop in overall contrast caused by lens flare generated with the use of a third-party mount adapter. I corrected the contrast and enhanced D-Lighting so that true lens performance can be seen. The image also had a yellow cast that I corrected. I think these corrections and adjustments have resulted in an image that very closely expresses actual lens characteristics. Even under these lighting conditions, sharpness on the focal plane seems to be maintained extremely well.

Nikon Z 7 with F-Z third-party adapter and GN Auto NIKKOR 45mm f/2.8
Aperture: f/2.8 (maximum aperture)
Shutter speed: 1/2500 s
No exposure compensation
Sensitivity: ISO 400
Image quality: RAW
White balance: Auto
D-Lighting: Auto
Picture Control: Portrait
Date of capture: September 2020
Sample 6
Sample 6 was also shot at f/2.8 (maximum aperture). This sample was captured so that blur characteristics could be examined. At approximately 1 m, the shooting distance was a little short. The sharpness of in-focus portions is in no way lacking. You can probably see how the blurring of critical portions increases through the defocus range. The items on the table are blurred, but still identifiable, and blurring of the curtain pattern is pleasing. While many semi-standard Tessar lenses tend to produce harsh bokeh, this lens does not.
VIII. Triplet and Tessar secrets
In this section we'll explore the secrets of triplets and Tessar structures. We will also examine their histories and the composition of triplet aberrations.
Why was the invention of the triplet such an innovation? In the late 1800s, the optimal Petzval sum could only be realized with triplets. Until then, the most common method for designing photographic objective lenses was to start with an achromatic doublet and then add a third and even fourth lens element to the compound lens. However, achieving achromaticity with the glass available at the time meant increasing the Petzval sum. The Petzval sum can be reduced for compound lenses for which achromaticity is not fully achieved, but chromatic aberration cannot be corrected. The Petzval sum can be calculated using the relatively simple formula P = Σ(1/(ni·fi)) where ni represents the refractive index of the individual lens elements that make up the lens, fi represents the focal length of each element, the total sum P for the 1/(ni·fi) value for each element is the Petzval sum. Concave lenses have a negative focal length. Therefore, if the focal length (fi) of the concave lens is short (high power), the negative power will increase. Therein lies the secret to making the Petzval sum smaller. However, the objective lens is convex overall. When the lens elements are simply combined, convex elements play a predominant role. In other words, the power of convex elements is stronger than that of concave elements. The Petzval sum cannot be decreased simply by using glass with the same refractive index (ni). Therefore, designers concentrated on the use of glass with different refractive indices (ni). Glass with a higher refractive index was used for convex elements, and one with a lower refractive index for concave elements. This reduces the Petzval sum. The problem is the elimination of color (achieving achromaticity). Until Schott developed its barium crown (BAK) glass, the refractive index was lower for convex elements than it was for concave elements in all achromatic glass combinations. It was impossible to achieve refractive indices that were higher for the convex elements than for the concave elements. Even József Petzval who developed the formula for the Petzval sum struggled with this issue while designing his narrow-angle, fast portrait lens for which the optimal Petzval sum was never achieved. Sadly, the designer who struggled most with the Petzval sum was the original developer of the formula. How ironic.
Now let's get back to triplets. How do triplets achieve the optimal Petzval sums? Through knowledge and experience. If the spacing between each lens element is increased, the power of each element must also be increased to maintain the combined power. That is, the power of the concave element can be increased by increasing the gap between the convex and concave elements. This discovery was a major breakthrough. It allows for a shorter focal length (fi) for the concave element at 1/(ni·fi). At a time when only conventional glasses were available, this method made it possible for designers at Cooke to maintain low Petzval sums. What's more, they designed a wide-angle, fast photographic objective lens constructed with just three lens elements. This was one of the best inventions ever in the world of optics.
It is ironic that though German companies led the optics industry at the time, optical theory was revolutionized by a small English optics company. Their achievement was a decisive victory. Zeiss's signature Protar lenses, which prevailed only in terms of their compound lenses and symmetrical structures, were inferior before aberration design even began. Zeiss recovered quickly with an immediate rewind. They put up a fierce counterattack in the name of the optics powerhouse that is Germany. The resulting lens was the famous Tessar. Zeiss described the lens as follows. The new Tessar lens (developed in 1902) combines the Unar structure developed in 1893 with its concave and convex lens elements in front of the aperture, and Zeiss' signature Protar structure developed in 1890 with its concave-convex doublet behind the aperture. However, this apparently seems to have been Zeiss's way of covering for themselves. With the Tessar lens it is natural to think of the lens element on the image side of the triplet as joined. Yes. Zeiss had imitated Cooke's innovation, but the Tessar wasn't just an imitation. Perhaps they should have called the Tessar a model. The point here is the doublet. What sort of aberration do you think this doublet corrects? Normally one would think that it eliminates colors or corrects spherical aberration. If so, the Tessar lens would offer basically the same level of performance and specifications as a triplet. In fact, the doublet served to further reduce the Petzval sum. Cooke's innovation was huge, but the Petzval sum could be improved further. To achieve a wider angle and increase performance, astigmatism and curvature of field must be easily corrected. To maintain a degree of freedom in improving the Petzval sum, astigmatism, and curvature of field, a doublet with which the refractive index of the convex lens element was greater than that of the concave lens element was used. This was an incredible leap forward for triplets. In addition, the symmetrical structure can be maintained because there is a separate convex lens element and concave lens element in front of the aperture, and a concave-convex doublet behind the aperture. The result of this improvement was completion of another outstanding photographic objective lens. And there we have the history and secrets behind triplets and the Tessar structure.
So what do you think? This tale did get a little technical. I'll bet that some readers of NIKKOR The Thousand and One Nights look forward to in-depth examinations of optics. I attempted to satisfy some of those expectations with this Tale 81. I have been writing NIKKOR The Thousand and One Nights tales for well over twenty years, and I am still working hard to find products and topics that appeal to readers. Please do not hesitate to contact us if there is a particular product or topic you would like to read about in one of our tales. Your interest in NIKKOR The Thousand and One Nights is much appreciated.
NIKKOR - The Thousand and One Nights
The history of Nikon cameras is also that of NIKKOR lenses. This serial story features fascinating tales of lens design and manufacture.

